Tracks
Use the Tracks tab to view ungrouped tracks. Track is a time interval and data collected during it.
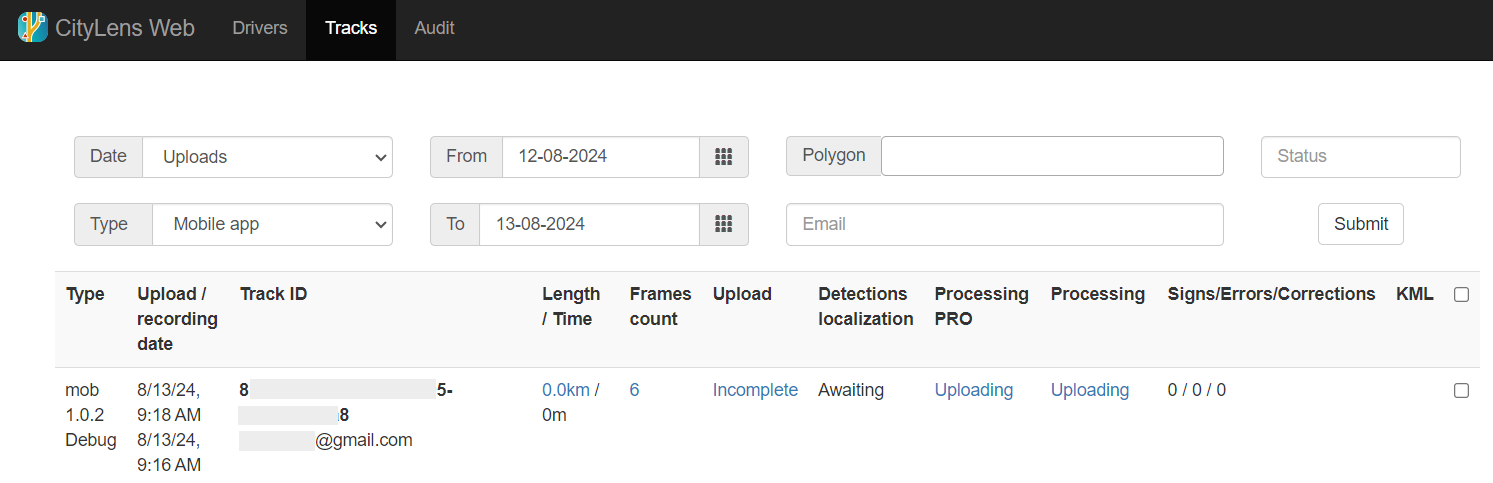
Filters
Configure filters to view the data in a convenient way:
-
Date: type of date to filter results by:
- Uploads: when a video was uploaded to CityLens Web
- Recordings: when a video was recorded by a driver
-
Type: video source:
- Mobile app: CityLens mobile application
- Dashcam: car dashboard camera for recording videos
- All: both source types
-
From and To: limit the results by a time frame (selected dates are included).
-
Polygon: territory.
-
Email: driver email.
To apply filters, click Submit.
Data
Data appears in the CityLens Web only after a driver uploads recorded tracks.
The following parameters are presented in a data table:
-
Type: video source type. Possible values: mobile application (with an application version) and car dashboard camera.
-
Upload/recording date: contains two lines:
- date and timestamp (UTC) of when the video was uploaded
- date and timestamp (UTC) of when the video was recorded
-
Track ID: contains two lines:
- unique track ID
- email of the author (driver)
-
Length/Time: information about the track, contains two lines:
- Length of the track in kilometers. Click this value to view the route on the map.
- Duration of the track in minutes.
-
Frames count: number of frames extracted from the track.
-
Upload: status of uploading the video from the mobile device. Click the status to view details.
-
Detections localization: status of detecting objects in the track.
-
Processing PRO: status of sending the track to 2GIS Pro.
-
Processing: status of the track. Click to see information about all frames in the track.
-
Signs/Errors/Corrections: contains three values separated by
/:- number of detected objects
- number of found errors
- number of suggested corrections
-
KML: link to download a
.kmlfile with the track information.
Operations with data
Downloading data
- If needed, apply filters or use checkboxes to select individual entries.
- Scroll down to the bottom of the page and click CSV.
Removing data from 2GIS Pro
By default, all presented data is automatically uploaded to 2GIS Pro. To hide selected entries from 2GIS Pro:
- If needed, apply filters or use checkboxes to select individual entries.
- Scroll down to the bottom of the page and click Hide from PRO.
Reuploading data to 2GIS Pro
If the data was removed from 2GIS Pro or was incorrectly processed, you can reupload it:
- If needed, apply filters or use checkboxes to select individual entries.
- Scroll down to the bottom of the page and click Send to PRO.