Templates
The documentation provides a description of the interface in Russian.
Templates are prepared sets of attributes for creating agents and tasks. Templates allow you to:
- create typical agents (for example, couriers) and typical tasks (for example, delivery tasks)
- filter agents and tasks by type when creating route plans
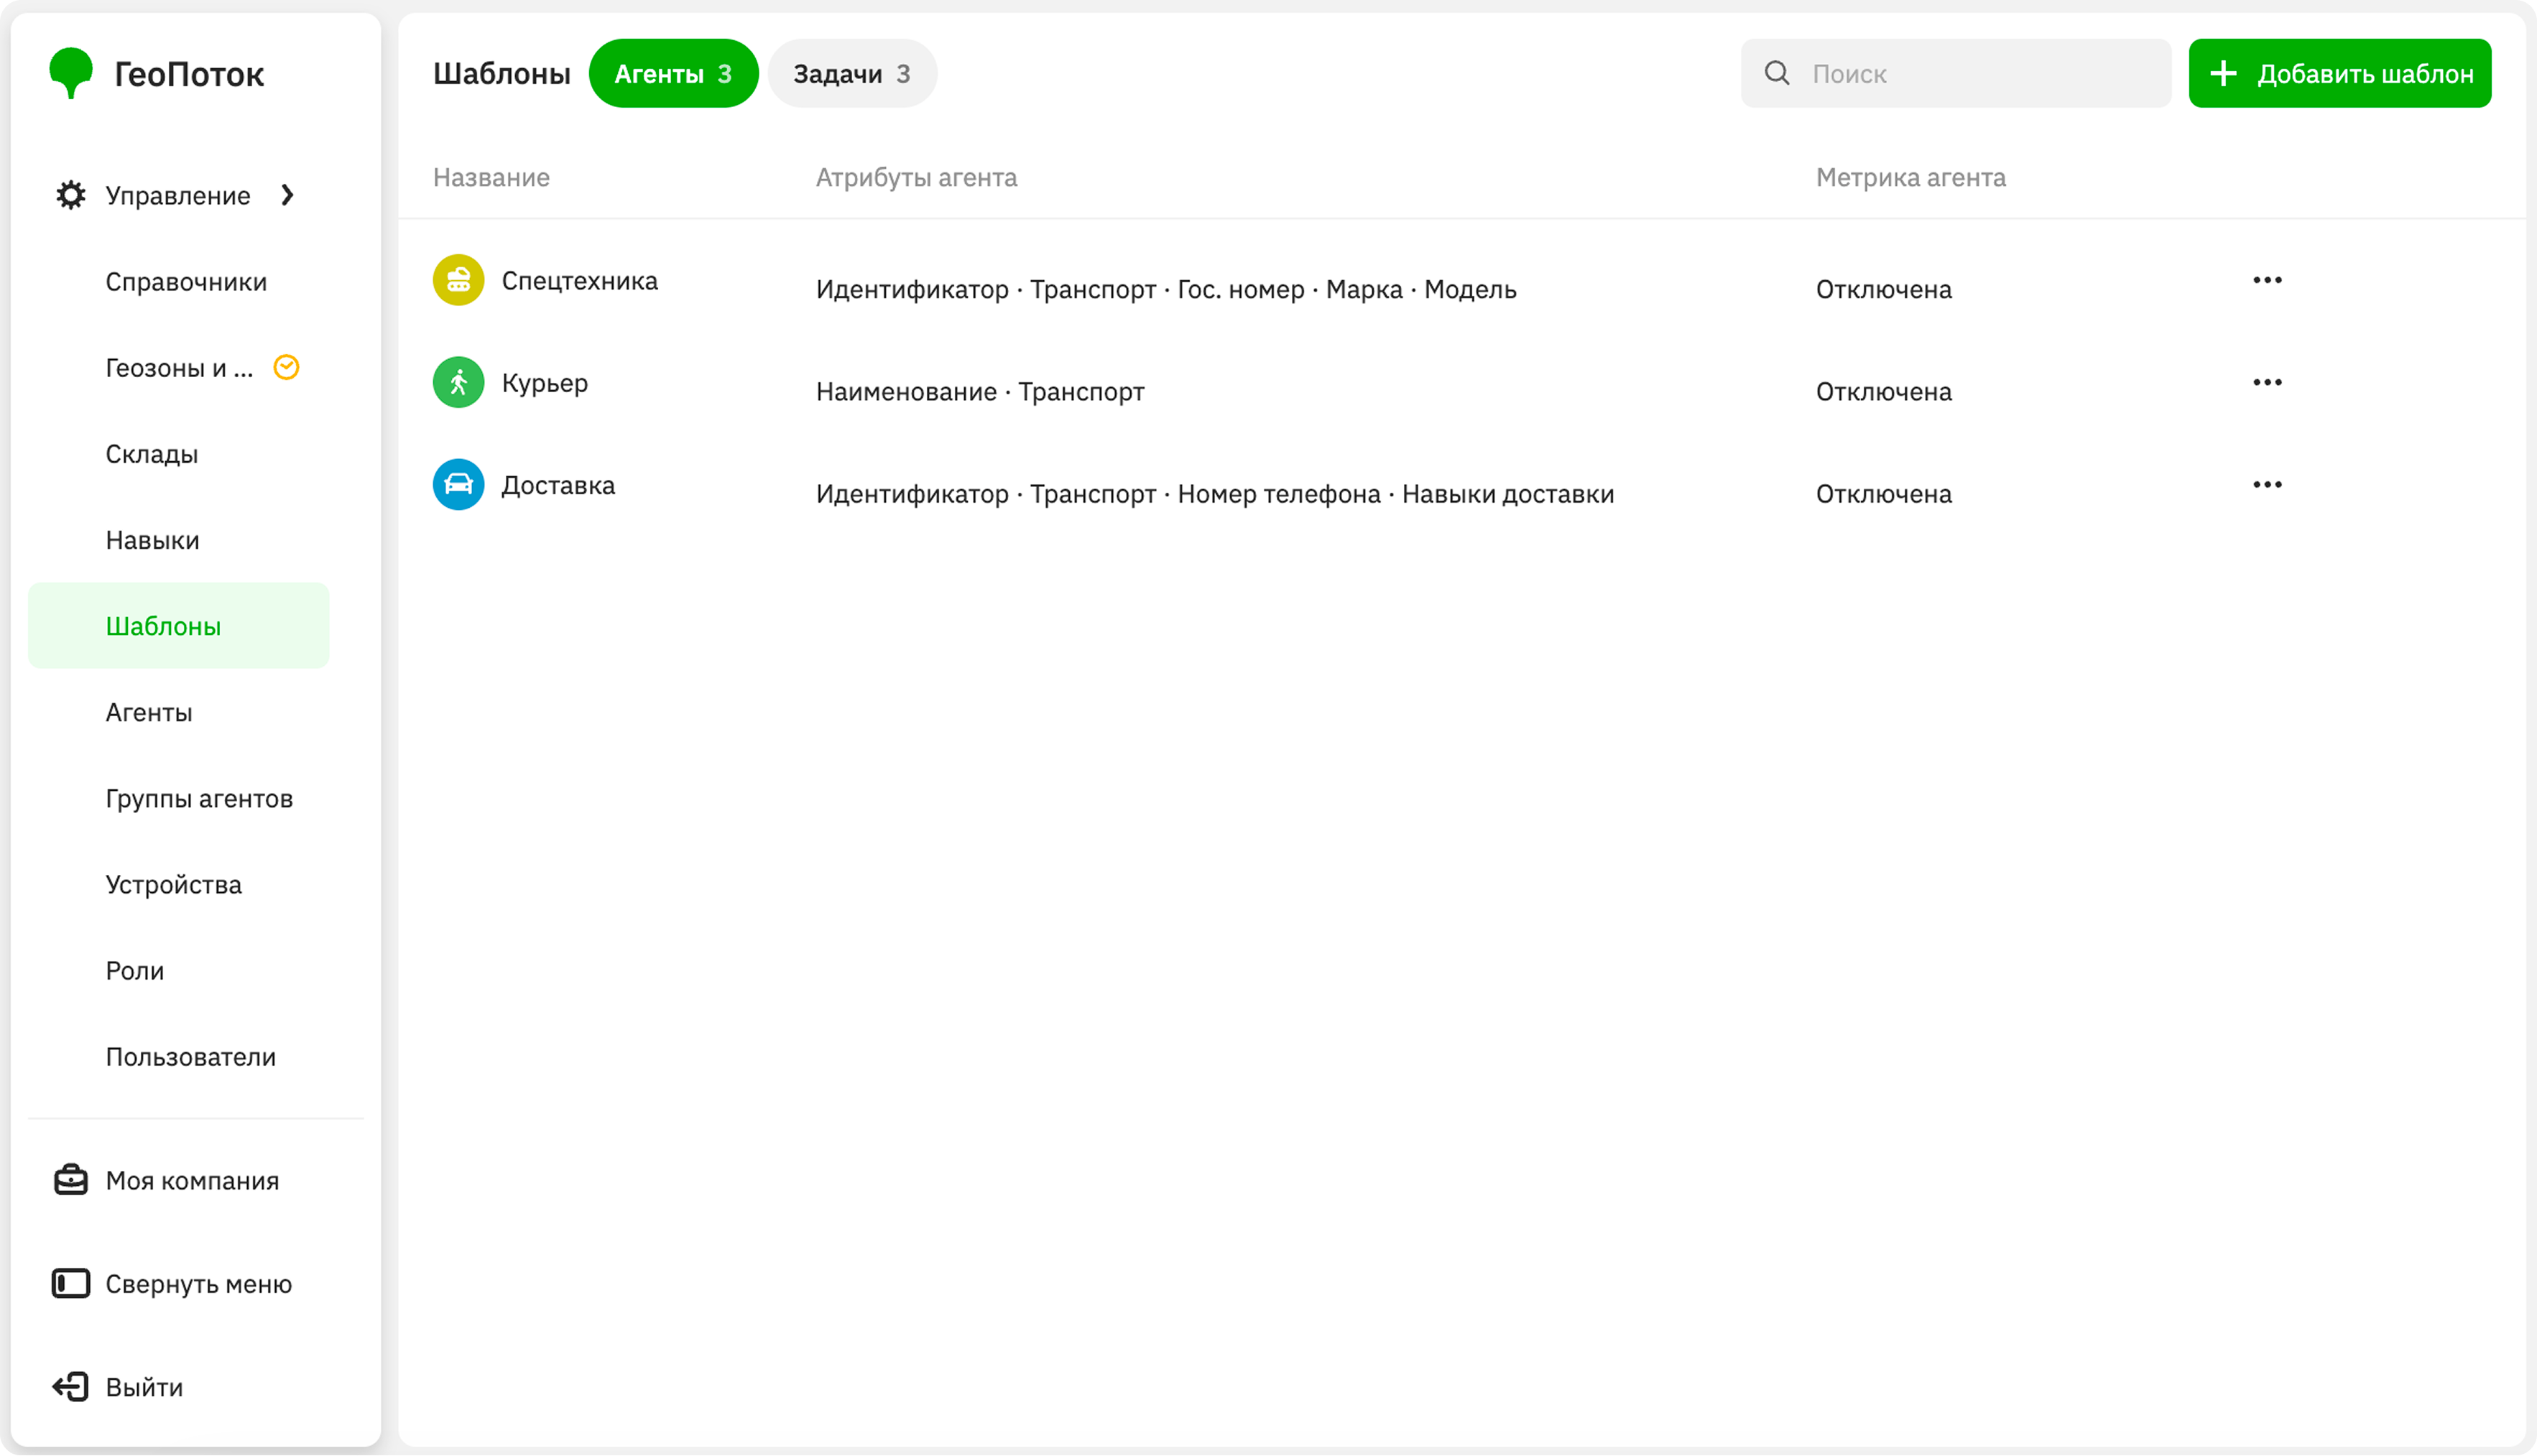
With the Main administrator and Company administrator roles, you can work with templates on the Management → Templates tab:
With the Dispatcher role, you can view the list of templates and their information.
Creating an agent template
-
Go to the Management → Templates tab.
-
Click Add template.
-
Select Agent from the dropdown list.
-
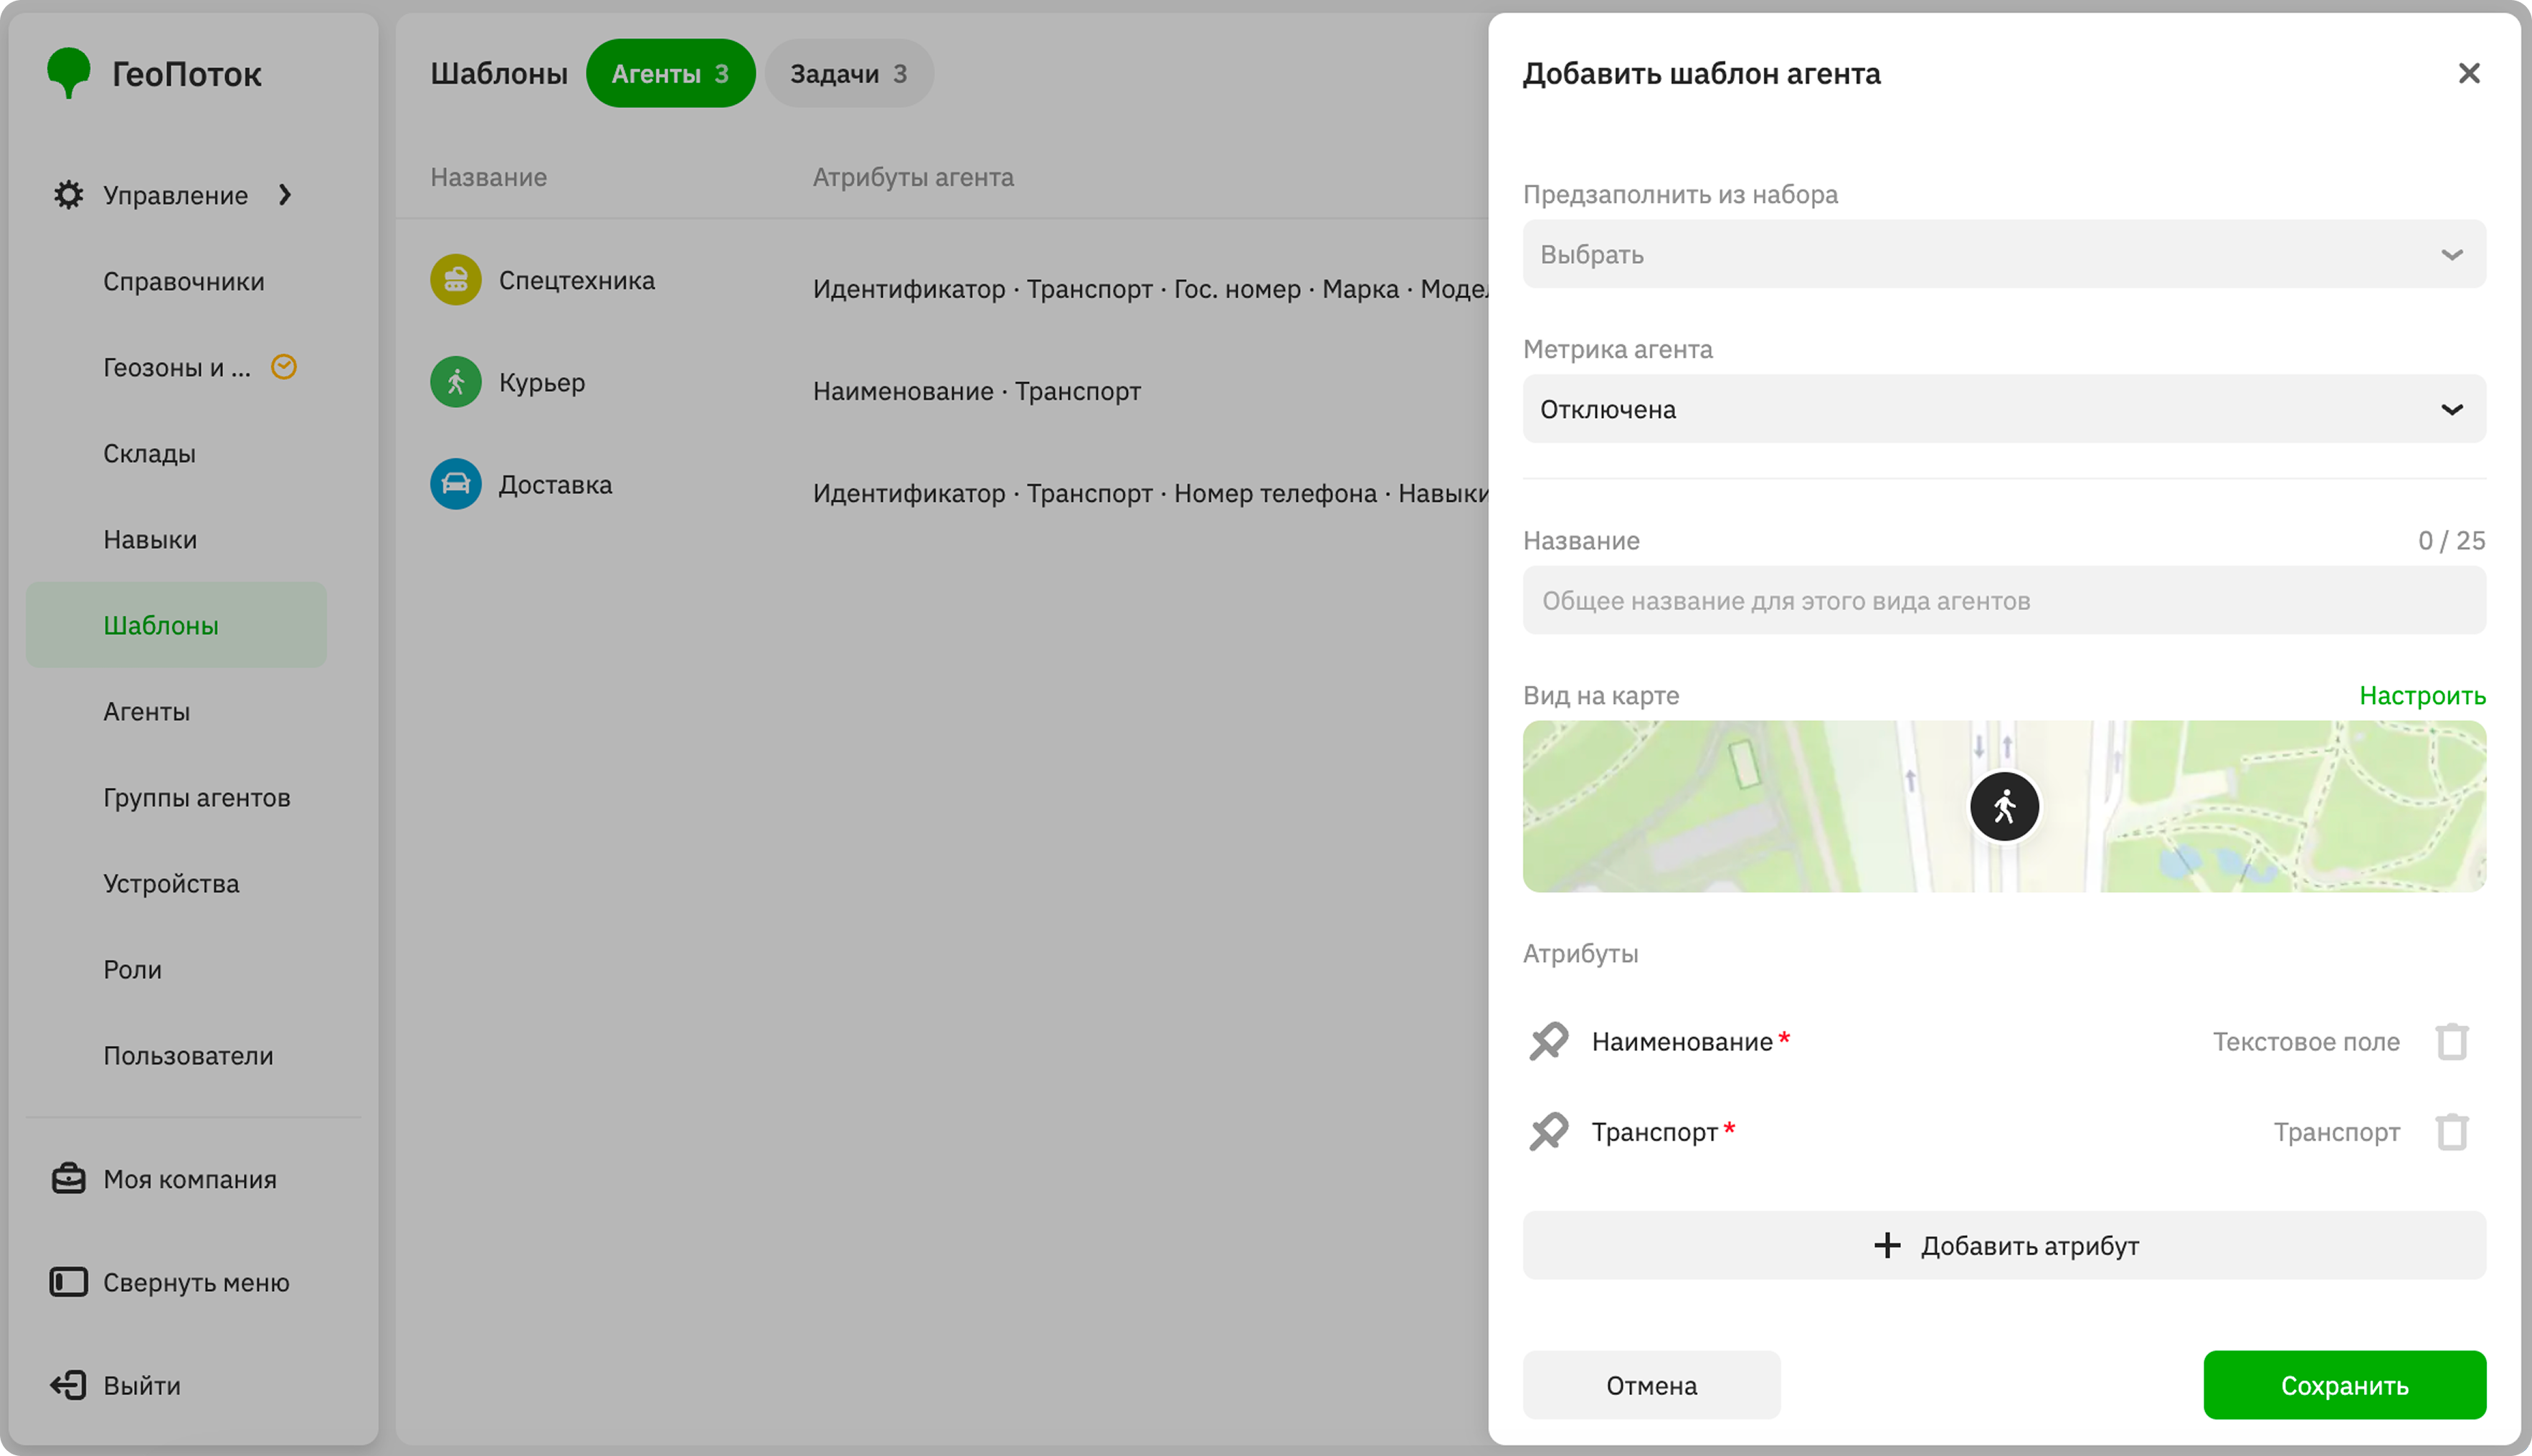
To create a custom agent template, leave the Pre-fill from set field empty. To use a pre-filled template, select one of the ready-made agent types in this field:
- Operator: an employee who performs tasks.
- Courier: an employee who delivers documents or packages.
- Special vehicle: vehicles or machines that perform work. For example, a courier vehicle, fuel truck, excavator, etc.
The parameters below will be filled in automatically for the selected type. You can edit them if necessary.
-
In the Agent metric field, select Disabled. To calculate agent performance, use the 2GIS GeoFlow: Monitoring solution along with 2GIS GeoFlow: Logistics. In the common web panel, administrators will be able to monitor agent performance.
-
In the Name field, enter a general name for the agent type.
-
(Optional) In the Map appearance block, specify the display of the agent icon on the map. Click the map preview and specify the parameters:
- Icon: agent icon.
- Color: icon color.
Click Save.
-
In the Attributes block, specify the list of fields for creating agents of this type. Some attributes are required and are added to the template by default. For all attributes, you can select the Required field checkbox to make them required for creating an agent.
To add an additional attribute, click Add attribute. To delete an attribute, click
 icon next to it. To change the order of attributes, hold
 icon next to the attribute and drag it.
Data type Required attribute Description Text fieldOne attribute is required to specify the agent’s unique identifier (for example, employee ID or full name). Single-line text. TransportYes. Transportation type of an agent: bicycle, car, scooter, on foot, truck. Multi-line textNo. Multi-line text. Numeric fieldNo. Numeric value. CheckboxNo. Boolean value. PhoneNo. Phone number. EmailNo. Email address. DirectoryNo. Used to select directory objects when creating an agent. Attribute values: - Directory.
- Allow multiple selection: to allow selecting multiple values from the directory when creating an agent, select the checkbox.
SkillsNo. Used to select skills when creating an agent. CapacityNo. Shipment that the agent can carry. Attribute values: - Number of places: number of shipment spaces.
- Weight in kg: maximum weight of the shipment in kilograms.
- Volume in m³: maximum volume of the shipment in cubic meters.
- Dimensions in m: maximum dimensions of the shipment in meters.
The agent's load percentage within route plans is calculated based on the values of these parameters if values for parameters with the Shipment type are specified for tasks. The total agent load for all tasks in the route plan is divided by the parameter value:- If one parameter is specified, the load is calculated based on it. For example, the value of the Weight in kg parameter for an agent is 100 kg, and the total agent load for all tasks in the route plan is 30 kg. The load value is 30%.
- If two or more parameters are specified, the load is calculated based on each of them, and the maximum value is taken. For example, the following values are specified for an agent: Number of places is 20, Weight in kg is 100 kg. The total agent load for all tasks in the route plan is 3 seats and 98 kg. The load value is 98%.
- If none of the parameters are specified, the load is not calculated.
Start pointNo. Location where the agent starts performing tasks. -
Click Save.
Creating a task template
-
Go to the Management → Templates tab.
-
Click Add template.
-
Select Task from the dropdown list.
-
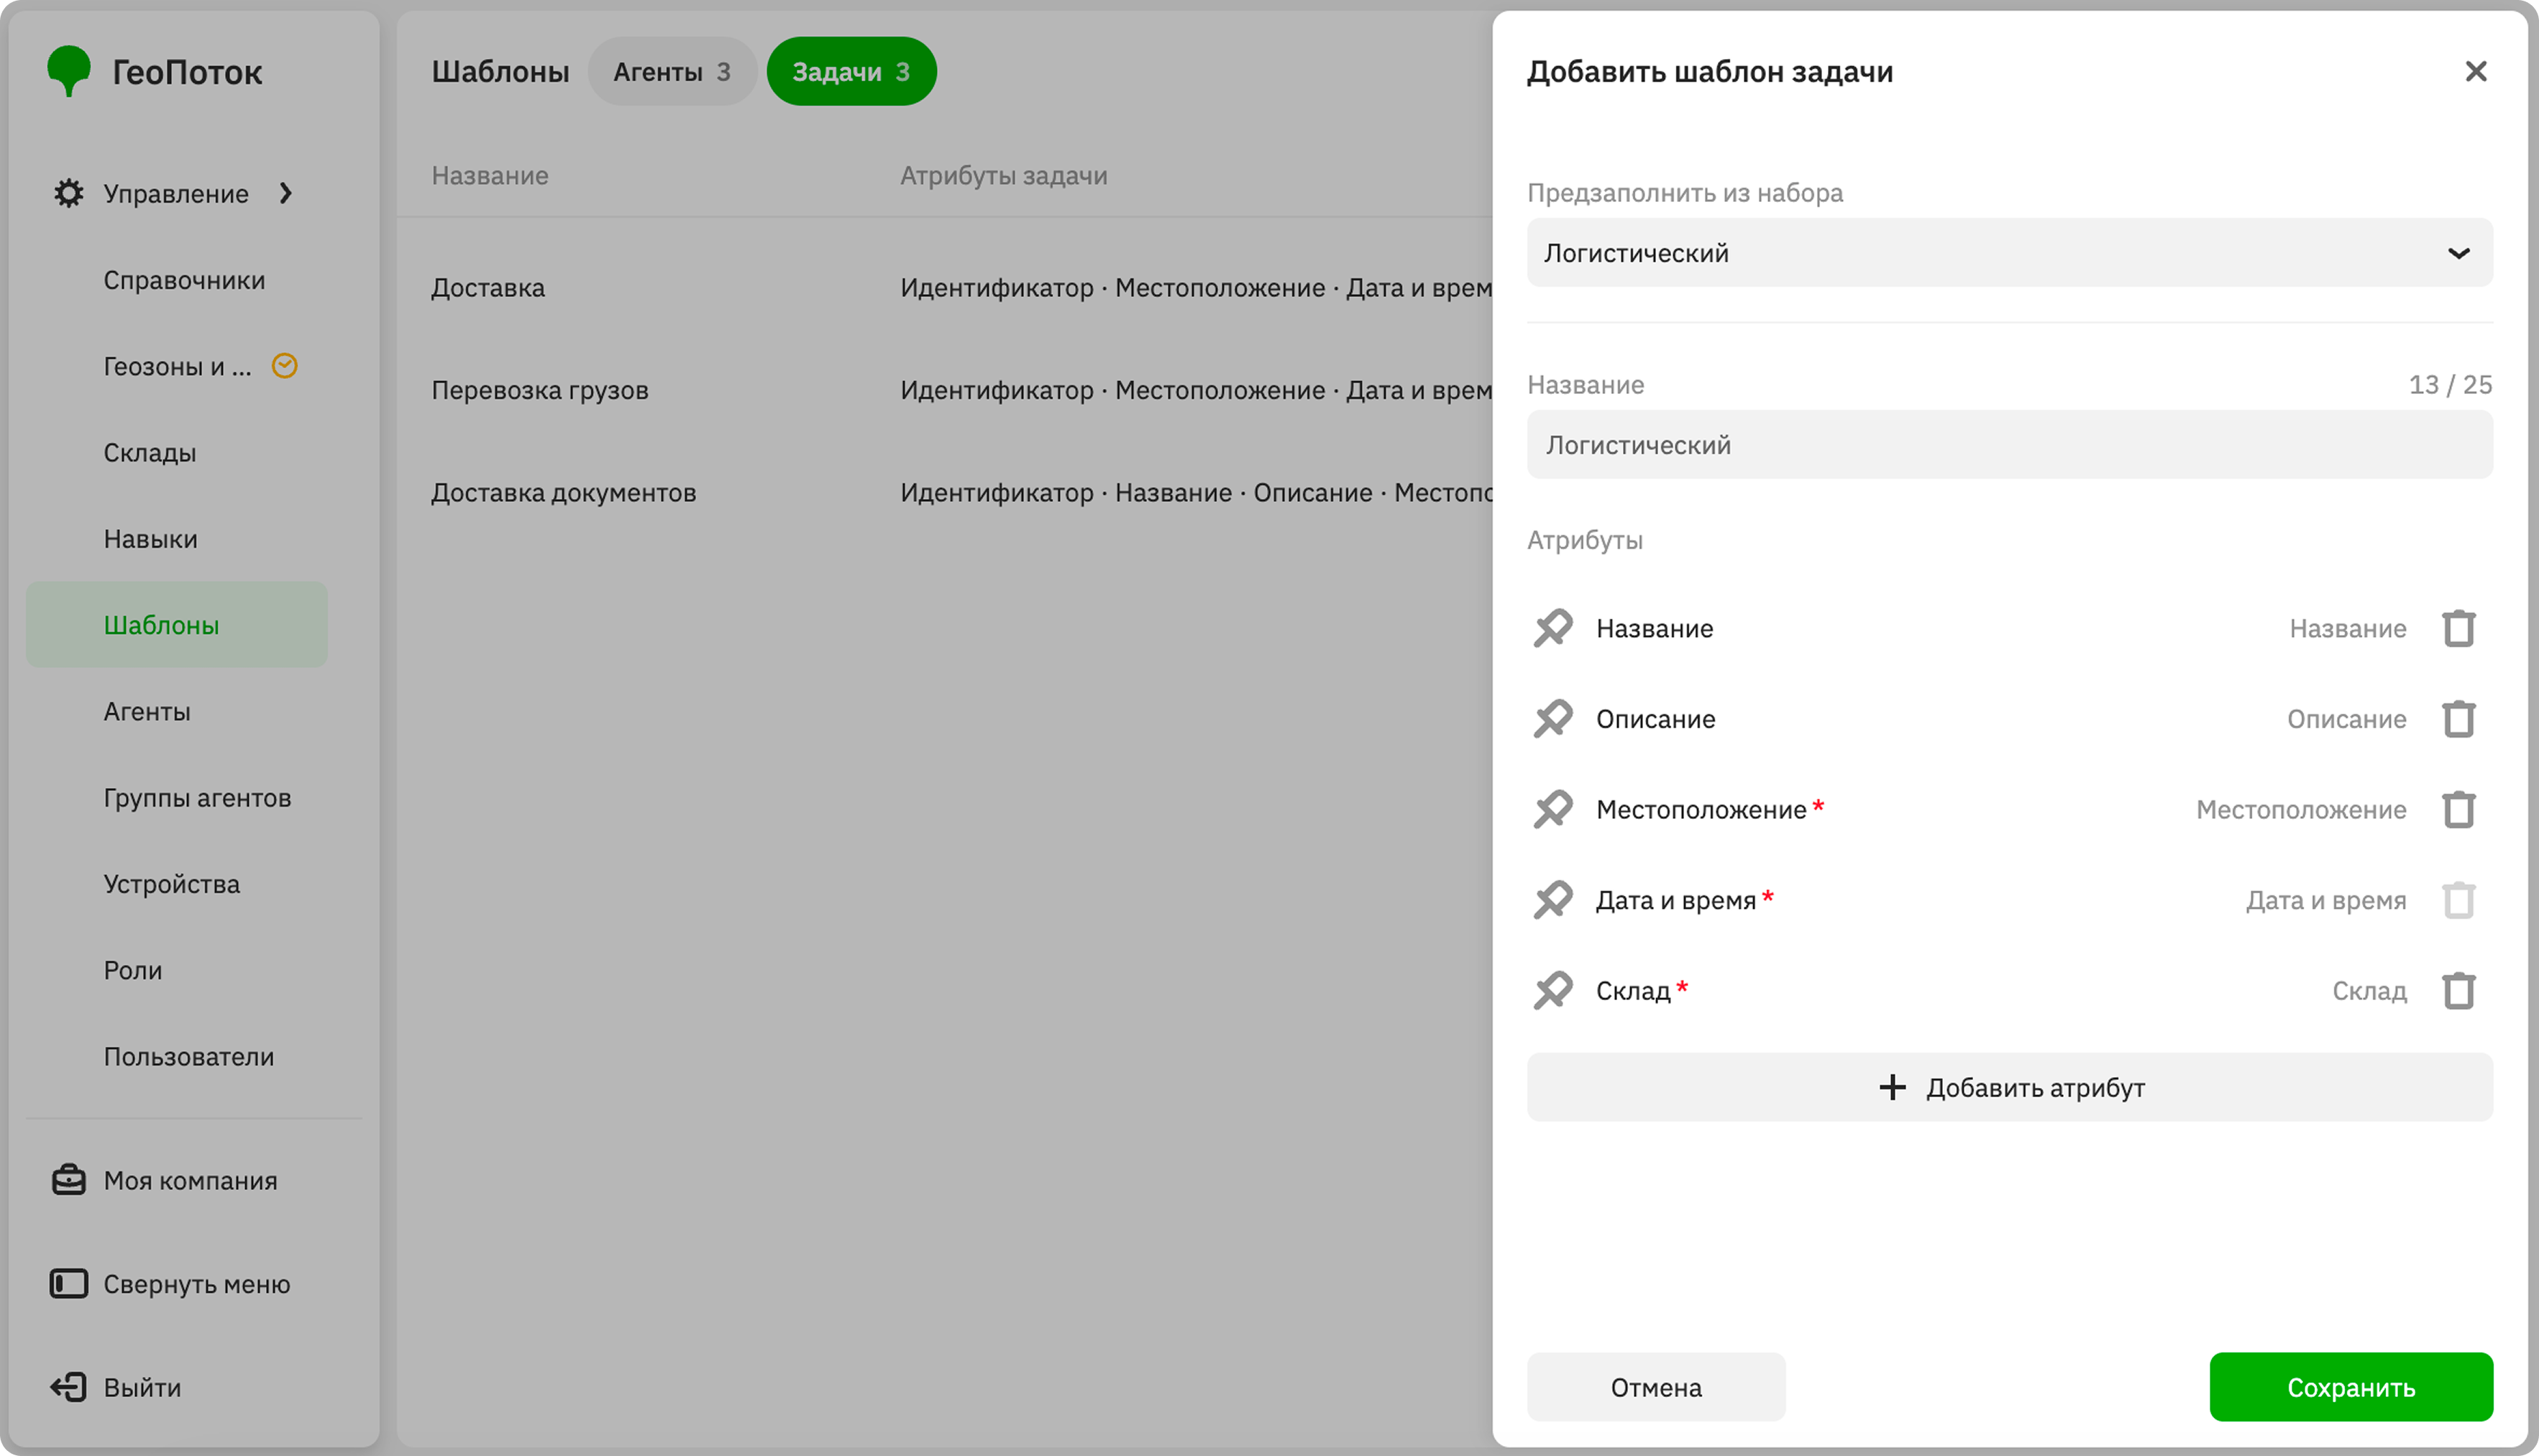
To create a custom task template, leave the Pre-fill from set field empty. To use a pre-filled template, select the Logistics ready-made task type in this field.
The parameters below will be filled in automatically for the selected type. You can edit them if necessary.
-
In the Name field, enter a general name for the task type.
-
In the Attributes block, specify the list of fields for creating tasks of this type. Some attributes are required and are added to the template by default. For all attributes, you can select the Required field checkbox to make them required for creating a task.
To add an additional attribute, click Add attribute. To delete an attribute, click
icon next to it. To change the order of attributes, hold icon next to the attribute and drag it.Data type Required attribute Description Date and timeYes. Date and time of task execution. To limit the time for completing a task, enable Time to complete the task in minutes. LocationYes. Destination (location): coordinates or address. DepotYes. Depot from which the agent must pick up the shipment. Attribute values: - Depot: indicates that the point is a depot.
- Shipment readiness time: time required to prepare the shipment at the depot.
- Loading time in minutes: time required to load the shipment at the depot, in minutes.
Text fieldNo. Single-line text. Multi-line textNo. Multi-line text. PhoneNo. Phone number. Numeric fieldNo. Numeric value. EmailNo. Email address. CheckboxNo. Boolean value. DirectoryNo. Used to select directory objects when creating a task. Attribute values: - Directory.
- Allow multiple selection: to allow selecting multiple values from the directory when creating a task, select the checkbox.
NameNo. Name or title of the task. DescriptionNo. Text description of the task. ShipmentNo. Shipment to be carried. Attribute values: - Number of places: number of shipment spaces.
- Weight in kg: weight of the shipment in kilograms.
- Volume in m³: volume of the shipment in cubic meters.
- Dimensions in m: dimensions of the shipment in meters.
The agent's load percentage within route plans is calculated based on the values of these parameters if values for parameters with the Capacity type are specified for agents. For more information on calculating load, see the Creating an agent template section.SkillsNo. Used to select skills when creating a task. ContactsNo. Attribute values: - Name: contact person's name.
- Phone: contact person's phone number.
- Email: contact person's email address.
Completion reportNo. Used for an agent to send a report in the mobile application. The files will be available for viewing in the administrator web panel. Attribute values: - Attachments: fields that the agent must fill in when completing a task in the mobile application:
- Camera photos only: upload of a photo taken with the device camera.
- Files: upload of a photo from the camera, selection of a photo from the gallery, or attachment of files in PDF, DOC, DOCX, XLS, and XLSX formats.
- Required to close: select the checkbox so that the agent cannot complete the task without sending a report.
FilesNo. Used to attach files (photos and documents) in JPG, JPEG, PNG, PDF, DOC, DOCX, XLS, and XLSX formats to a task. You can attach up to 10 files of up to 10 MB each. The files will be available for viewing in the administrator web panel and in the mobile application. -
Click Save.
Editing a template
Editing a template (for example, its attributes) changes the settings of all agents or tasks created from this template.
You can:
- rename the template
- change the list of attributes, their names, type, and whether they are required
- additionally for agent templates: change the agent icon appearance on the map
To edit a template:
- Go to the Management → Templates tab.
- In the template row, click
 icon and select Edit.
- Apply changes to the template.
- Click Save.
Duplicating a template
- Go to the Management → Templates tab.
- In the template row, click icon and select Duplicate.
- (Optional) Apply changes to the template.
- Click Save.