Route plans
The documentation provides a description of the interface in Russian.
Route plan is an optimal sequence of points that agents must visit to complete tasks. The agents can view the list of their tasks for the current route plan in the mobile application.
For each plan, the total length of roads, estimated execution time, and required number of agents are calculated.
With the Main administrator, Company administrator, and Dispatcher roles, you can work with route plans on the Routes tab:
Route calculation algorithm
The goal of the calculation is to distribute the maximum number of tasks among agents while minimizing the number of agents involved, the total plan execution time, and the total distance.
The algorithm iteratively builds routes and selects the best option based on the specified criteria. The order of route option selection:
- The route with the largest number of distributed tasks is selected.
- If the number of distributed tasks is the same, the route with the fewest agents is selected.
- If the number of agents is the same, the option with the shortest total time is selected.
- If the total time is the same, the option with the shortest total distance is selected.
The calculation takes into account the location of points and the following constraints:
- agent capacity
- shipment data in tasks
- time constraints: time windows of depots and points, service times, agent working hours, travel time between points
- task and agent skills (a task with a skill is assigned only to an agent with the same skill)
- type of transport used in tasks and by agents
- traffic situation (data on current and statistical traffic jams) depending on the selected route optimization parameter
The algorithm does not divide tasks by districts and does not distribute the agent capacity evenly: it selects the optimal option with the lowest overall cost and taking into account all constraints.
In some cases, the algorithm may distribute not all tasks along the route if this is impossible given the constraints. Such tasks will be displayed in the Not assigned panel. Some agents may be excluded if using fewer agents would be more optimal.
Creating a plan
To create a plan, at least one depot, two tasks, and one agent are required. You can create depots, tasks, and agents during the process of creating a plan or before it.
You cannot add tasks and agents to a plan that are already used in other route plans on the same date (except plans with the Draft status) and shifts (if you use the 2GIS GeoFlow: Monitoring solution).
To create a plan:
-
Go to the Routes tab.
-
Click Add route.
-
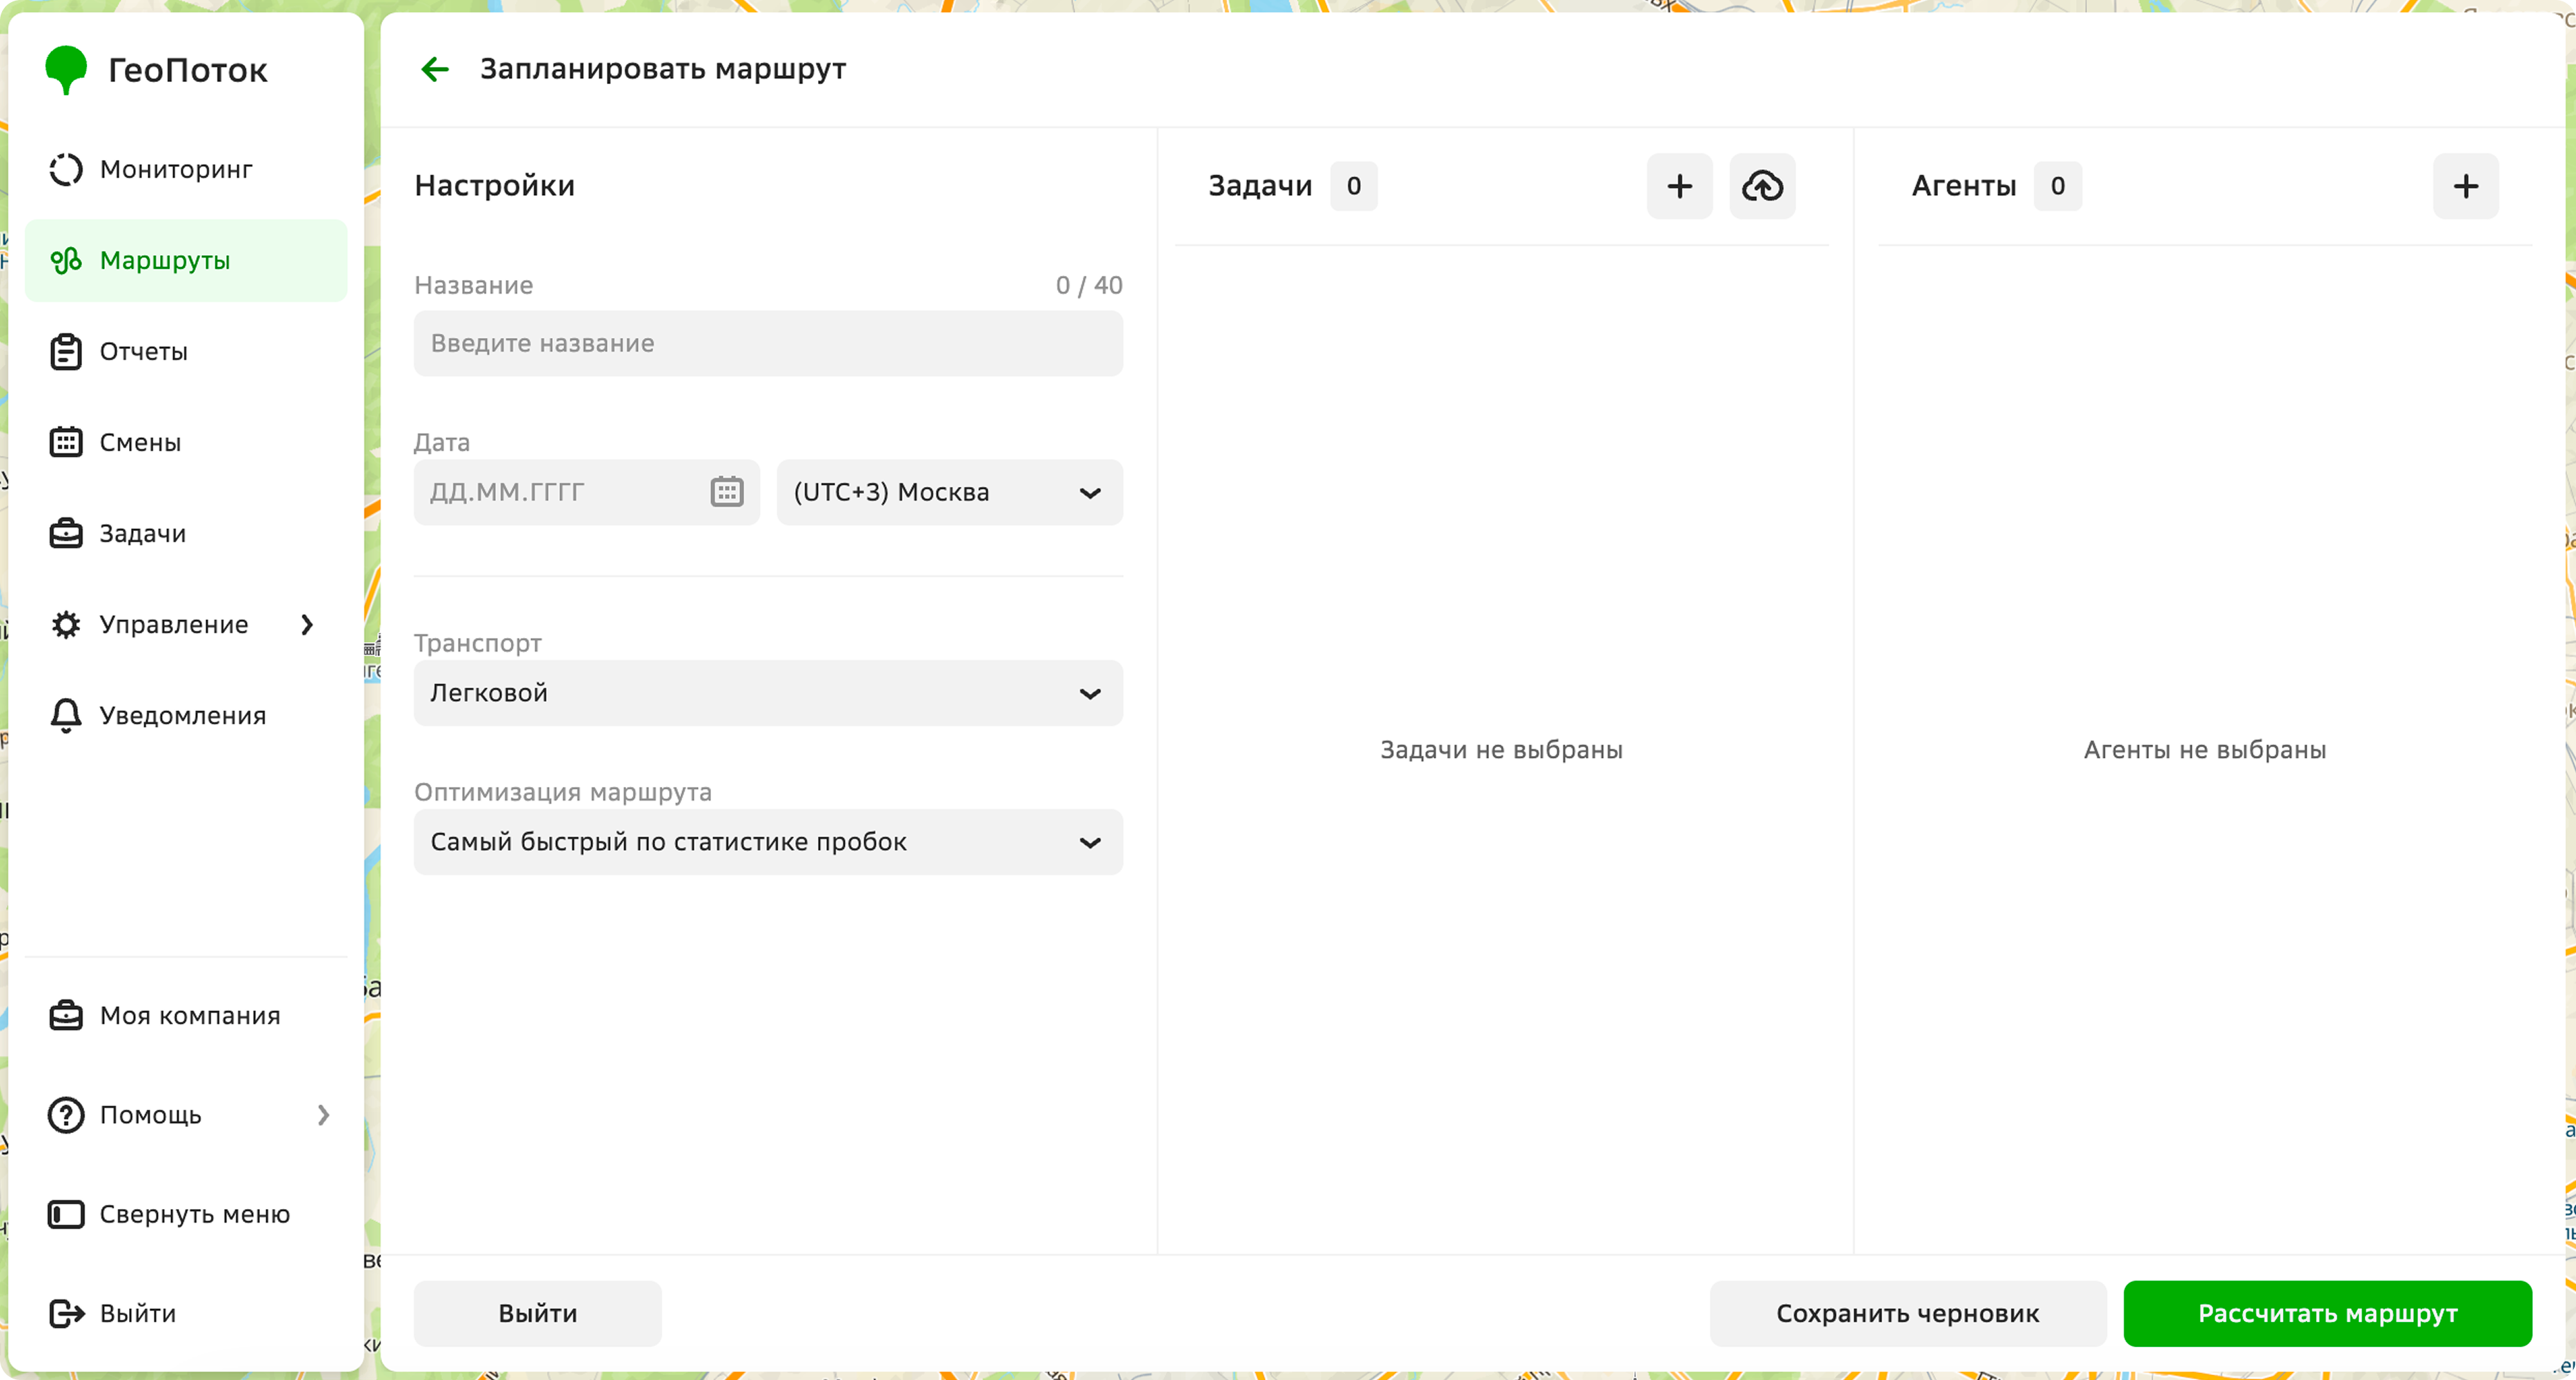
Specify the mandatory plan parameters:
-
Name: plan name.
-
Date: date of plan execution. You can select a date no earlier than the current date and no later than 365 days from now. Must match the date specified in the tasks.
-
Time zone: time zone in which the time of the plan execution is specified. Must match the time zone specified in the tasks.
-
Transport: type of transport used in the plan tasks:
Car,Bicycle,On foot,Scooter,Truck. Must match the transport type specified in the Transport field for the agents (the field may have a different name depending on the agent template). -
Route optimization: parameter for optimizing the route to pass the points:
Shortest in time according to traffic data: shortest in time using statistical traffic data.Shortest in time according to current traffic: shortest in time considering the current traffic data.Shortest in distance: shortest in distance without considering traffic data.
For more information about the calculation algorithm, see the Route calculation algorithm section.
-
-
Add tasks to the plan using one of the following methods. You can add from 2 to 350 tasks to the plan.
- Create tasks
- Select created tasks
- Import tasks
To create tasks in the route plan creation form:
-
In the Tasks panel, click
 icon.
icon. -
Select or create a task template. To create a template, click Add task template: for details, see the Creating a task template section.
If the template is not suitable for creating a plan (missing required attributes), click Edit task template. Add the attributes and click Save. For more information on attributes, see the Creating a task template section.
-
In the top-right corner, click + Task.
-
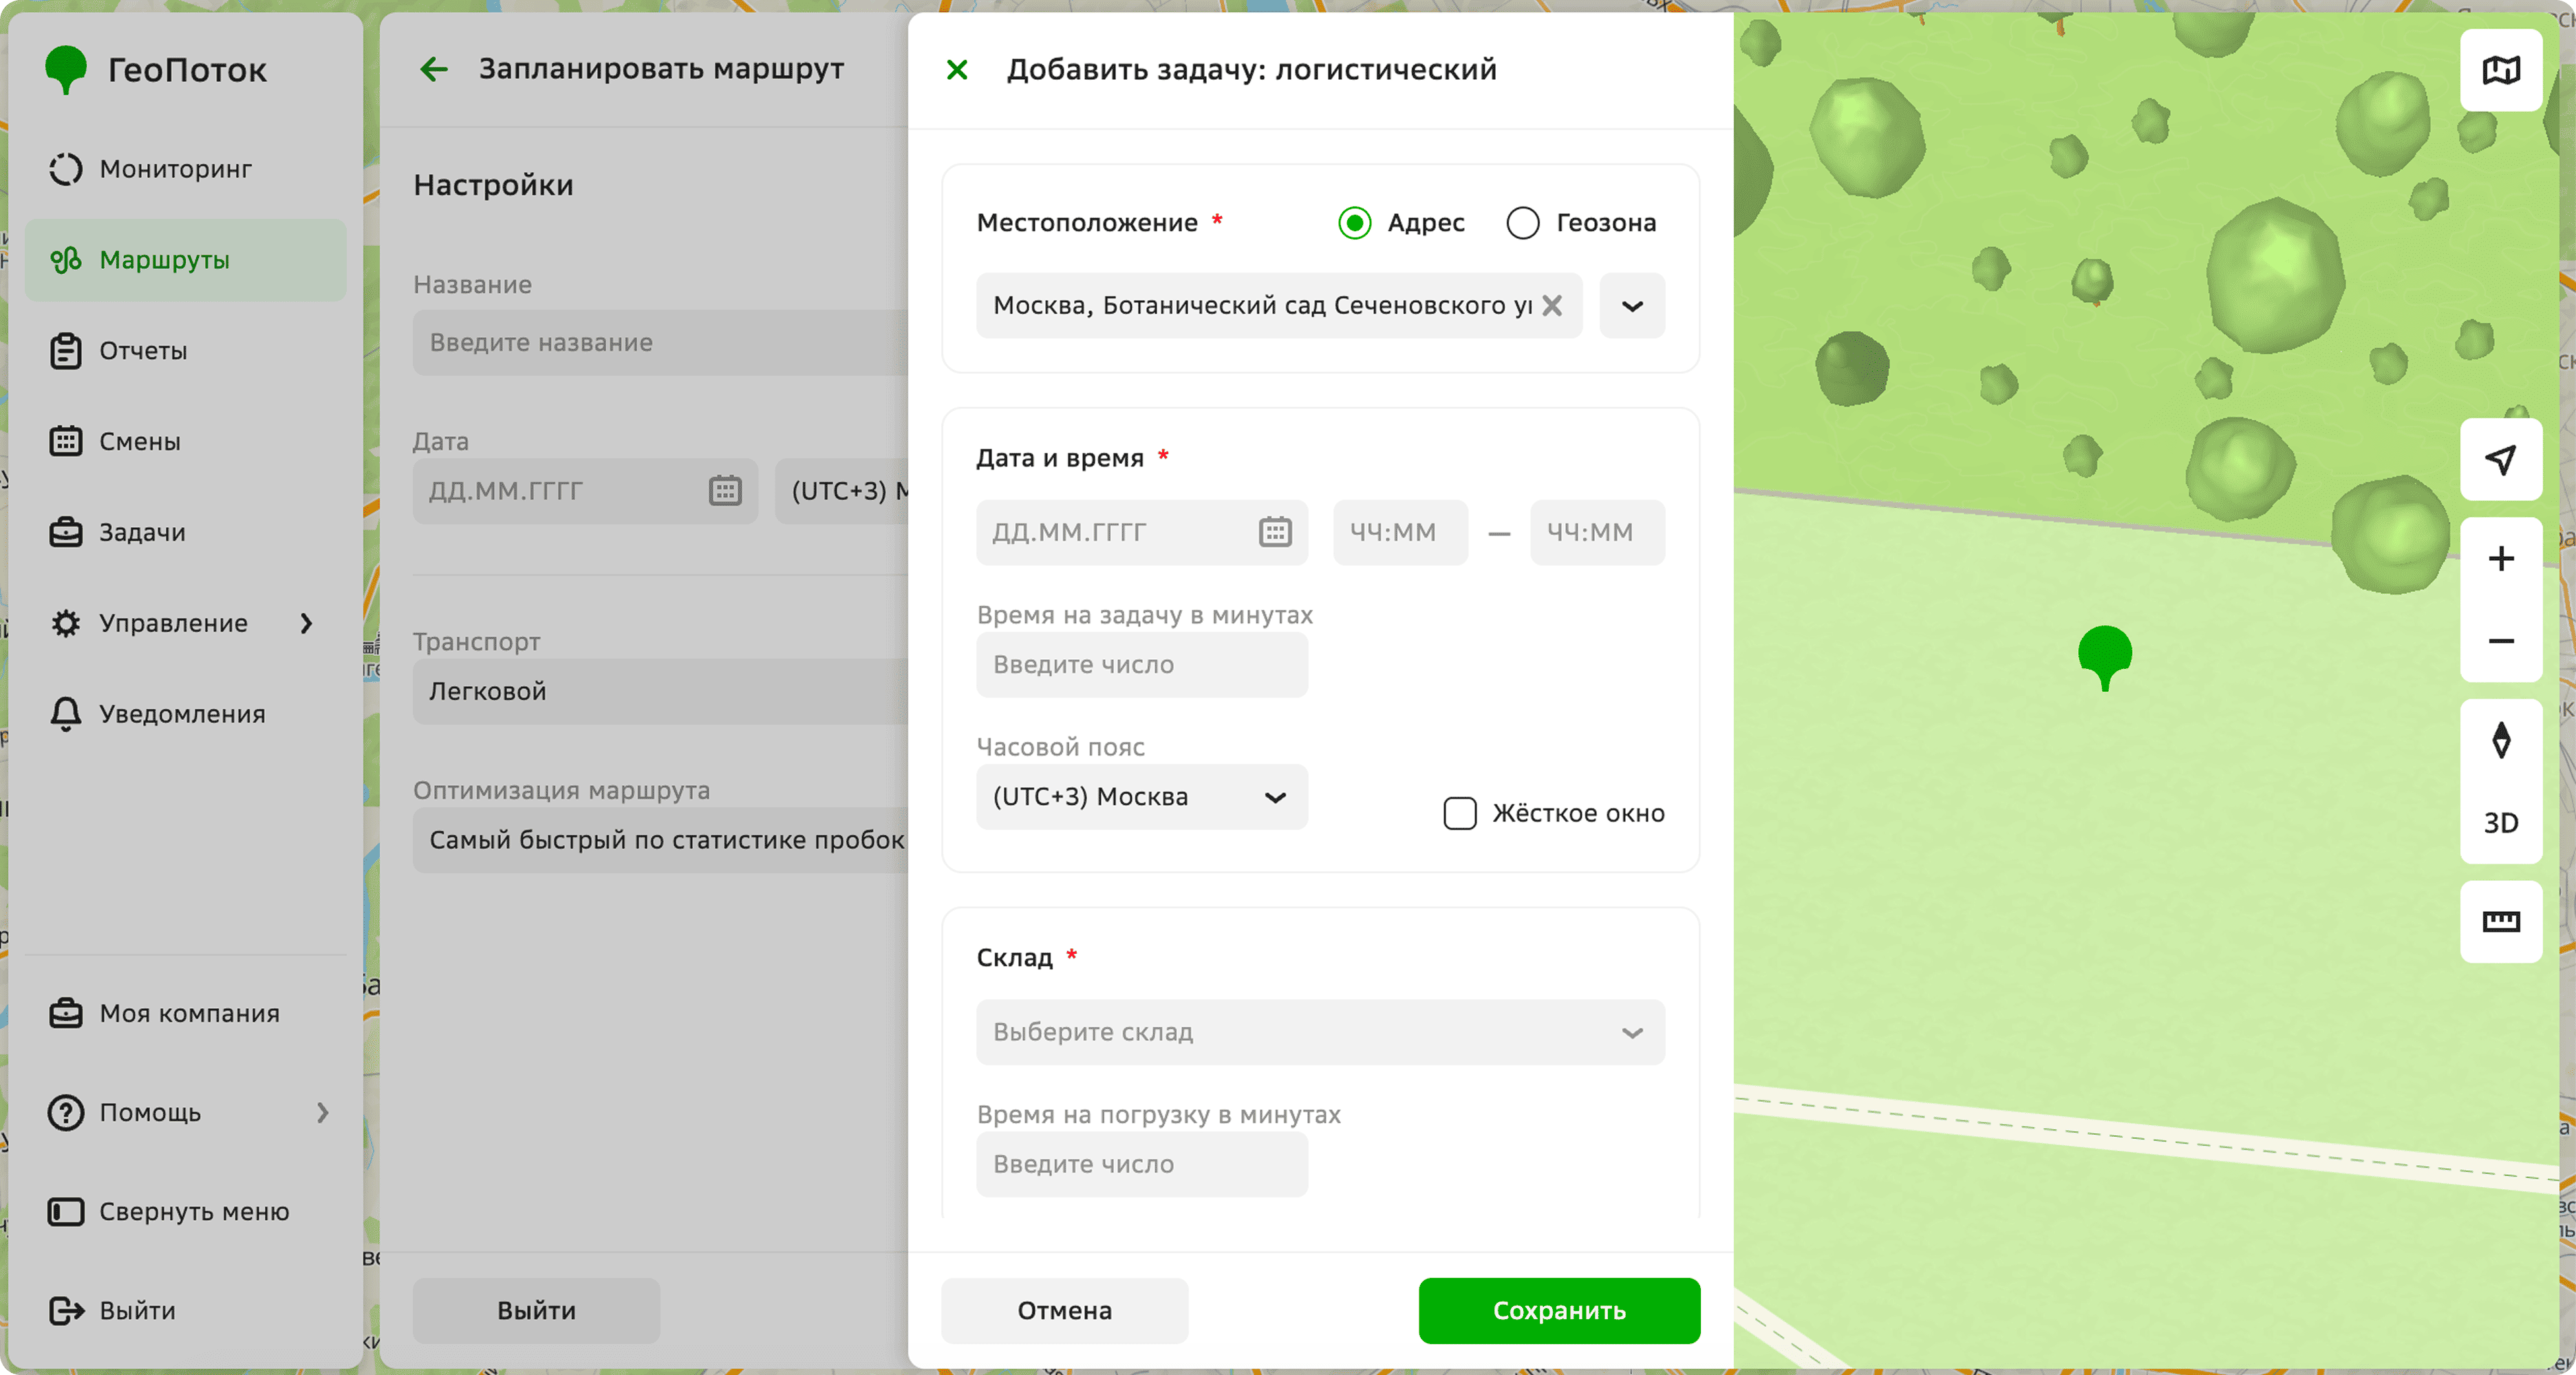
Specify the task parameters:
-
Name: unique task identifier. The field may have a different name depending on the task template, for example,
Identifier. -
Location (mandatory parameter): specify the point address in one of the following ways:
- Click the point on the map. You can drag the marker icon to any location on the map.
- Enter the point address in the field and select the option from the dropdown list.
- Enter the point coordinates in the
longitude, latitudeformat (for example,37.607132,55.7680412).
If necessary, specify the entrance, floor, apartment or office, and a comment for the address.
-
Date and time (mandatory parameter): date and time of the task execution:
- Date (mandatory parameter): date of the task execution. Must match the date specified in the plan.
- Time (mandatory parameter): time interval in which the task must be completed.
- Time for the task in minutes: time required to complete the task.
- Time zone (mandatory parameter): time zone in which the time of the task execution is specified.
- Hard time window: select the checkbox if the task must be performed only at the specified time. If the parameter is specified, the agent will not be able to perform the task earlier or later than the specified time.
-
Depot (mandatory parameter): depot from which the agent must pick up the shipment:
-
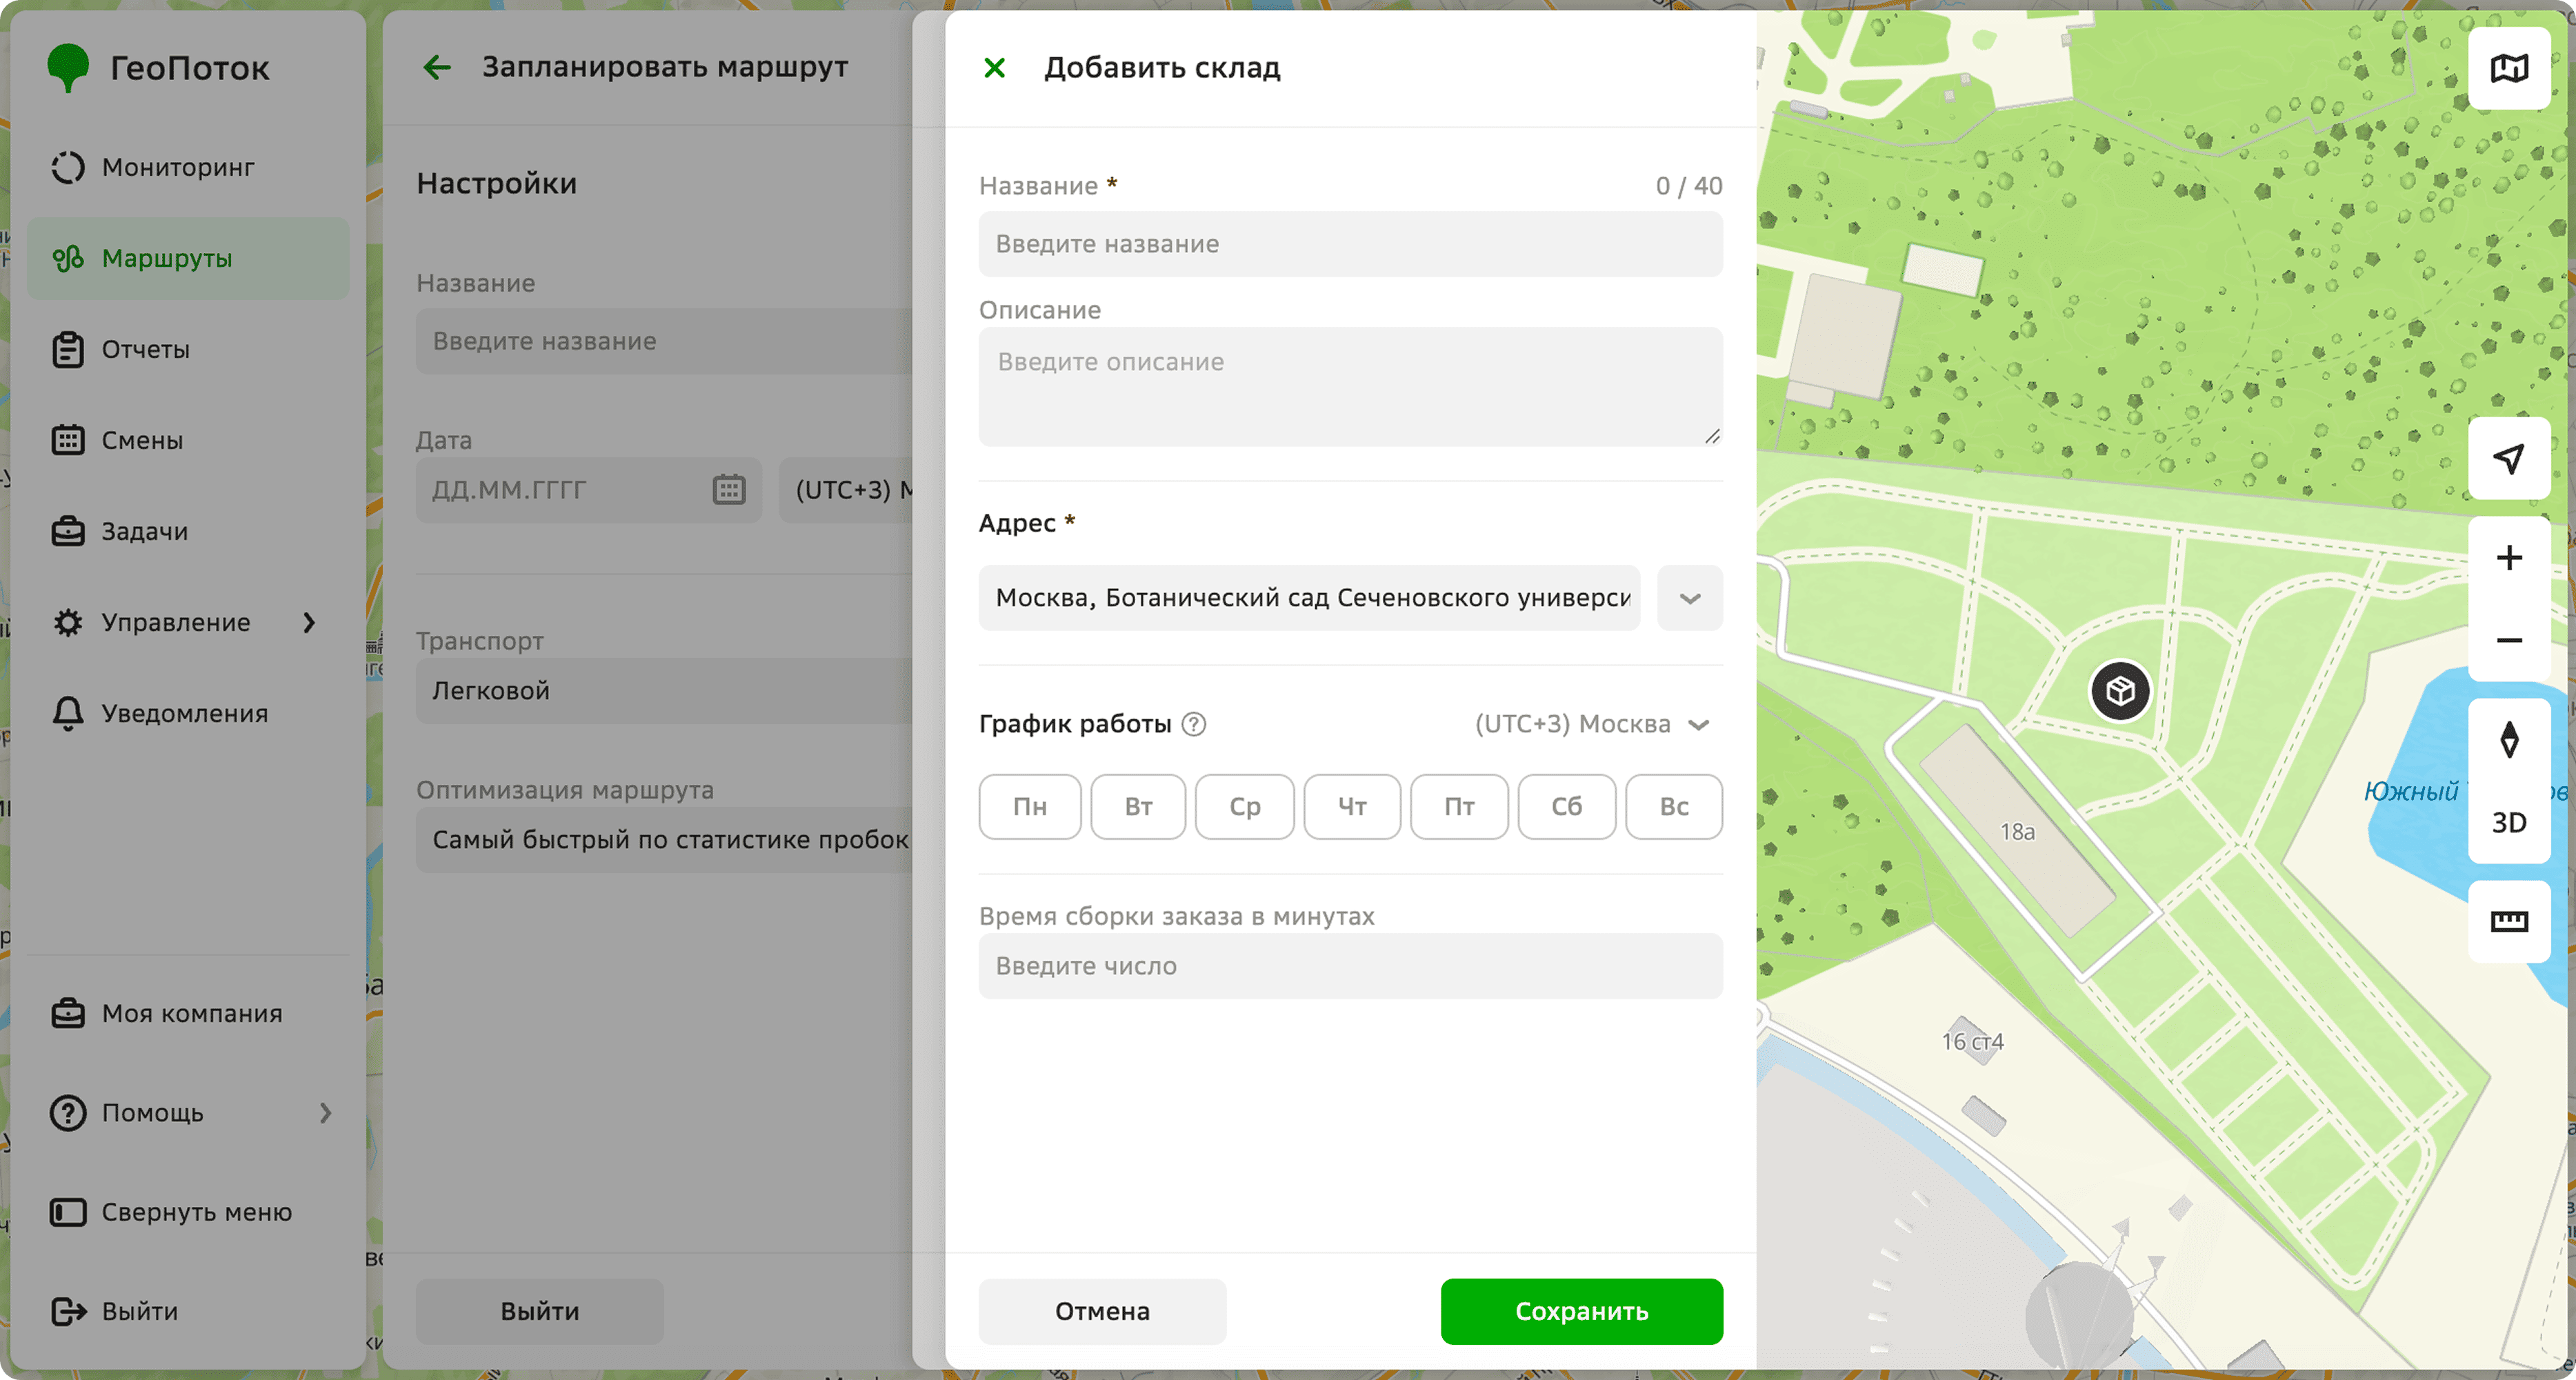
Depot: select a depot from the list or add a new one. To add a depot, click Add depot and specify its parameters:
-
Name (mandatory parameter): depot name.
-
Description: depot description.
-
Address (mandatory parameter): specify the depot address in one of the following ways:
- Click the point on the map. You can drag
 icon to any location on the map.
 - Enter the depot address in the field and select the option from the dropdown list.
- Enter the depot coordinates in the
longitude, latitudeformat (e.g.,37.607132,55.7680412).
If necessary, specify the entrance, floor, office, and a comment for the address.
- Click the point on the map. You can drag
-
Work schedule: depot operating hours:
- Time zone: time zone in which the depot working hours are specified.
- Days of the week: days of the week when the depot operates.
- Working hours: time interval when the depot operates. To add a working interval, click Add interval and enter the time. To delete an interval, click
 icon next to it.
 - Hard time window: select the checkbox if the depot can only be visited at the specified time. If an agent cannot arrive at the depot within the specified time interval, the depot is excluded from route calculation.
-
Order assembly time in minutes: time required to assemble an order at the depot.
-
-
Loading time in minutes: time required to load the order at the depot.
-
-
-
Specify other attributes, which depend on the task template.
-
Click Save.
-
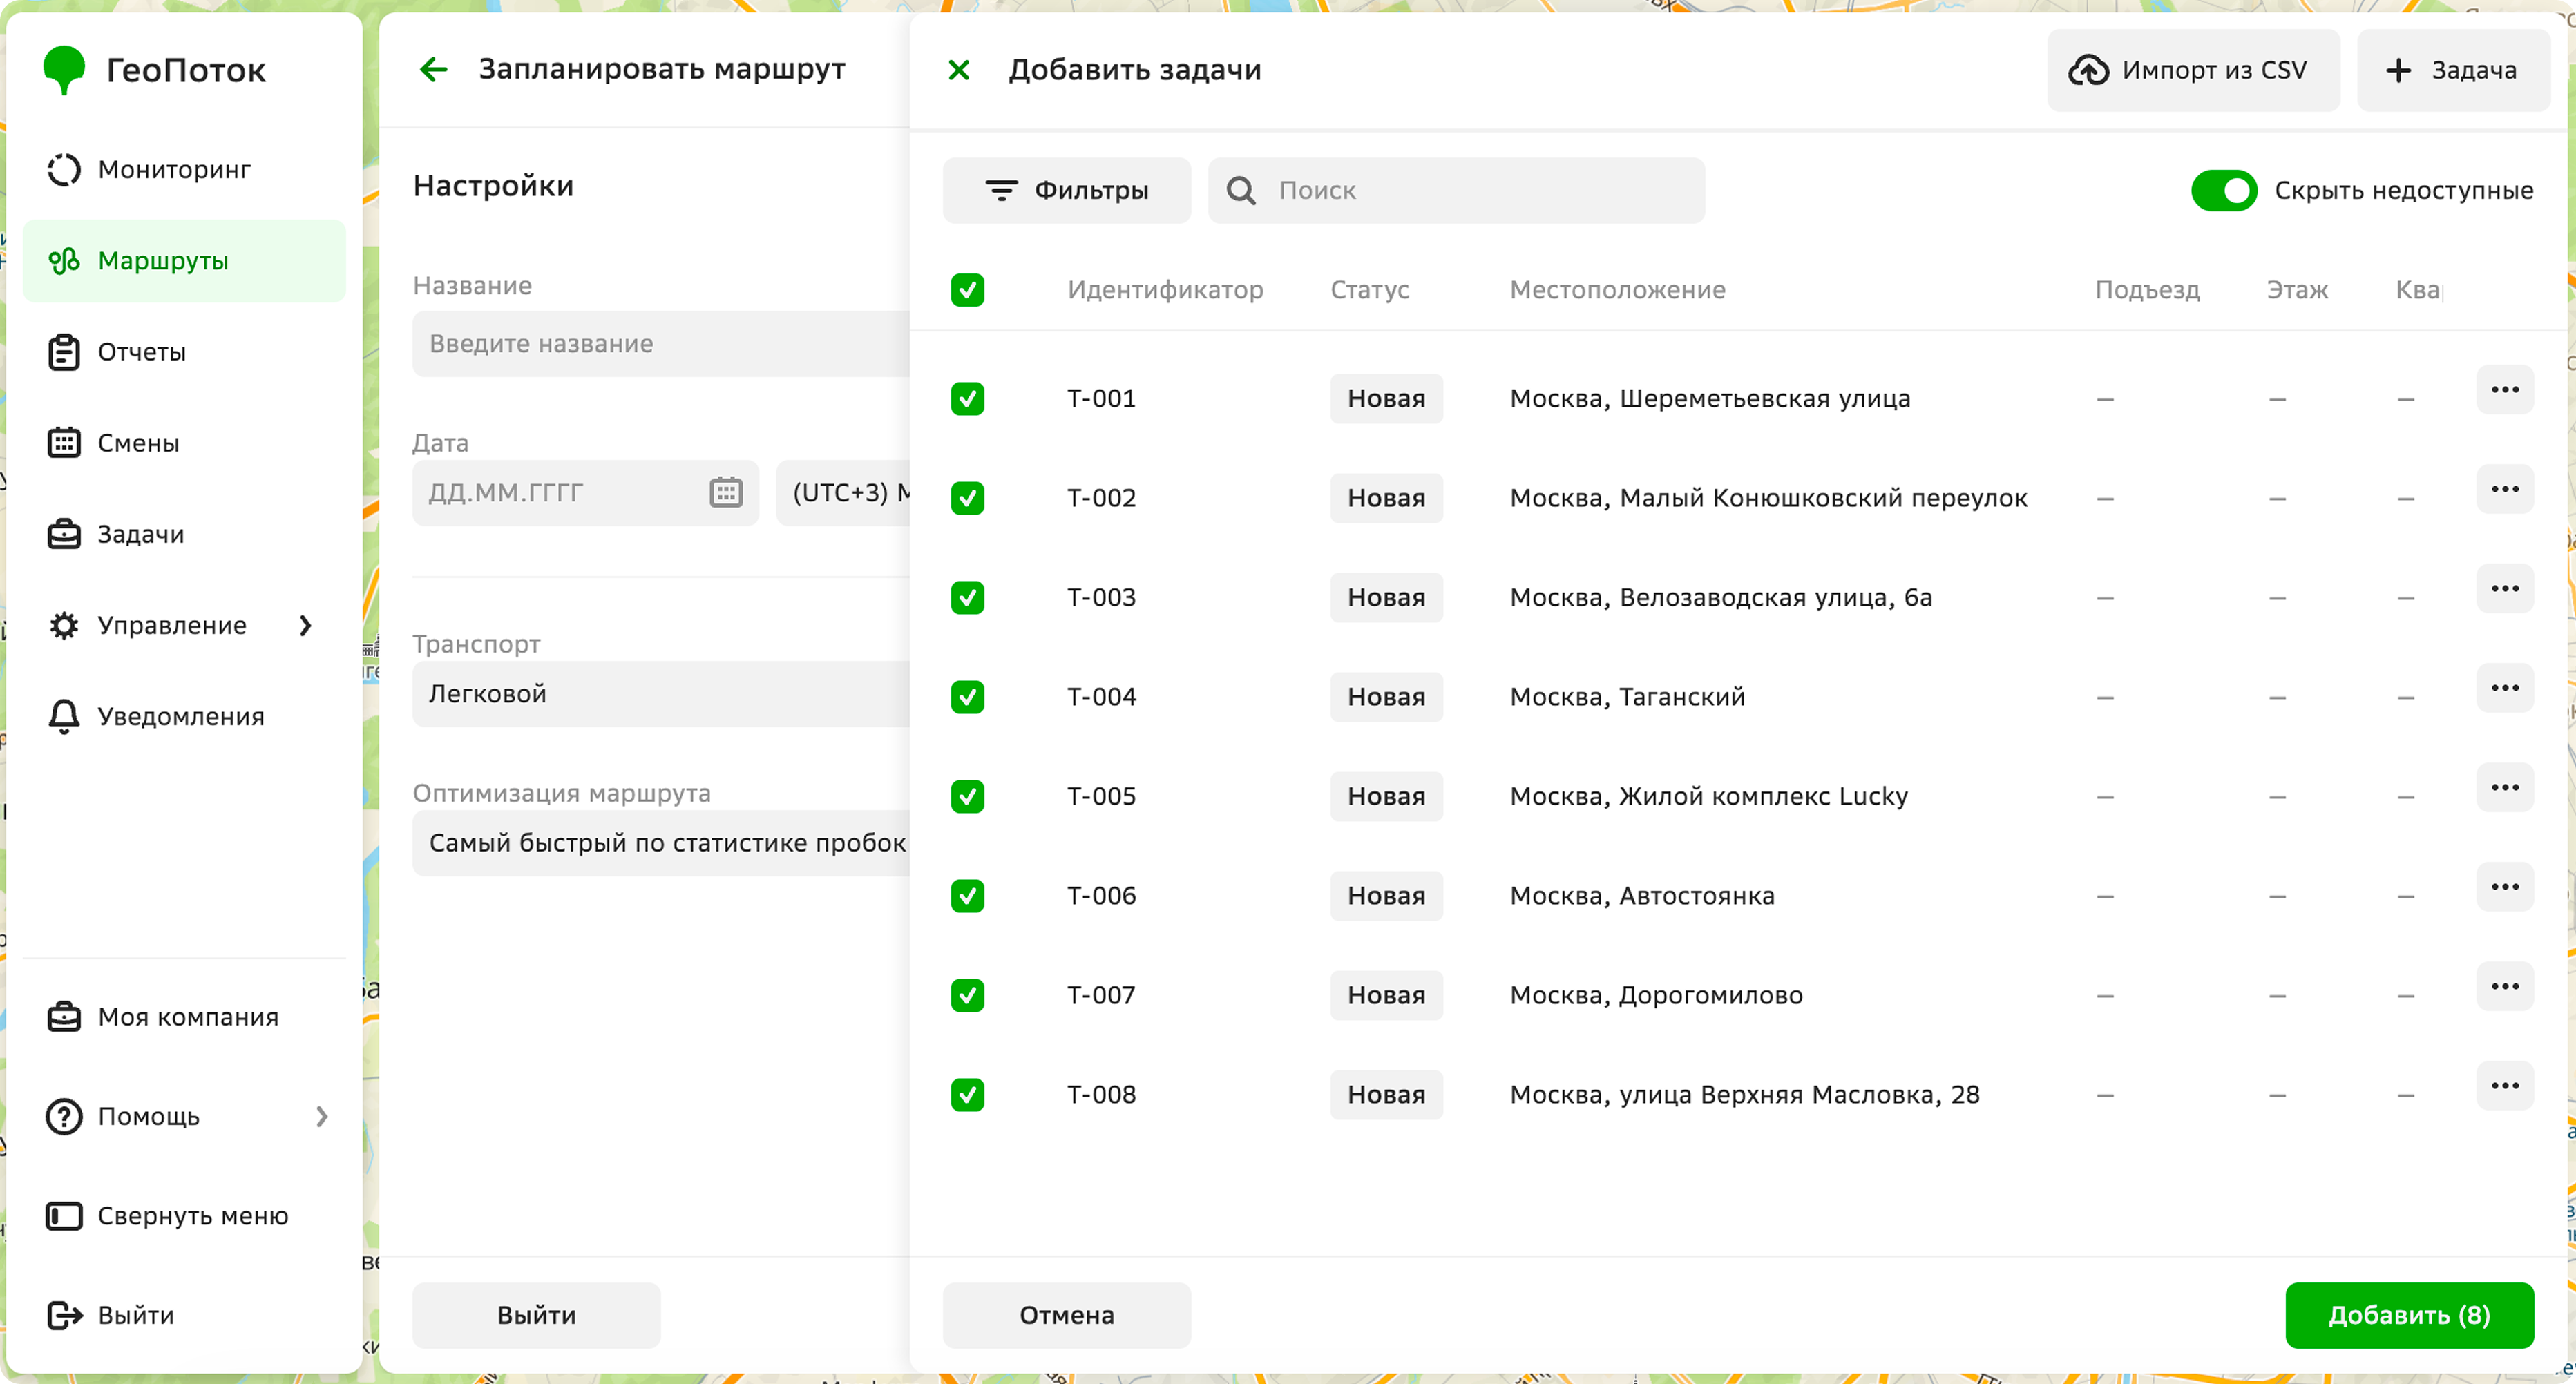
Select the checkboxes next to the tasks.
You can search for tasks by name, filter them by type (template), by date and time of execution, depot, skills, and date of update. To hide tasks that cannot be added to the plan, enable the Hide unavailable option.
Tasks must contain mandatory attributes: unique identifier, the date and time of task execution in the time zone specified in the template, location, and the depot from which the agent must pick up the shipment. For more information on attributes, see the Creating a task template section.
-
Click Add.
To select tasks that were previously created on the Tasks tab:
-
In the Tasks panel, click
icon. -
Select a task template.
If the template is not suitable for creating a plan (missing required attributes), click Edit task template. Add the attributes and click Save. For more information on attributes, see the Creating a task template section.
-
Select the checkboxes next to the tasks.
You can search for tasks by name, filter them by type (template), by date and time of execution, depot, skills, and date of update. To hide tasks that cannot be added to the plan, enable the Hide unavailable option.
Tasks must contain mandatory attributes: unique identifier, the date and time of task execution in the time zone specified in the template, location, and the depot from which the agent must pick up the shipment. For more information on attributes, see the Creating a task template section.
-
Click Add.
To import tasks from a CSV file:
-
In the Tasks panel, click
 icon.
icon. -
Select or create a task template. To create a template, click Add task template: for details, see the Creating a task template section.
If the template is not suitable for creating a plan (missing required attributes), click Edit task template. Add the attributes and click Save. For more information on attributes, see the Creating a task template section.
-
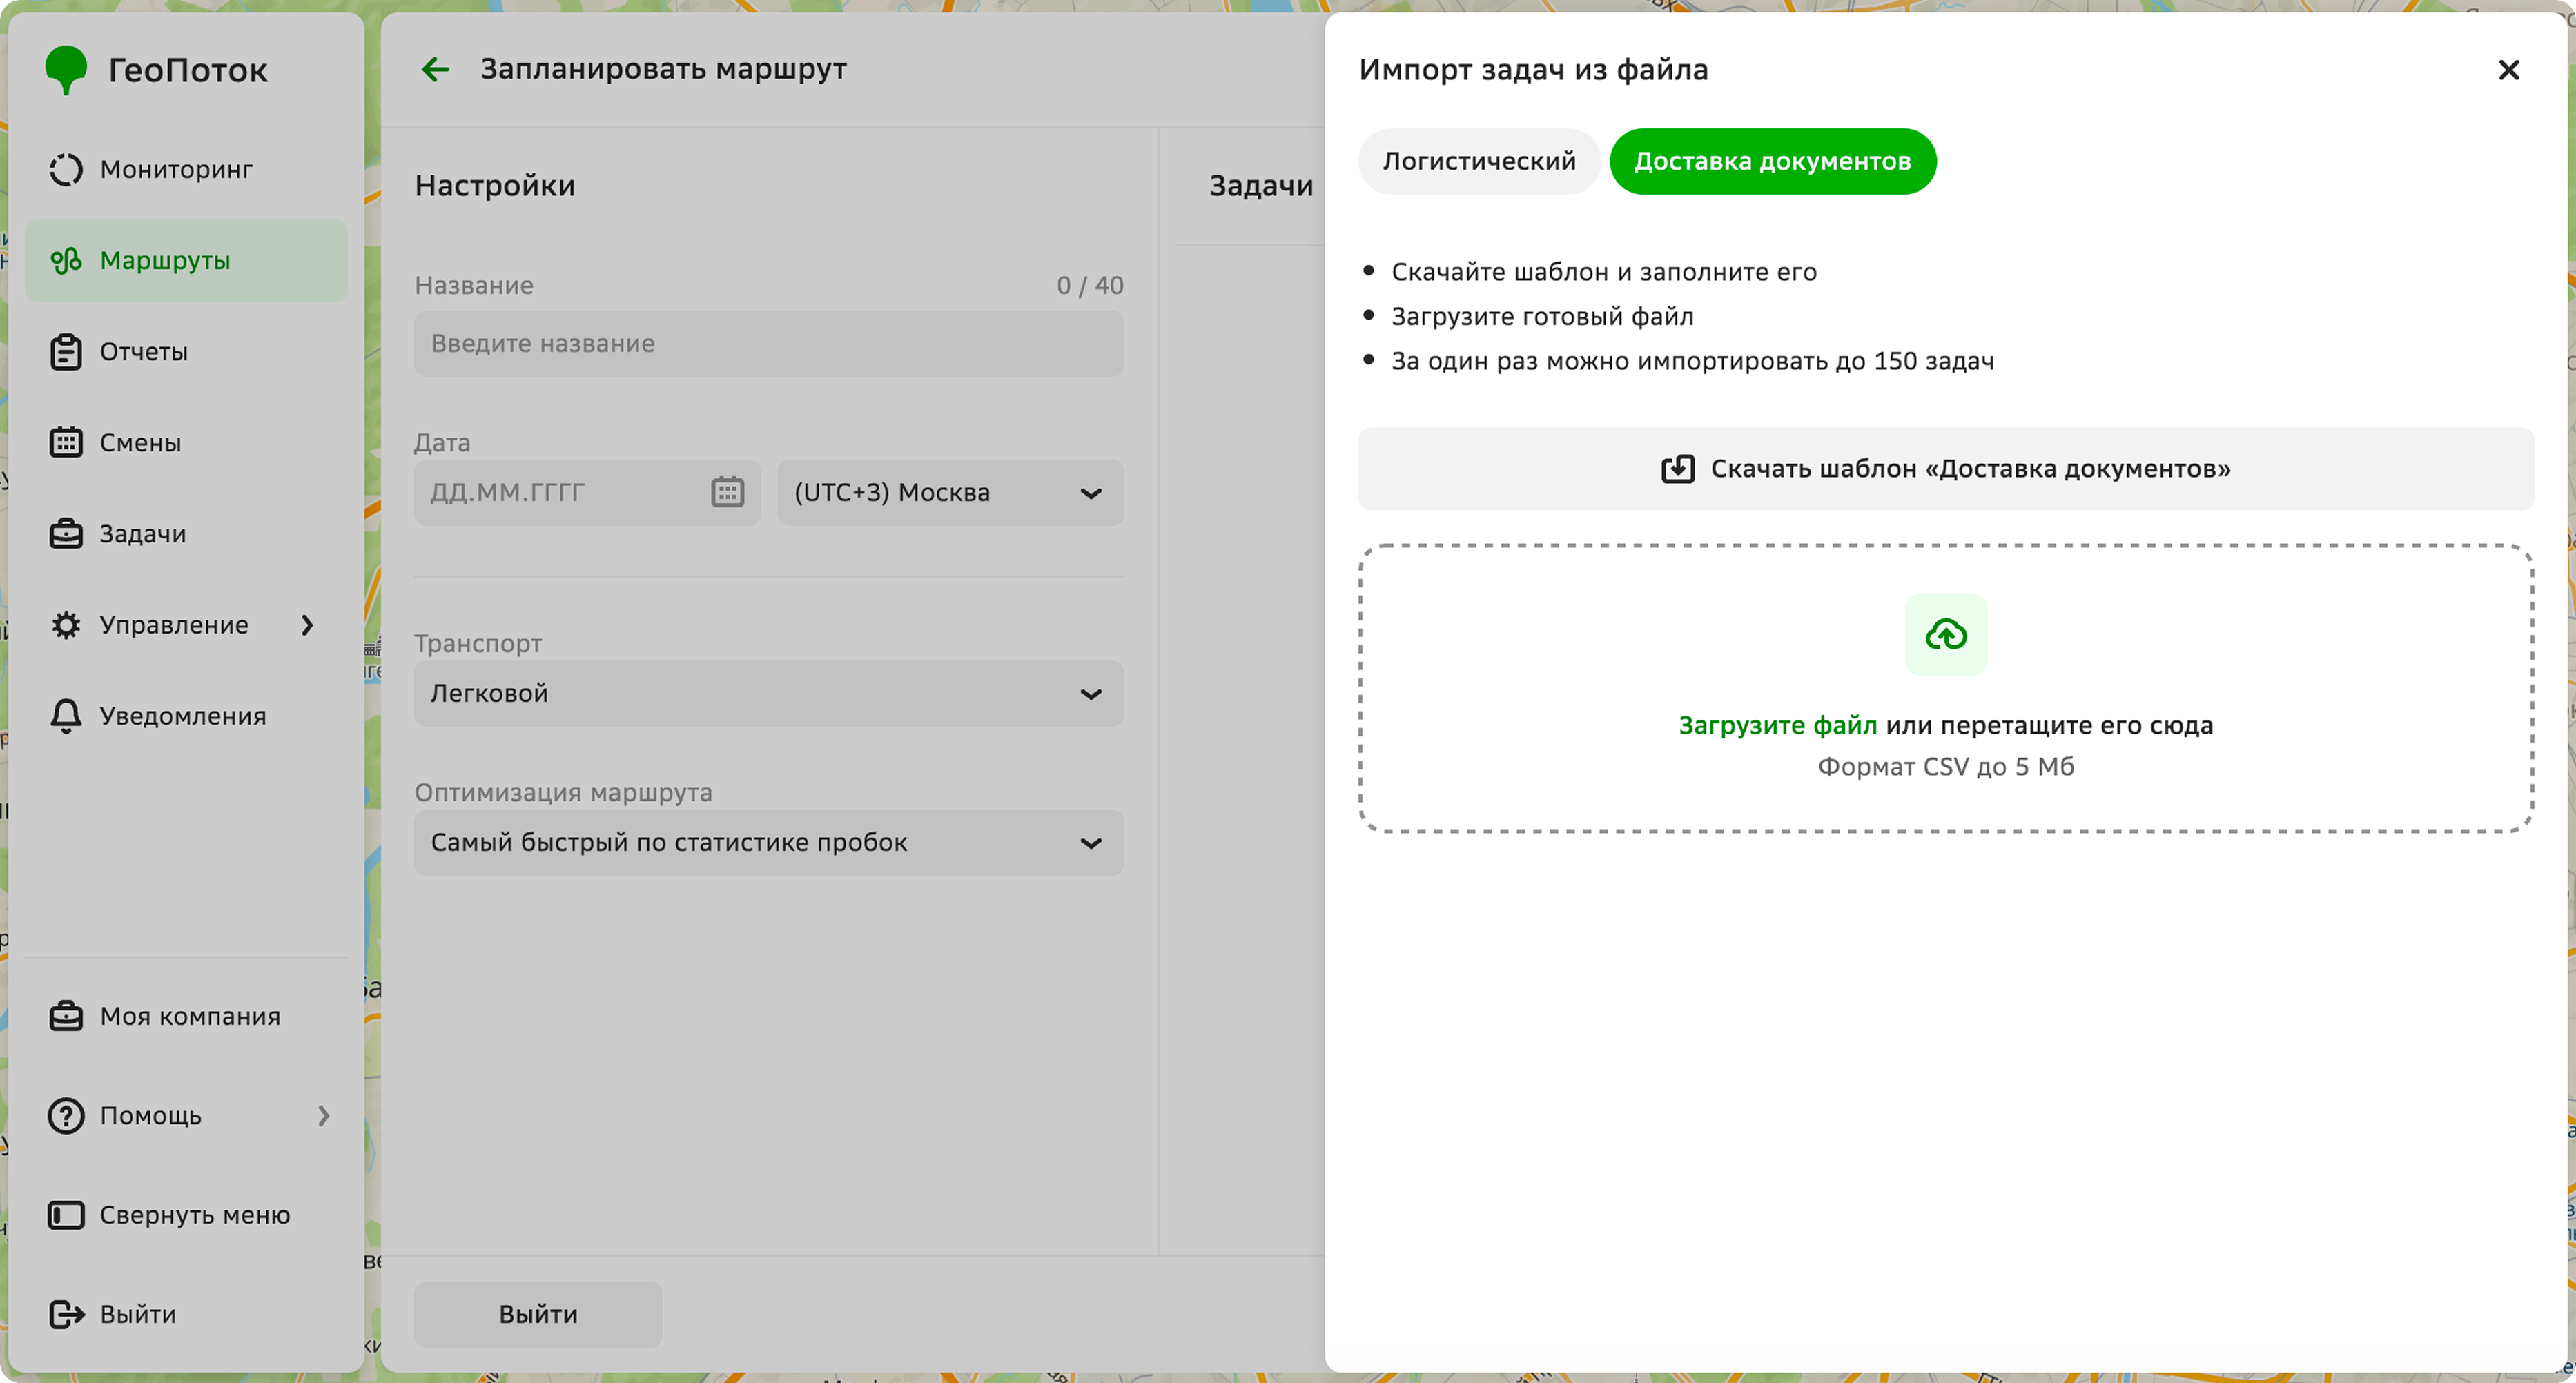
Click Download template.
-
Fill in the template with task data. The template shows which data to add and includes an example of filling out. Tasks must contain mandatory attributes: unique identifier, the date and time of task execution in the time zone specified in the template, location, and the depot from which the agent must pick up the shipment. For more information on attributes, see the Creating a task template section.
One file can contain up to 350 tasks. The maximum file size is 5 MB.
-
Return to the form for creating the route plan and drag the file into the upload area.
-
If there are errors in the file, a notification indicating the rows with errors will appear. To upload tasks, correct the errors and upload the file again.
-
All tasks from the file will be added to the plan. To edit a task, hover over it, click
 icon, apply the changes, and click Save. To delete a task from the plan, hover over it and click icon.
-
Add agents to perform the plan tasks using one of the following methods. You can add from 1 to 200 agents to the plan.
- Create agents
- Select created agents
To create agents in the route plan creation form:
-
In the Agents panel, click
icon. -
Select or create an agent template. To create a template, click Add agent template: for details, see the Creating an agent template section.
-
In the top-right corner, click + Agent.
-
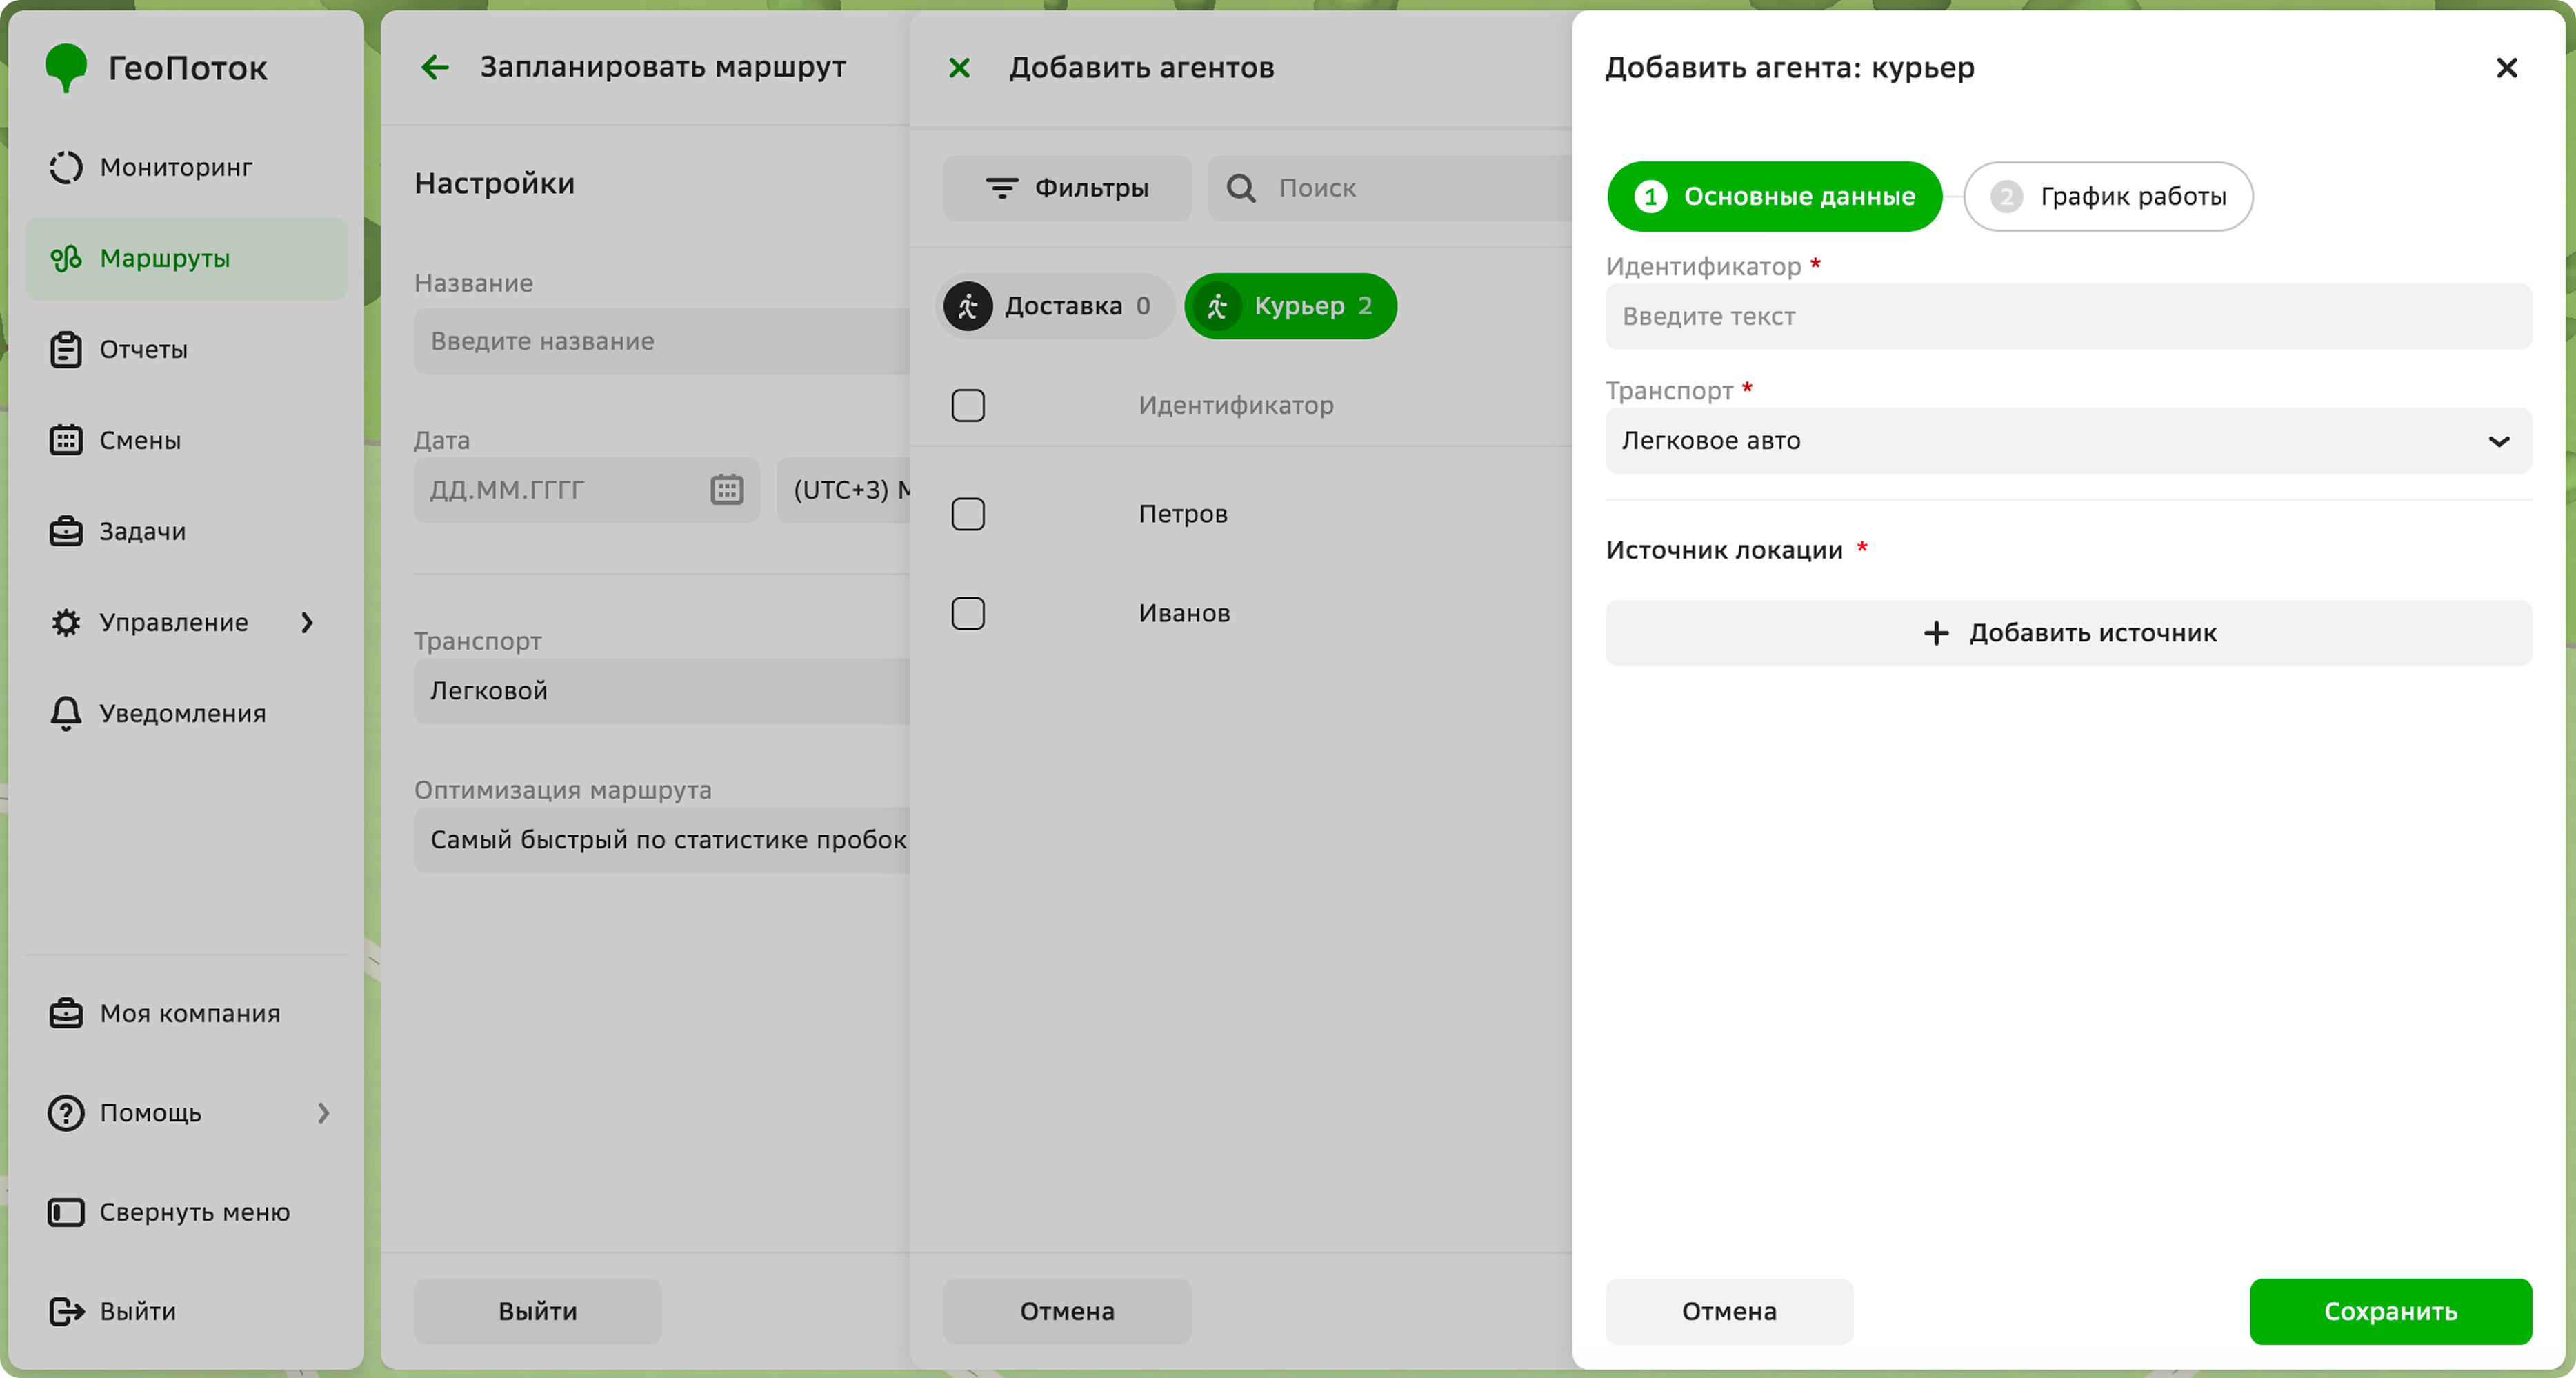
Specify the agent main data:
-
Name: unique agent identifier. The field may have a different name depending on the agent template, for example,
Identifier. -
Transport: agent transport type. The field may have a different name depending on the agent template.
-
Location source: click Add source and select one of the location source types:
- Application: select a user who uses the mobile application and will be linked to the agent.
- EGTS tracker: to link the device to the agent, use the 2GIS GeoFlow: Monitoring solution along with 2GIS GeoFlow: Logistics. In the common web panel, administrators will be able to track agent location.
You can select multiple location sources for one agent, but each source can only be linked to one agent at a time.
To add a source, click Add source. To remove a source, click
icon next to it.
-
-
Specify other attributes, which depend on the agent template.
-
Specify the agent work schedule:
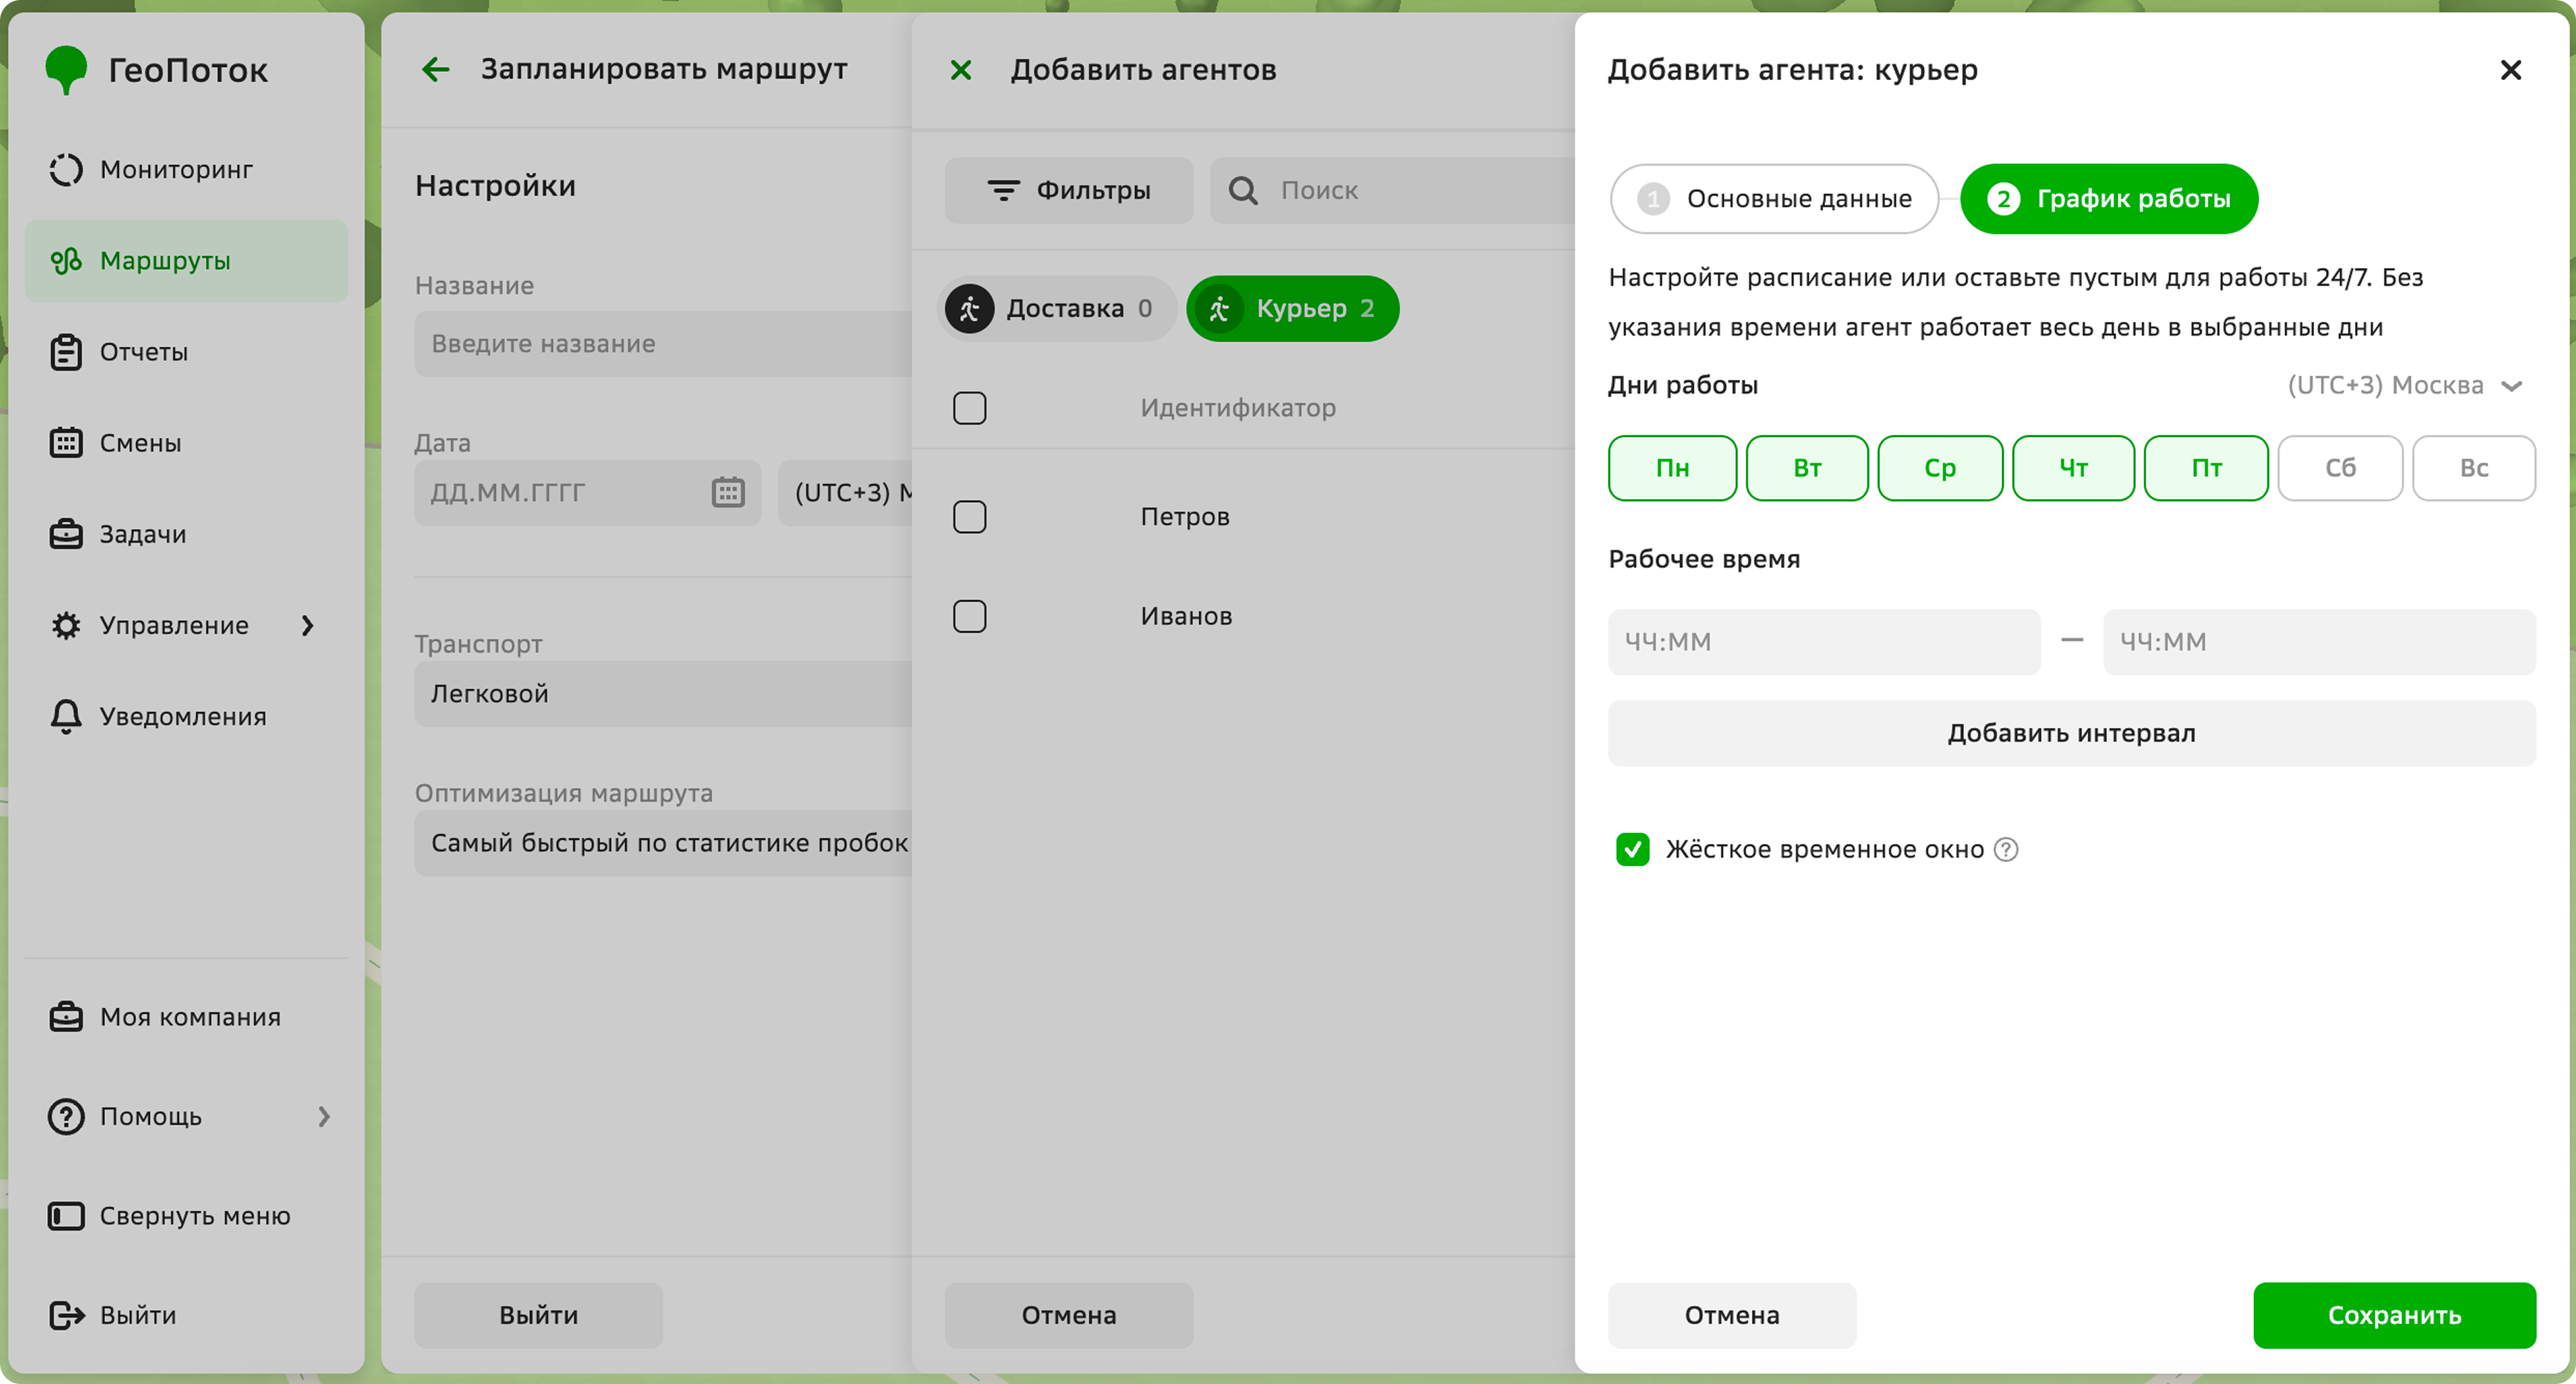
- Time zone: time zone in which the agent working time is specified.
- Working days: days of the week when the agent works.
- Working hours: time interval when the agent works. To add a working interval, click Add interval and enter the time. To delete an interval, click icon next to it.
- Hard time window: select the checkbox if the agent can work only at the specified time. If the agent cannot work during the specified time period, they will be excluded from the route calculation.
-
Click Save.
-
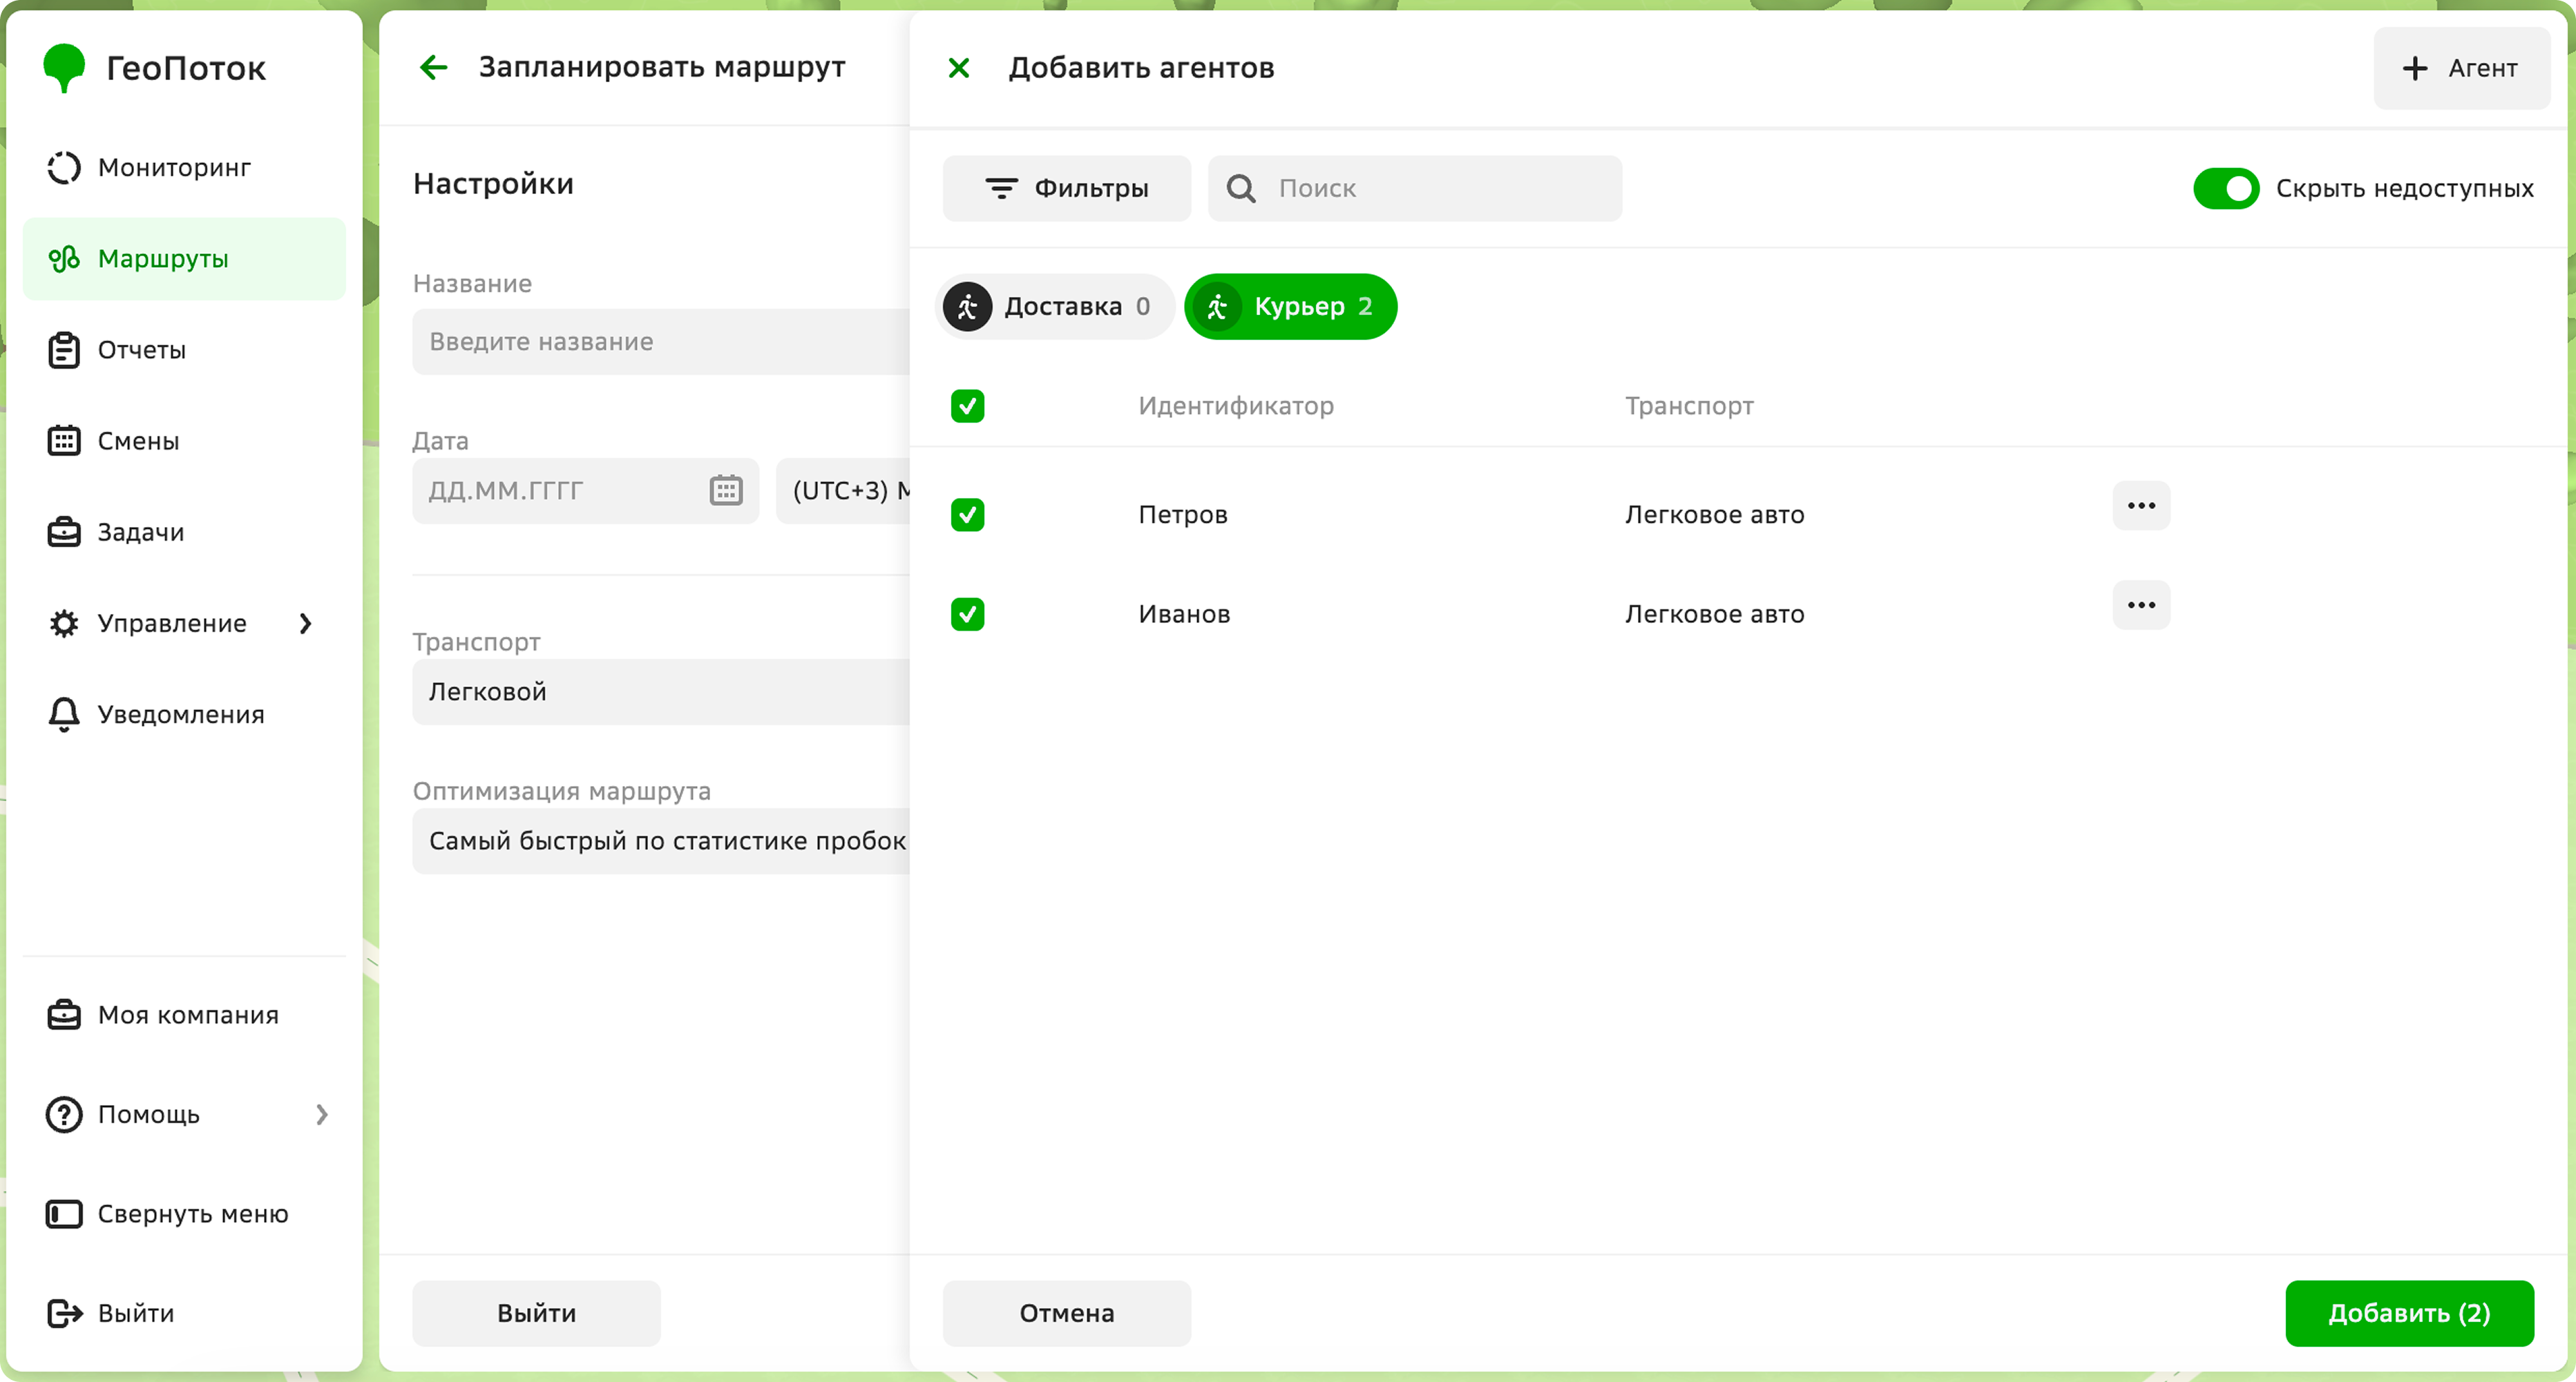
Select the checkboxes next to the agents or groups.
You can search agents by identifier, filter them by agent type (template) and skills. To hide agents that cannot be added to the plan, enable the Hide unavailable option.
-
Click Add.
-
In the Agents panel, click
icon. -
Select the checkboxes next to the agents or groups.
You can search agents by identifier, filter them by agent type (template) and skills. To hide agents that cannot be added to the plan, enable the Hide unavailable option.
-
Click Add.
-
Finish planning.
- Calculate route
- Save draft
To calculate the route:
-
Click Calculate route. The plan will have the
Calculatedstatus. -
Review the plan.
-
To confirm the plan, click Confirm route. The plan will have the
Scheduledstatus. Agents will see their routes and tasks in the mobile application.After confirming the plan, you can replan the route, for example, exclude tasks or add agents.
To save the plan as a draft, click Save draft. The plan will have the
Draftstatus. Later you can calculate the route or edit the plan.
Replanning the route
You can replan routes in plans with the Calculated, Scheduled, and In progress statuses:
- add or remove tasks from the plan
- add or remove agents from the plan
- unassign tasks from agents
- select another route optimization method
You can only delete tasks or unassign them from an agent if they belong to a trip that has not started yet. If a trip is linked to another trip (for example, shipment for one of the points on the second trip is picked up during the first trip), neither trip can be edited once the route plan has started.
You can either edit the current version of the plan or create a new one. Once a version is confirmed, the other versions are deleted. After a route is replanned, agents receive a notification in the mobile application that the route has changed, along with the list of new tasks.
Multiple users cannot replan the same route at a time. If another user is editing the route, you will see a notification that the change is unavailable. Editing is locked for 10 minutes. The lock period is automatically extended by any action on the plan (for example, adding or removing a task) or manually.
To replan a route:
-
Go to the Routes tab.
-
Open the plan page.
-
Click Change route plan.
-
Apply changes to the plan:
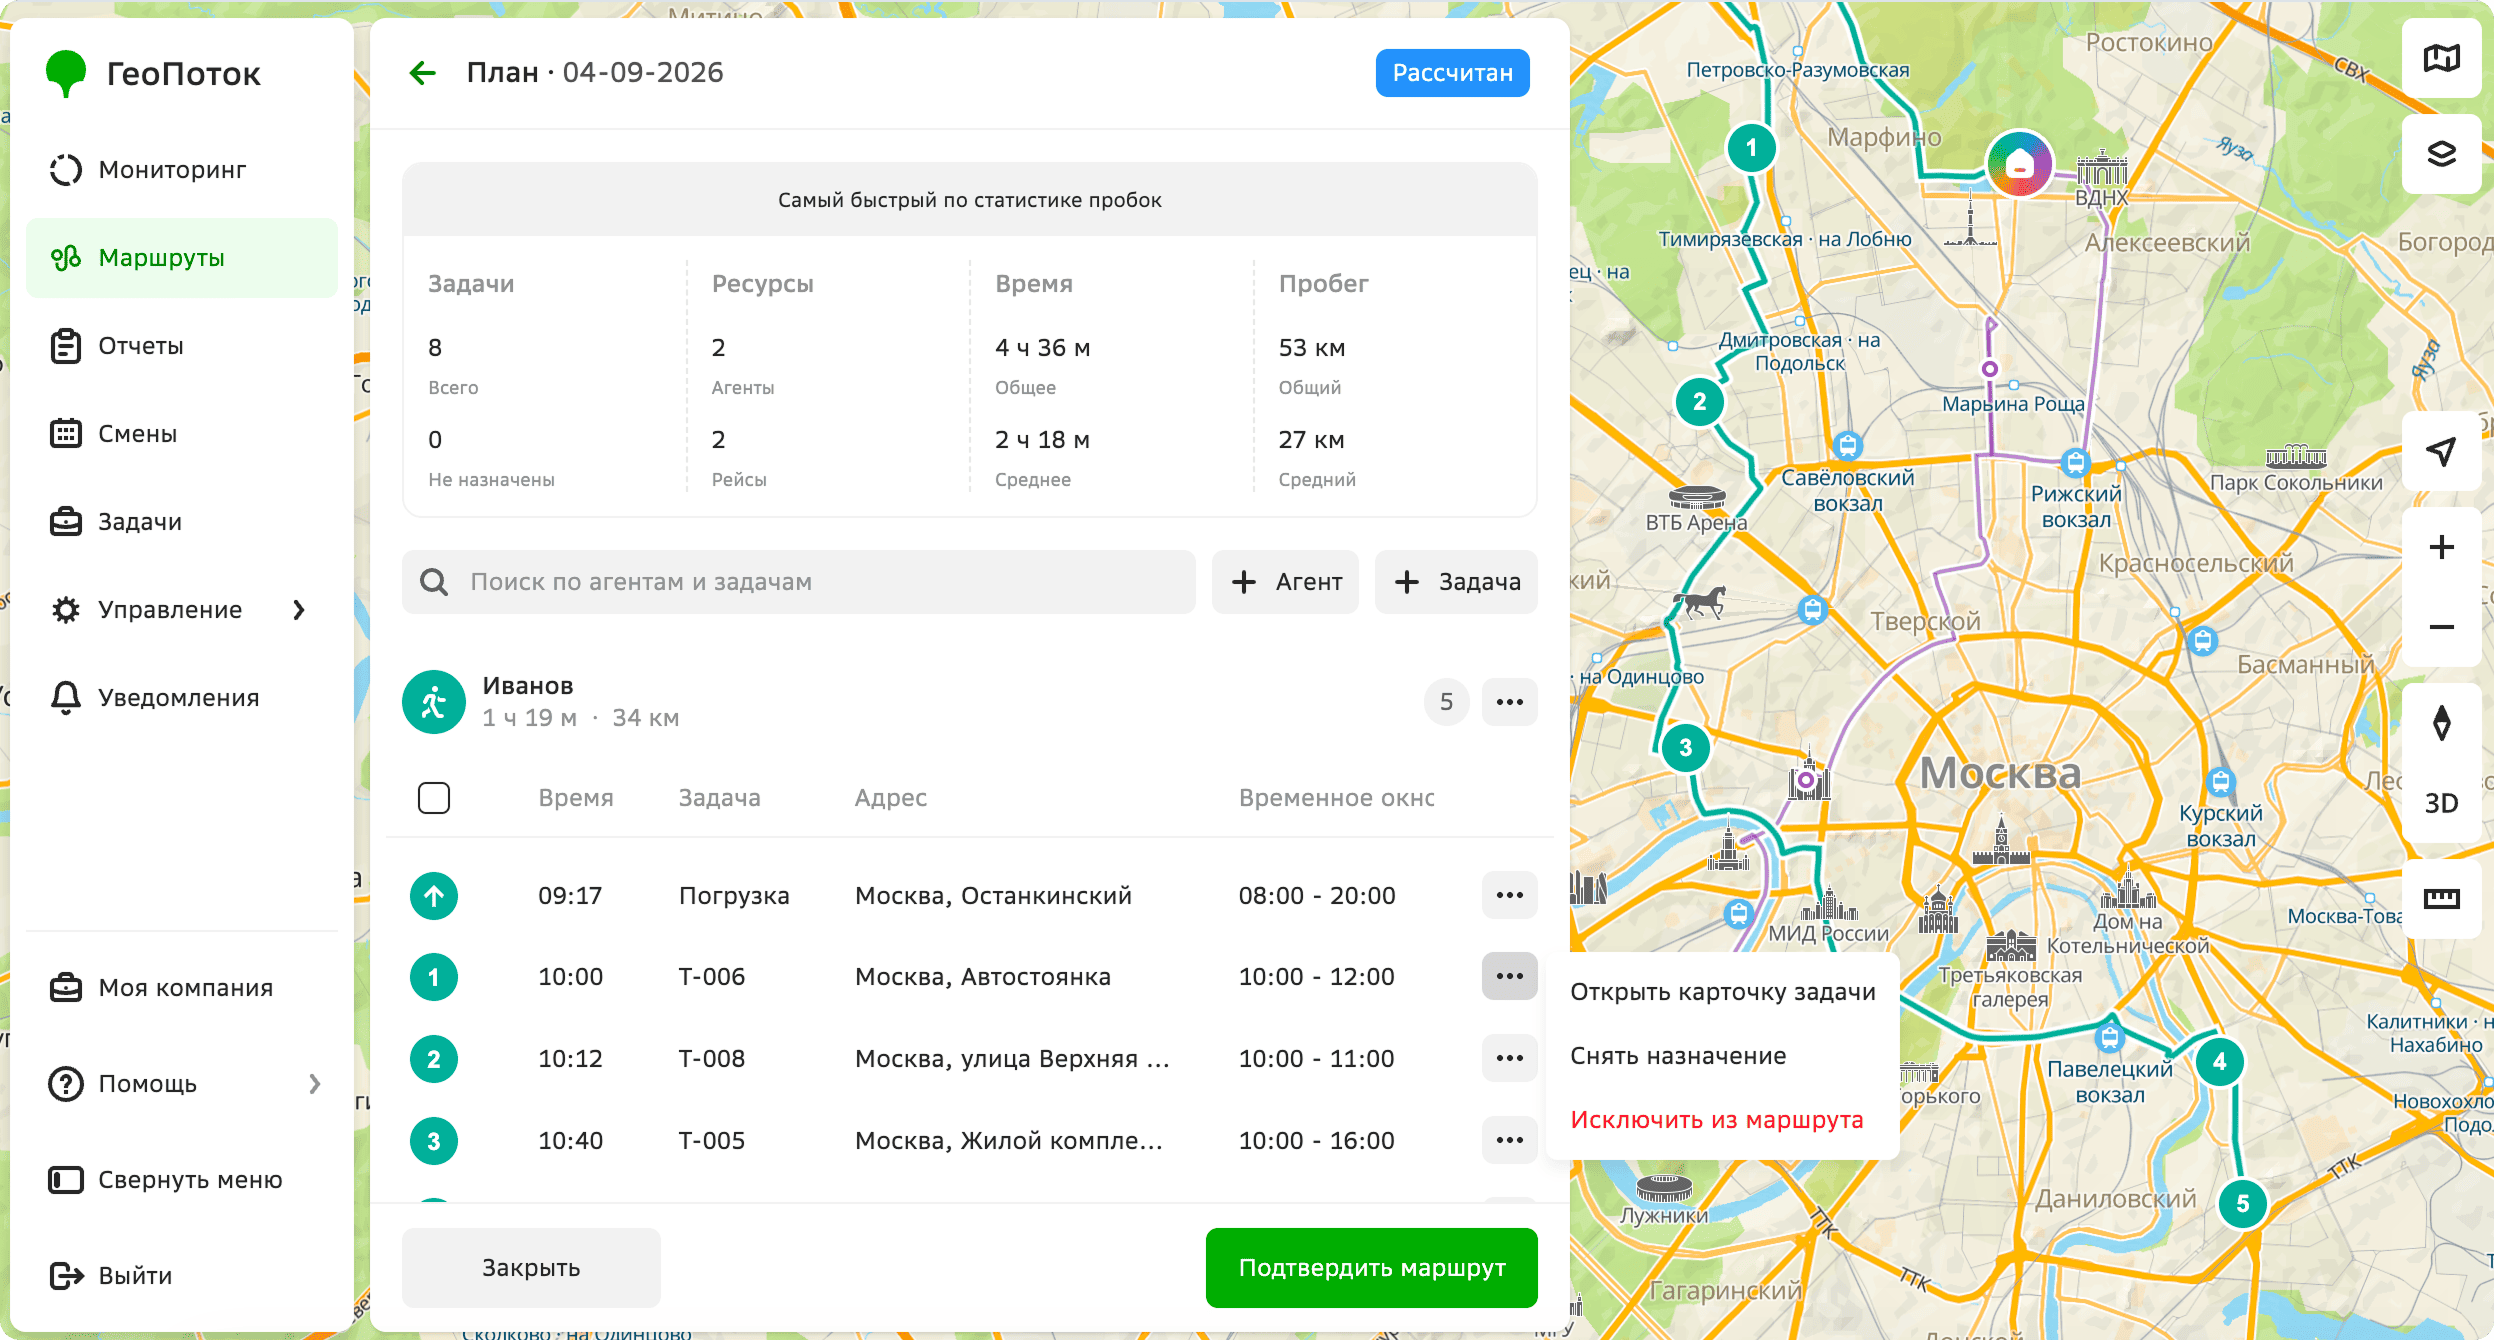
- To add agents, click + Agent and select the checkboxes next to agents or groups. You can search for agents by identifier, filter them by agent type (template) and skills. To hide agents that cannot be added to the plan, enable the Hide unavailable option. Click Add.
- To add tasks, click + Task and select the checkboxes next to tasks. You can search for tasks by name, filter them by type (template), by date and time of execution, depot, skills, and date of update. To hide tasks that cannot be added to the plan, enable the Hide unavailable option. Click Add.
- To unassign a task from an agent, in the task list, click
 icon next to the task and select Unassign. The task will be moved to the task list in the Not assigned panel and will be assigned to another or the same agent when the route is recalculated.
 - To remove a task from the plan, in the task list, click icon next to the task and select Remove from route. The task will be removed from the plan.
- To remove an agent from the plan, in the agent list, click icon next to the agent and select Remove agent from route. The agent will be removed from the plan. Uncompleted tasks of the agent will be moved to the task list in the Not assigned panel and will be assigned to other agents when the route is recalculated.
-
To recalculate the route, click Recalculate plan. If you want to reset the changes made and return to the previous version of the plan, click Reset changes.
-
If the plan has the
CalculatedorScheduledstatus, in the dialog:-
Select the route optimization method:
Shortest in time according to traffic data: shortest in time using statistical traffic data.Shortest in time according to current traffic: shortest in time considering the current traffic data.Shortest in distance: shortest in distance without considering traffic data.
-
Specify whether to create a new plan version.
Versions are created automatically for plans with the
In progressstatus and for plans with theScheduledstatus for which only one version has been created.
-
-
Click Calculate route.
-
To confirm the plan version, select it and click Confirm selected route. Agents will see new routes and tasks in the mobile application.
Editing a plan
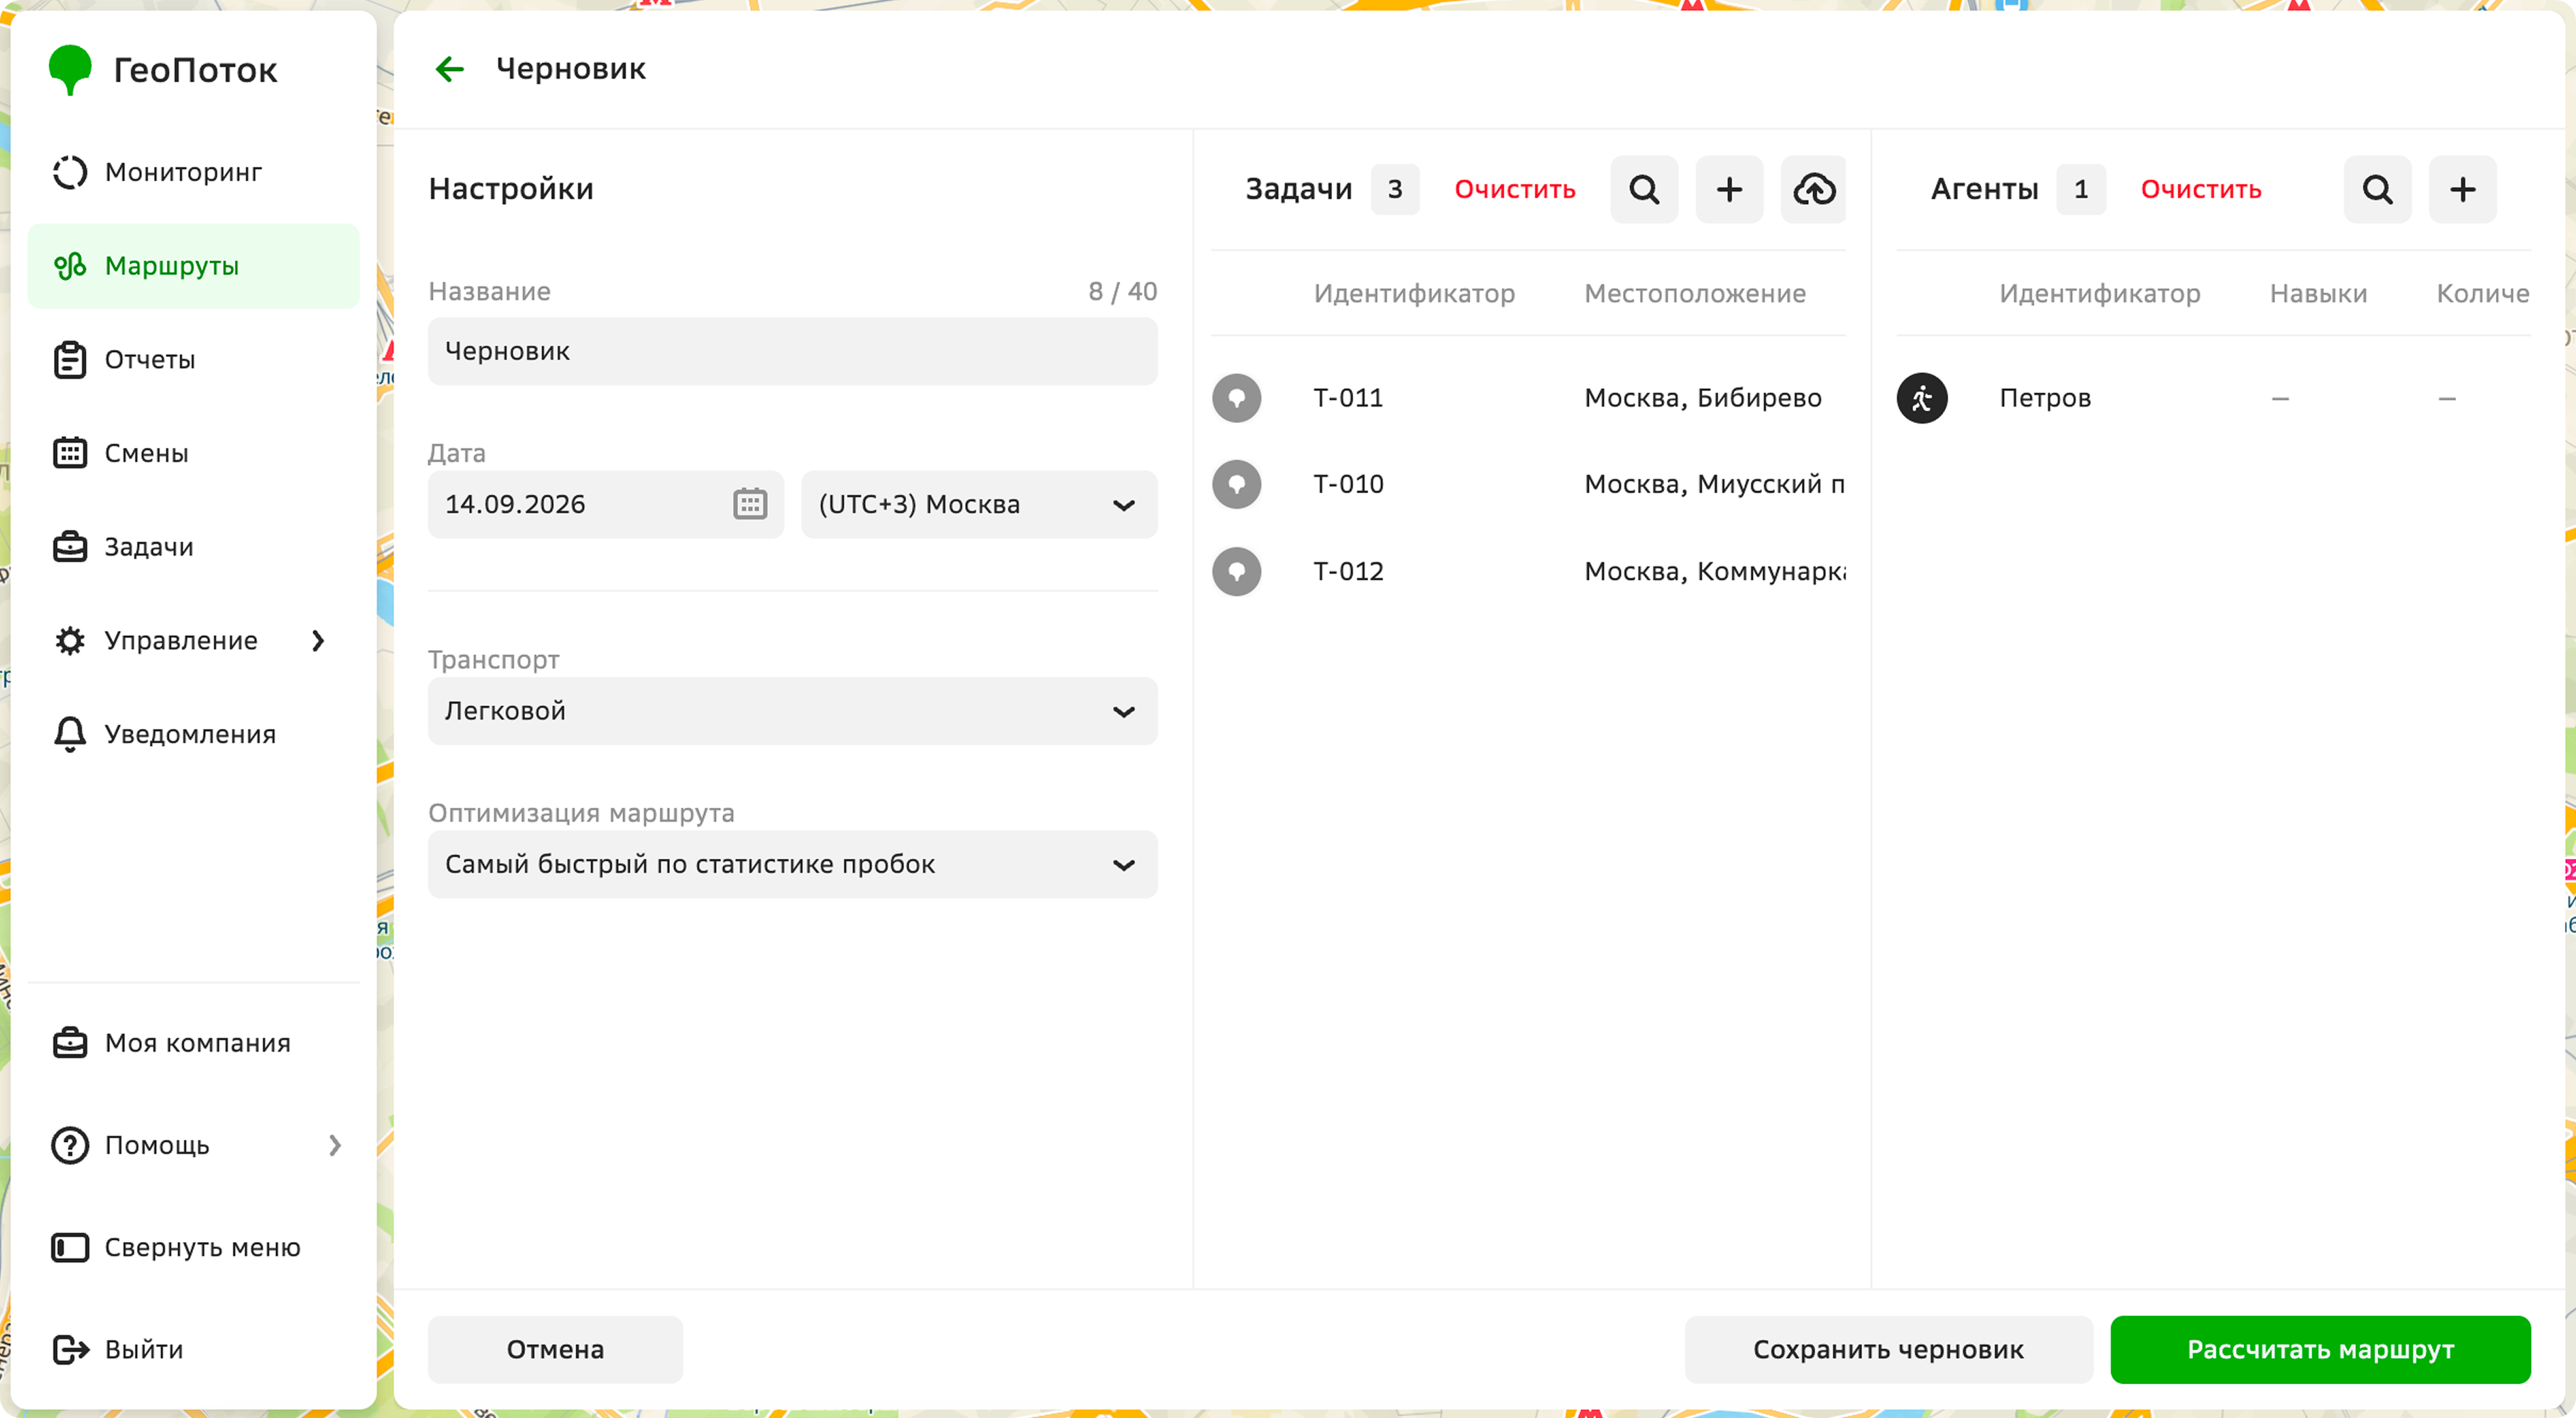
You can edit plans with the Draft and Not calculated statuses:
- change transport type, and route optimization method
- add or remove tasks from the plan
- add or remove agents from the plan
For plans with the Draft status, you can change the name and date.
To edit a plan:
-
Go to the Routes tab.
-
Open the plan page.
-
Apply changes to the plan.
-
Finish planning.
- Calculate route
- Save draft
To calculate the route:
-
Click Calculate route. The plan will have the
Calculatedstatus. -
Review the plan.
-
To confirm the plan, click Confirm route. The plan will have the
Scheduledstatus. Agents will see their routes and tasks in the mobile application.After confirming the plan, you can replan the route, for example, exclude tasks or add agents.
To save the plan as a draft, click Save draft. Later you can calculate the route or edit the plan again.
Viewing plan information
- Go to the Routes tab.
- Open the plan page. You can search plans by name and filter them by date and plan status: active and completed.
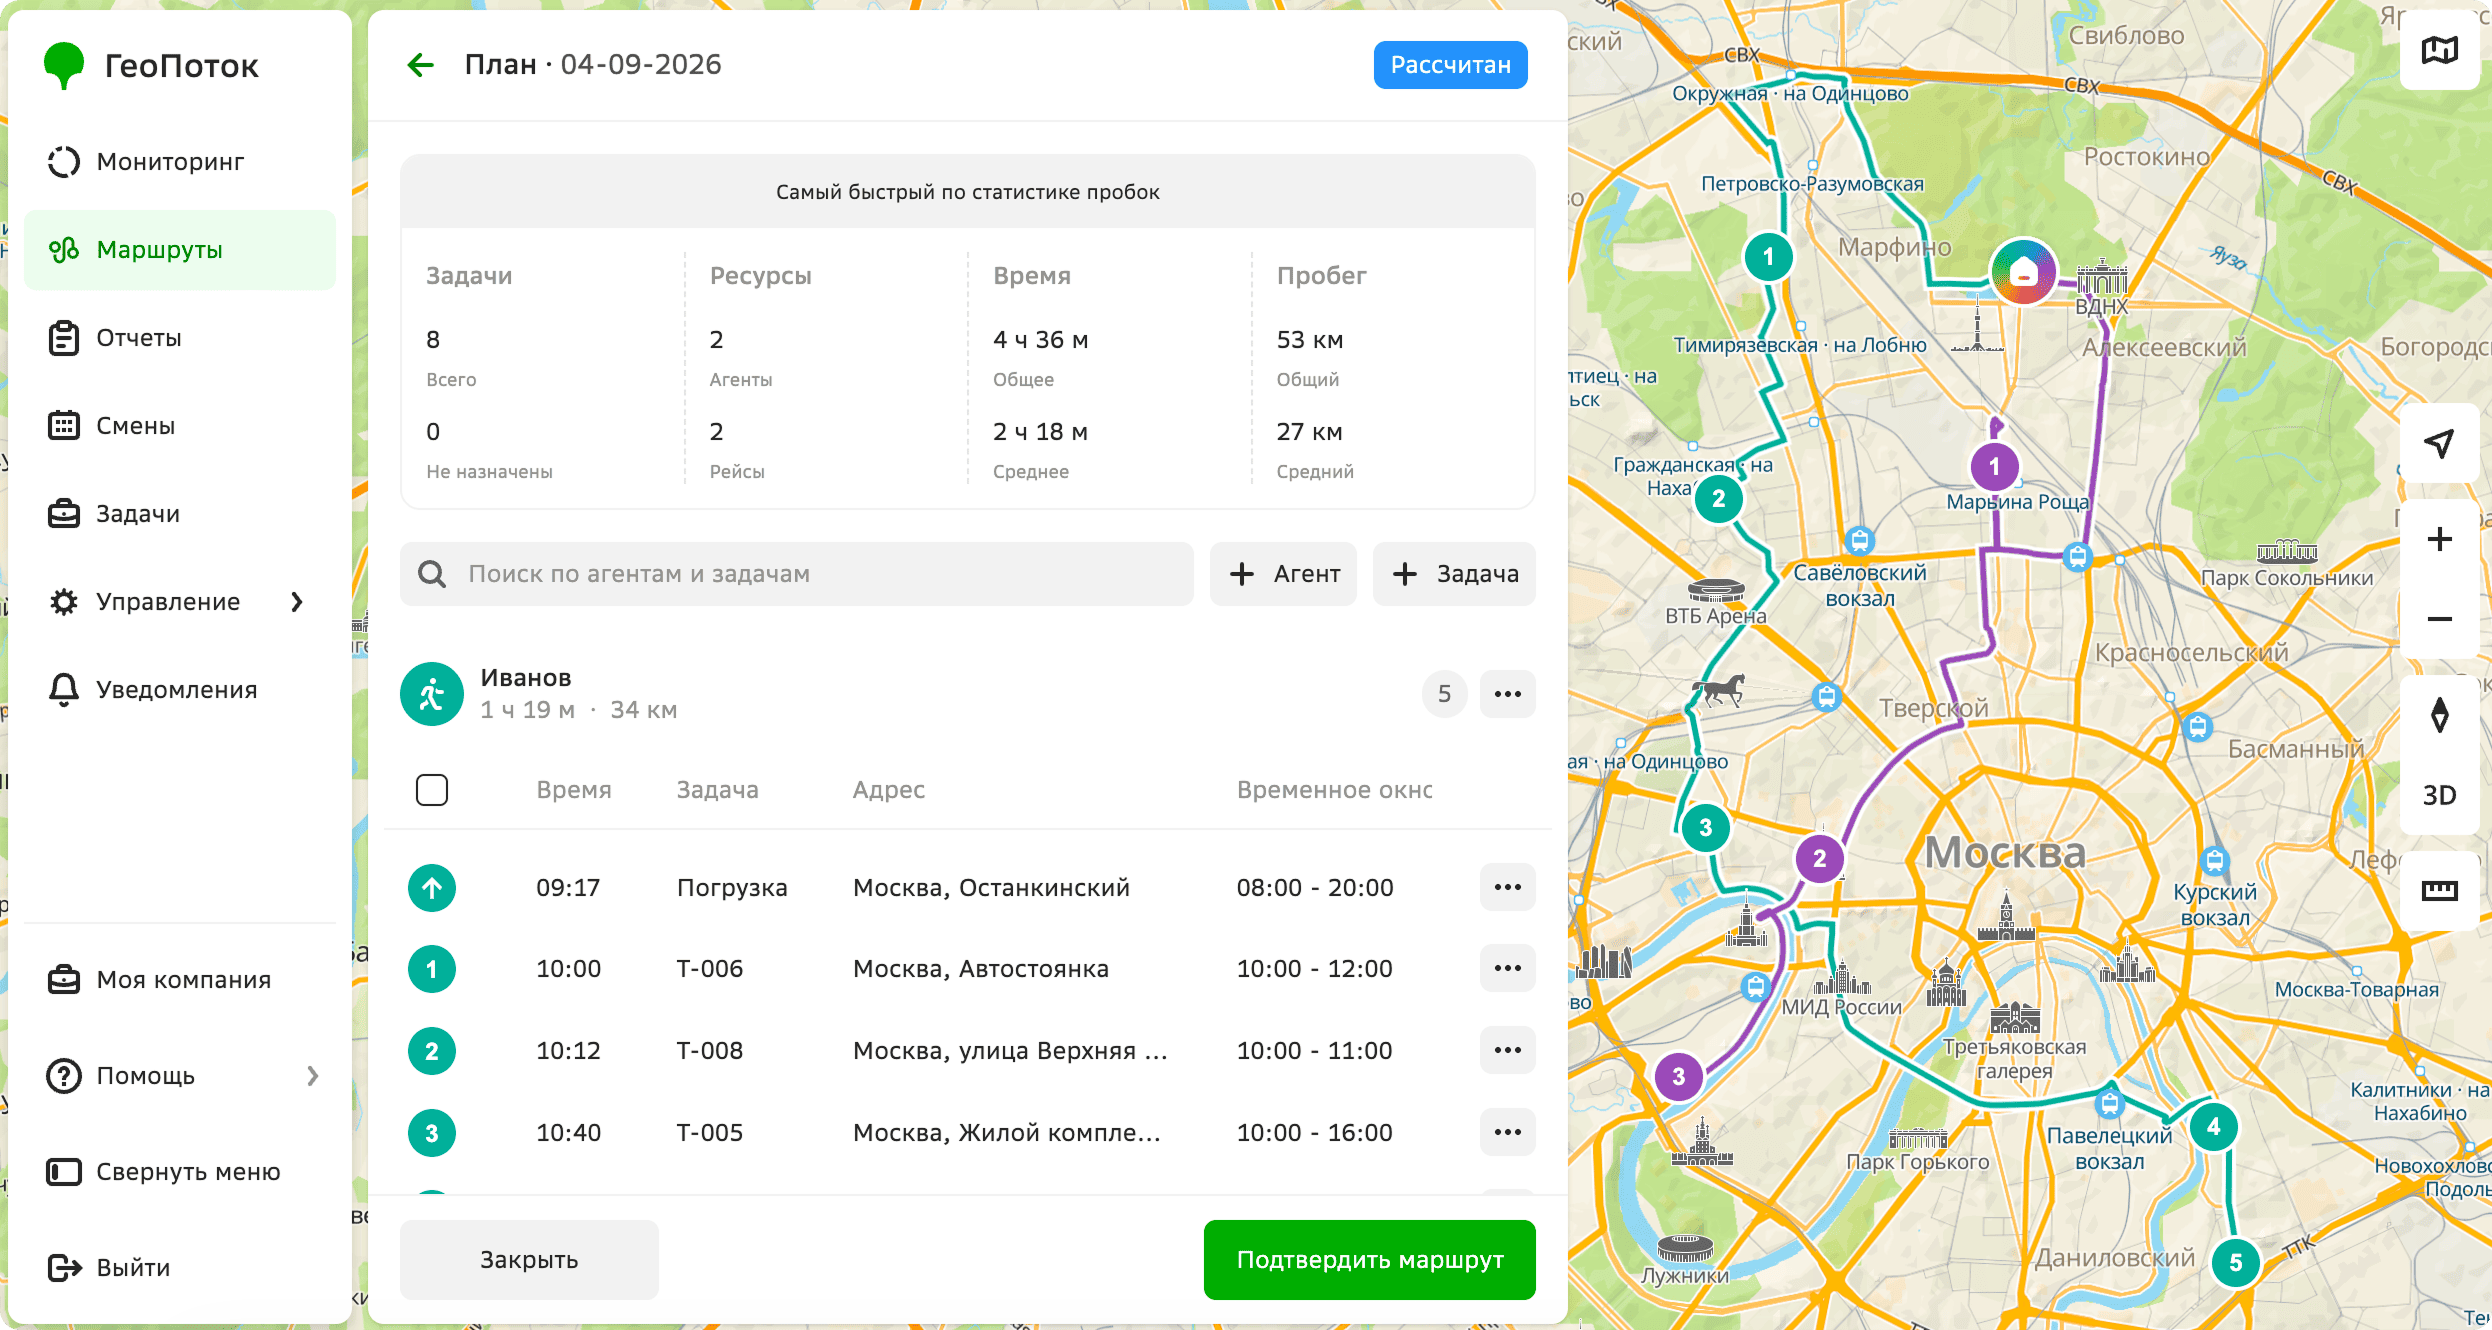
Plan page
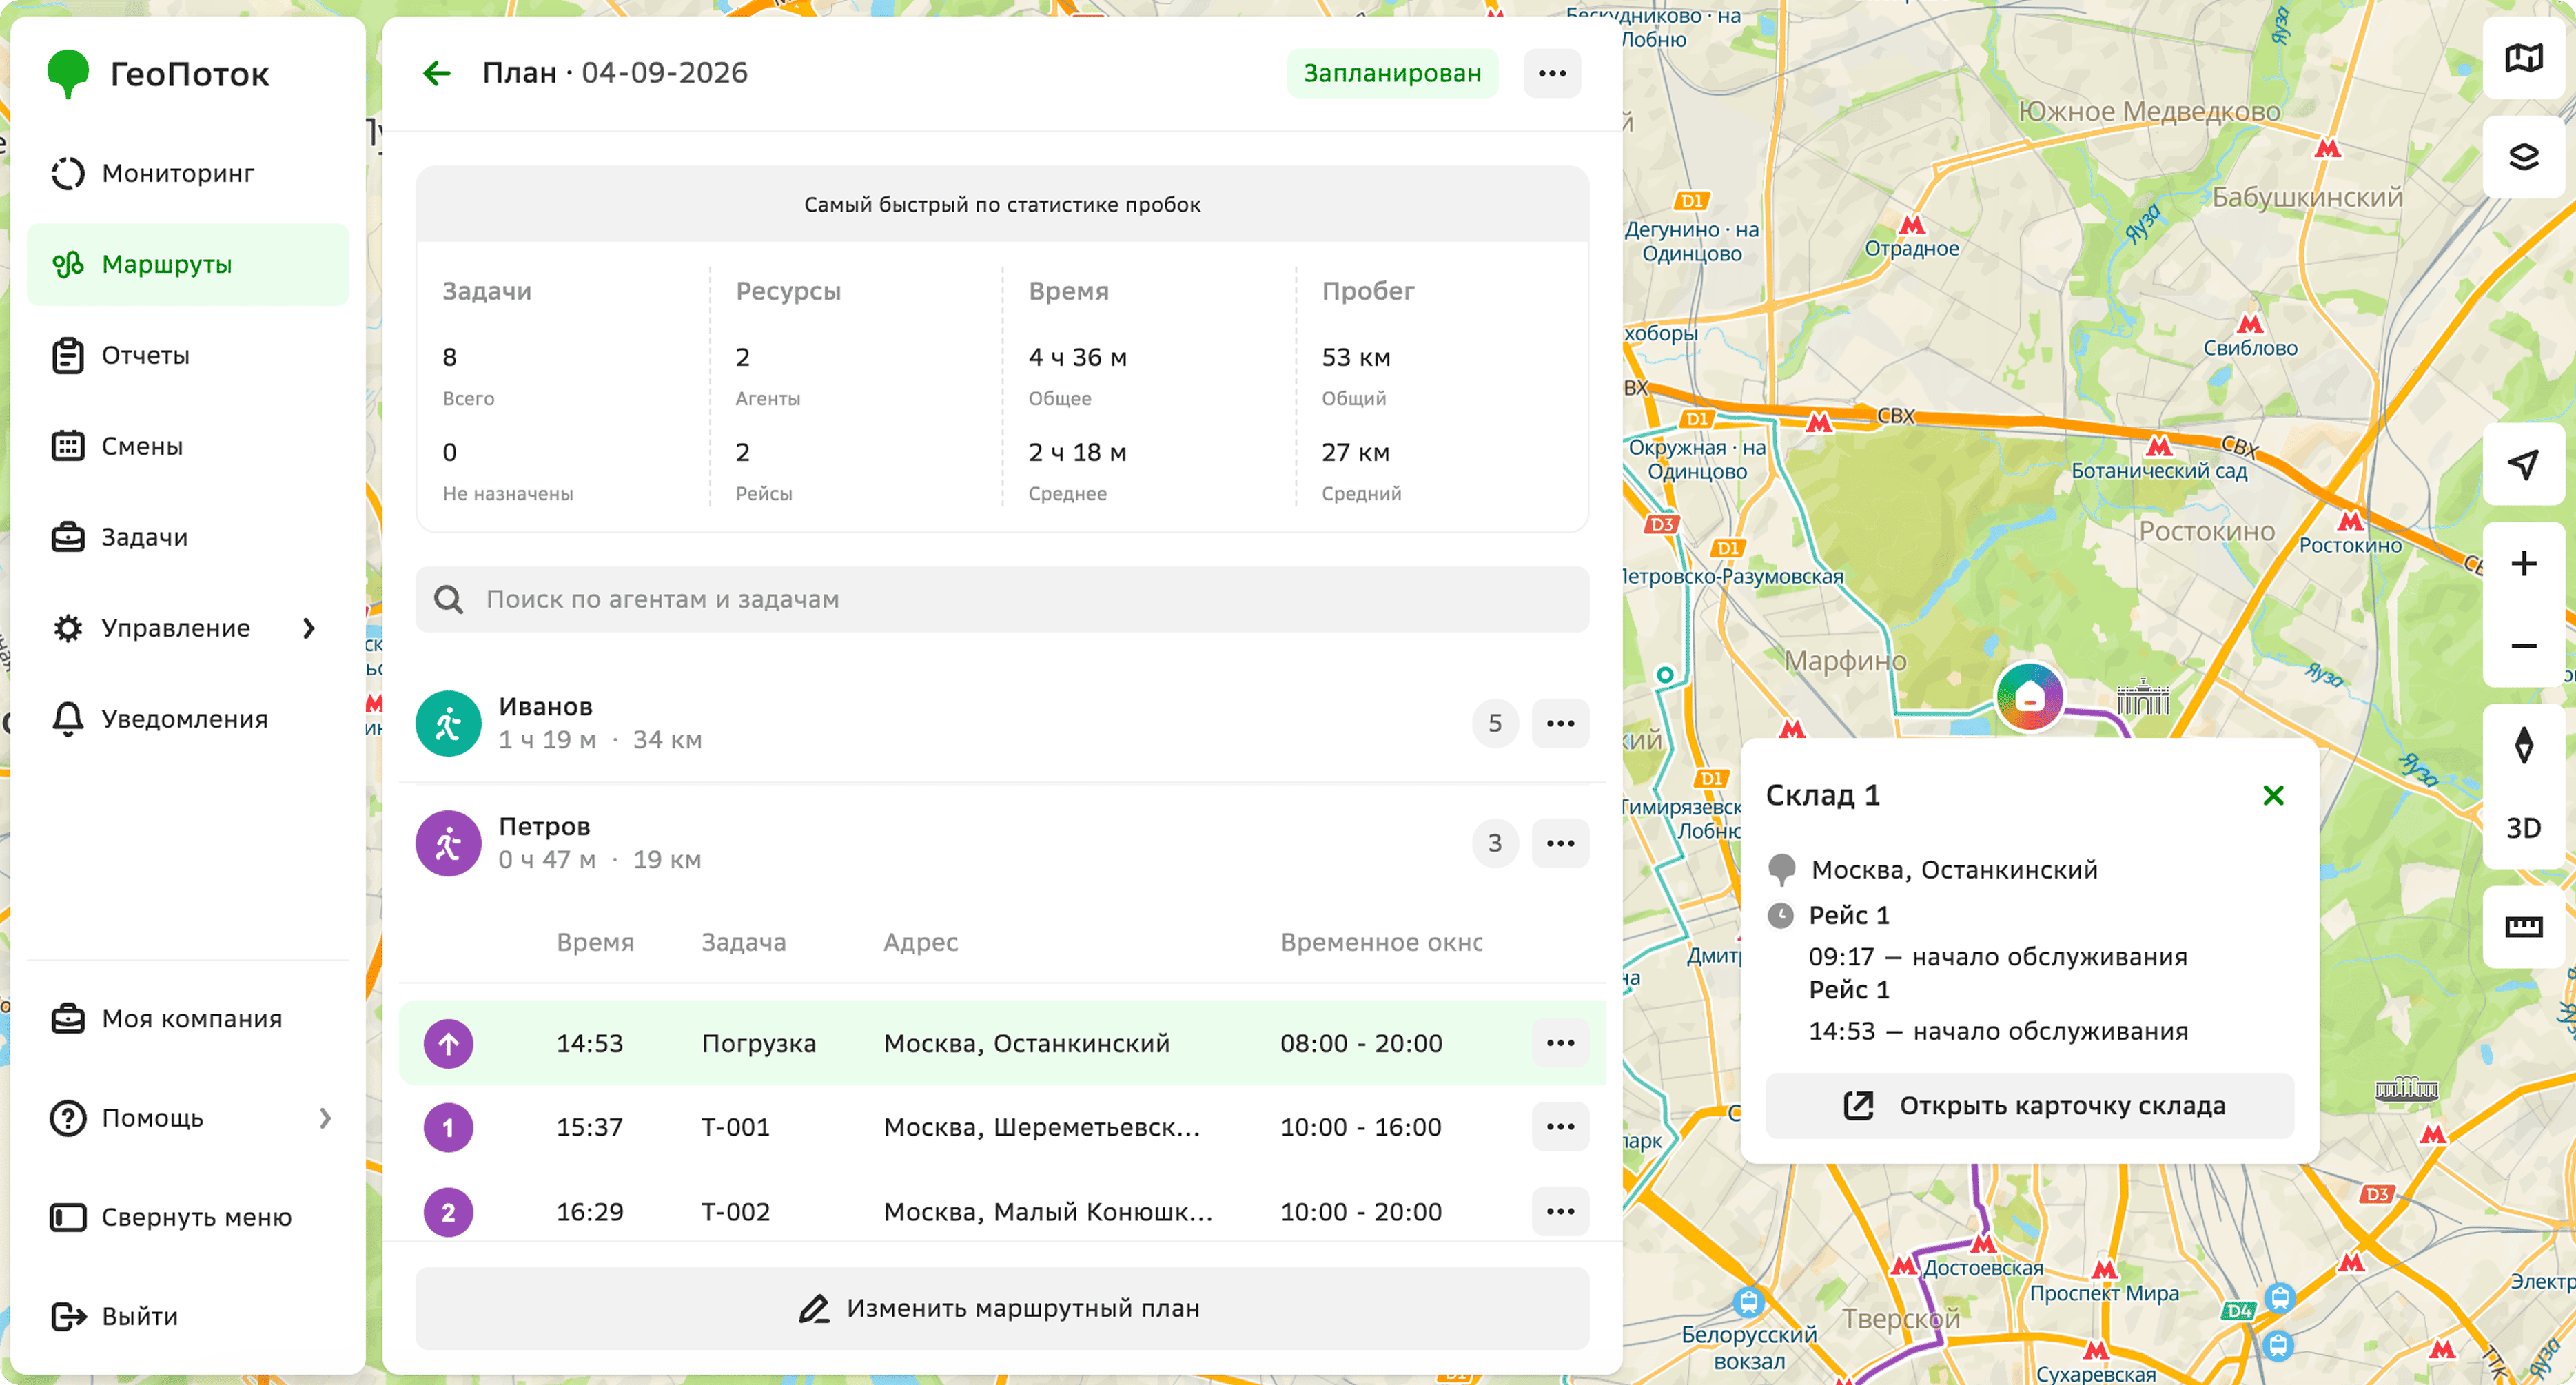
The plan page displays:
-
Plan name.
-
Date of plan execution.
-
Plan status:
- Draft: plan is created but not calculated.
- Calculating: plan is being calculated.
- Calculated: plan is calculated but not confirmed by the administrator. To display plan tasks and routes in the mobile application for agents, confirm the plan.
- Scheduled: plan is confirmed by the administrator, but agents have not started work yet.
- In progress: at least one plan task is being worked on by an agent (the agent has taken the task in the mobile application).
- Completed: all tasks in the plan are completed by agents.
- Not calculated: plan could not be calculated. To recalculate the plan, click Repeat or Edit parameters.
- Error: error occurred while calculating the plan.
For plans with the Calculated, Scheduled, In progress, and Completed statuses, the following information is displayed:
-
Route optimization method. Not displayed for plans with the
Completedstatus. -
Tasks:
- Total: total number of tasks in the plan.
- Not assigned: number of tasks that could not be assigned.
- Completed: number of tasks completed by agents within the plan. Displayed only for plans with the
ScheduledandIn progressstatuses.
-
Resources:
- Agents: number of agents assigned to the plan tasks.
- Trips: number of trips in the plan. A trip is a part of an agent's route from the depot to the ending point or to the next depot visit (whichever comes first).
Not displayed for plans with the
Completedstatus. -
Time:
- Total: estimated total time to complete the plan. For plans with the
Completedstatus, the difference between estimated and actual time is displayed. - Average: estimated average time to complete the plan for all agents. For plans with the
Completedstatus, the difference between estimated and actual time is displayed.
- Total: estimated total time to complete the plan. For plans with the
-
Mileage:
- Total: estimated total distance for all agents in the plan. For plans with the
Completedstatus, the difference between estimated and actual traveled distance is displayed. - Average: estimated average distance per agent in the plan. For plans with the
Completedstatus, the difference between estimated and actual traveled distance is displayed.
- Total: estimated total distance for all agents in the plan. For plans with the
-
Agents: list of agents assigned to the plan tasks. For each agent, the following information is displayed:
-
Estimated completion time of all plan tasks.
-
Estimated distance.
-
Load percentage. If an agent has two or more trips within a route plan, the load range is displayed: the minimum and the maximum load percentage in trips. For more information on calculating load, see the Creating an agent template section.
-
Task indicators (displayed for plans with the
In progressstatus):- Number of completed tasks out of the total number of agent tasks in the plan.
- Number of canceled tasks ( icon on a red background).
- Number of uncompleted tasks that the agent did not complete within the plan (— icon on a red background).
The icons are also displayed on the map.
-
Estimated time of arrival to the depot for each trip.
-
List of tasks the agent must complete within the trip. For each task, the following information is displayed:
- Estimated time of arrival at the point.
- Task name.
- Point address or depot name.
- Time window in which the task must be completed. If a hard window is selected, an exclamation point icon is displayed.
- Shipment details and skills, if specified in the task template.
-
On the map
For plans with the Calculated, Scheduled, In progress, and Completed statuses, the map displays:
- Depot icons with names and agent arrival times (service start times).
- Trip routes for each agent with the order in which they visit points, task names, and the estimated arrival time at each point. If an agent has multiple trips, they are displayed on the map in different colors.
Downloading a plan
You can download a plan in the XLSX or JSON formats.
- Go to the Routes tab.
- Open the plan page.
- Click icon and select Download as XLSX or Download as JSON.
Deleting a plan
You cannot restore a deleted plan.
You can delete a plan with any status except the In progress status.
- Go to the Routes tab.
- In the plan row, click icon and select Delete.
- Confirm the deletion.