Installing 2GIS Pro
During a real installation, it is recommended to use more complex and reliable passwords.
1. Prepare for installation
1.1. Prepare network infrastructure
The recommended infrastructure for running On-Premise services includes a public network and a private network. The table below describes an example of such an infrastructure with the example.com and example.local domains. All the components must be deployed in a single Kubernetes cluster managed from the example.com host.
| Infrastructure component | Who must have access | Network type | Domains used in the documentation |
|---|---|---|---|
| Artifacts delivery infrastructure | The infrastructure administrator | Public | example.com example-external.comexample-internal.com |
| Docker Registry for storing service images | DGCLI utility from the example.com host | Public | docker.registry.example.com |
| Installation Artifacts Storage | DGCLI utility from the example.com host | Public | artifacts.example.com |
| Services' frontends | Applications and end users in the private network | Private | *.example.com |
| Services' backends | Other services and storages from all pods in the Kubernetes cluster | Private | *.example.local |
| Data storages | Other services and storages from all pods in the Kubernetes cluster | Private | *.storage.example.local |
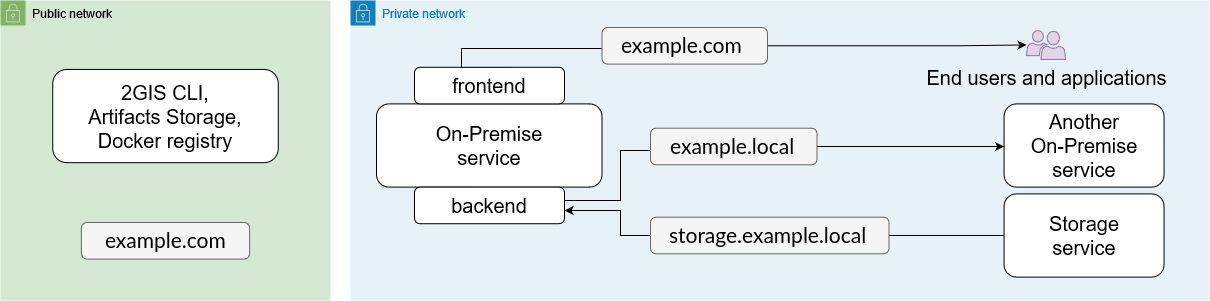
If you use Managed Kubernetes (Kubernetes as a Service) to deploy the product, make sure that access to the Docker registry is configured using the HTTPS protocol and a certificate signed by a trusted certification authority (for example, Let’s Encrypt).
1.2. Add Helm repository
A Helm chart from the On-Premise repository is used to install each product. You need to add this repository on the host from which the installation will be run. In the example described above, it is the example.com host.
-
Install the Helm package manager into the cluster. To do so, follow the official installation instructions.
-
Add the repository containing the Helm charts.
helm repo add 2gis-on-premise https://2gis.github.io/on-premise-helm-chartshelm repo update -
Check that Helm and the repository are installed correctly by running:
helm search repo 2gis-on-premiseIf the command output contains a non-empty list of charts, everything is set up correctly.
If you install services in a private network without internet access, make sure that you have access to the 2GIS Helm charts. For example, you can pre-download them.
1.3. Fetch installation artifacts
Configure hosts
Example of On-Premise hosts architecture:

docker.registry.example.com
This host will serve the Docker Registry. The host must be available in the public network, see the Prepare network infrastructure section.
To configure the host:
-
Install an operating system.
-
Install Docker Registry.
The registry must be available at
https://docker.registry.example.com/.The Kubernetes cluster must trust this registry and be able to download images from it. To do this, the registry must be configured with a valid HTTPS certificate.
-
Configure authentication in the registry by username and password.
Example:
- Username:
registry - Password:
DOCKERregistryP@ssW0rd
- Username:
artifacts.example.com
This host will serve the S3 compatible installation artifacts storage. The host must be available in the public network, see the Prepare network infrastructure section.
To configure the host:
-
Install an operating system.
-
Install an S3 compatible storage that fits your needs. It is recommended to use Ceph.
The storage must be available at
https://artifacts.example.com/. -
In the installed storage, create the
onpremise-artifactsbucket of the needed size. -
Set a service account with read and write permissions to the bucket.
Generate a key for this account, which will be used to access the bucket.
Example:
- Access key:
AKIAIOSFODNN7EXAMPLE - Secret key:
wJalrXUtnFEMIK7MDENGbPxRfiCYEXAMPLEKEY
- Access key:
example.com
This host will serve the DGCLI utility. The host must be available in the public network, see the Prepare network infrastructure section.
To configure the host:
-
Install an operating system.
-
Install Docker Engine.
-
Ensure that the previously configured services are available:
https://docker.registry.example.com/https://artifacts.example.com/
After that, you can download the installation artifacts using one host.
If a single host cannot provide simultaneous access to the public network, Docker registry, and S3 compatible storage, configure two hosts:
example-external.comwith access to the public network;example-internal.comwith access tohttps://docker.registry.example.com/andhttps://artifacts.example.com/.
After that, you can download the installation artifacts using two hosts.
Download installation artifacts
The process can be launched on one host that has both Docker registry, S3, and internet access, or on two separate hosts with different access settings. Perform the following steps depending on the selected host configuration.
For downloading installation artifacts, DGCLI utility is used. Before running the utility, ensure your user has permission to run Docker without using sudo. Otherwise, download errors will occur.
- Using one host
- Using two hosts with different access options
-
Log in to
example.comvia SSH. -
Create the
dgctl-config.yamlconfiguration file. In thecomponentssection, specify the versions of all components included in your build. For a detailed description of the available parameters, see the DGCLI configuration file description.dgctl-config.yamlkey: DEMO-KEY-DGCTL-AAAAAA-BBBBBBlog-format: jsonstorage:type: s3host: artifacts.example.combucket: onpremise-artifactsaccess-key: AKIAIOSFODNN7EXAMPLEsecret-key: wJalrXUtnFEMIK7MDENGbPxRfiCYEXAMPLEKEYdocker:registry:username: registrypassword: DOCKERregistryP@ssW0rdserver-address: https://docker.registry.example.comimage-prefix: /# For utility version 3components:core:version: <core-version>api-platform:version: <api-platform-version> -
Download installation artifacts to the file system using the DGCLI utility:
docker run --rm \-v $(pwd)/dgctl-config.yaml:/dgctl-config.yaml \-v /var/run/docker.sock:/var/run/docker.sock \-v $(pwd)/values:/values \--user $(id -u):$(id -g) \2gis/dgctl:3 \pull --config=/dgctl-config.yaml --apps-to-registry --generate-valuesFetching artifacts may take a long time. When the process is complete, the command output will include the path to the manifest files for all components. Example:
manifests/<component>/1640661259.json.If you use the
--generate-valuesflag, thegeneral.yamlfile with configuration parameters is generated and stored in the local directory specified in the-v <path>:/values/<component>/argument (-v $(pwd)/values:/valuesin the example). If the path is not specified, the file is deleted after running the utility.Features of DGCLI versionsIf you are using:
- DGCLI utility version 2, additionally specify the
--versionparameter with the required On-Premise software suite version - DGCLI utility version 3.6 or later, the
-v /var/run/docker.sock:/var/run/docker.sockargument is not required
For details, see the DGCLI command-line arguments reference.
- DGCLI utility version 2, additionally specify the
When using two hosts, you need to download installation artifacts from the update servers and transfer them to an S3 compatible storage. You can use the DGCLI utility (recommended) or another S3 client for this purpose.
-
Connect to the
example-external.comhost via SSH. -
Create a directory to fetch the installation artifacts. You can save its path in the
COPY_DIRenvironment variable. For example:COPY_DIR=/mnt/dgctl-source -
Create a
dgctl-config.yamlconfiguration file. In thecomponentssection, specify the versions of all components in your build. For a detailed description of the available parameters, see the DGCLI configuration file description.dgctl-config.yamlkey: DEMO-KEY-DGCTL-AAAAAA-BBBBBBlog-format: jsonstorage:type: fsdirectory: /data# For utility version 3components:core:version: <core-version>api-platform:version: <api-platform-version> -
Download installation artifacts to the file system using the DGCLI utility:
docker run --rm \-v $(pwd)/dgctl-config.yaml:/dgctl-config.yaml \-v $COPY_DIR:/data \-v $(pwd)/values:/values \--user $(id -u):$(id -g) \2gis/dgctl:3 \pull --config=/dgctl-config.yaml --generate-valuesFetching artifacts may take a long time. Once the process is complete, the command output will include the path to the manifest files for all components. Example:
manifests/<component>/1640661259.json.If you use the
--generate-valuesflag, thegeneral.yamlfiles with configuration parameters are generated for each component and stored in the local directory specified in the-v <path>:/values/<component>/argument (-v $(pwd)/values:/valuesin the example). If the path is not specified, the files are deleted after running the utility.Using DGCLI version 2If you are using DGCLI utility version 2, additionally specify the
--versionparameter with the required On-Premise software suite version. For details, see the DGCLI command-line arguments reference. -
Transfer the
COPY_DIRdirectory fromexample-external.comtoexample-internal.com. -
Connect to the
example-internal.comhost via SSH. -
Create a
dgctl-config.yamlconfiguration file. In thecomponentssection, specify the versions of all components in your build. For a detailed description of the available parameters, see the DGCLI configuration file description.dgctl-config.yamlkey: DEMO-KEY-DGCTL-AAAAAA-BBBBBBlog-format: jsonstorage:type: s3host: artifacts.example.combucket: onpremise-artifactsaccess-key: AKIAIOSFODNN7EXAMPLEsecret-key: wJalrXUtnFEMIK7MDENGbPxRfiCYEXAMPLEKEYdocker:registry:username: registry-userpassword: DOCKERregistryP@ssW0rdserver-address: https://docker.registry.example.comimage-prefix: /# For utility version 3components:core:version: <core-version>api-platform:version: <api-platform-version> -
Transfer the data from the
COPY_DIRdirectory to the Docker registry and storage using the DGCLI utility:docker run --rm \-v $(pwd)/dgctl-config.yaml:/dgctl-config.yaml \-v $COPY_DIR:/dgctl-source \-v /var/run/docker.sock:/var/run/docker.sock \--user $(id -u):$(id -g) \2gis/dgctl:3 \restore --config=/dgctl-config.yaml --from-dir=/dgctl-source --apps-to-registryUsing utility version 3.6 or laterIf you are using DGCLI utility version 3.6 or later, the
-v /var/run/docker.sock:/var/run/docker.sockargument is not required.
Create a Kubernetes secret for accessing Docker Registry
This secret is required so that Helm, which is used for installing On-Premise services, can access the Docker images located in the Registry. Without a secret, any operation involving the Registry will fail.
Example:
kubectl create secret docker-registry onpremise-registry-creds \
    --docker-server=docker.registry.example.com \
    --docker-username=registry \
    --docker-password=DOCKERregistryP@ssW0rd
2. Complete preliminary steps
-
Get familiar with:
-
Install the API Platform services:
-
After installation, get the license, check its status, and save the License service endpoint.
-
After installation, get:
-
service tokens for the Tiles API, Catalog APIs, Isochrone API, and 2GIS Pro
-
an API key with access to the MapGL JS API, Catalog APIs, Search API, and Isochrone API
Service What to obtain Where it is used Tiles API Service token Tiles API configuration. MapGL JS API API key ui.mapgl.keyparameter in Pro UI.Catalog APIs Service token and API key Catalog APIs configuration and catalog.keyparameter in Pro API.Isochrone API Service token and API key navi.keyparameter in Pro API.2GIS Pro Service token Pro API configuration.
-
-
Install the required components:
- Tiles API - during installation, set
types[0].kind: weband specify the Map Tiles API service token obtained in the previous step for access to vector data. - MapGL JS API - after installation, save the service endpoint and API key for configuring Pro UI.
- Tiles API - during installation, set
-
Install the required components:
- Search API - after installation, save the service endpoint for configuring Pro API.
- Catalog APIs - specify the service token obtained in the previous step. After installation, save the service endpoint and Catalog APIs key for configuring Pro API.
-
-
Make sure that the rules file
rules.yamlcontains a rule for the Isochrone API. In thequeriesparameter, specify the request typeget_hull, and inrouting- the transport types for which proximity zones need to be calculated. You can add these values to an appropriate existing rule or create a separate one:- name: isochronequeries: ["get_hull"]routing: ["driving", "pedestrian"] -
Install the required components:
- Navi-Castle
- Navi-Back
- Navi-Router - in the
keys.apis.isochrone-apiparameter, specify the Isochrone API service token - Navi-Front
-
After installation, save:
- Navi-Front service endpoint
- API key for the Isochrone API for configuring Pro API
-
-
-
Collect data specified or retrieved on previous steps:
Object Example value How to get value Endpoint of the Docker Registry for storing service images docker.registry.example.comSee Fetching installation artifacts Endpoint of the S3 compatible Installation Artifacts Storage artifacts.example.comSee Fetching installation artifacts Installation Artifacts Storage bucket name onpremise-artifactsSee Fetching installation artifacts Installation Artifacts Storage access key AKIAIOSFODNN7EXAMPLESee Fetching installation artifacts Installation Artifacts Storage secret key wJalrXUtnFEMIK7MDENGbPxRfiCYEXAMPLEKEYSee Fetching installation artifacts License service endpoint https://licenseSee Installing License service MapGL JS API endpoint http://mapgl-js-apiSee Installing maps API Catalog APIs endpoint http://catalog-apiSee Installing search API Search API endpoint http://search-apiSee Installing search API Navigation API endpoint http://navi-frontSee Installing navigation API API Keys MAPGL_KEY
CATALOG_KEY
NAVI_KEYSee Installing API Keys service -
Make sure that the resource requirements specified in the Helm charts are met:
For more information on how to do this, see the System requirements document.
Refer to a relevant chartContents of Helm charts described in this chapter are relevant for the latest 2GIS Pro version (see 2GIS Pro releases). To find parameters for previous versions, open the required values.yaml on GitHub and select a
Pro-<version>tag in the tag switcher on the left. -
Choose domain names for the 2GIS Pro services. For example:
- Domain name for the API backend:
pro-api.example.com - Domain name for Permissions UI:
pro-permissions-api.example.com - Domain name for the frontend:
pro-ui.example.com
- Domain name for the API backend:
3. Prepare infrastructure
If you use alternatives from the unified register of Russian programs instead of PostgreSQL and Apache Kafka, refer to their official documentation for configuration instructions.
Configure PostgreSQL
-
Place a PostgreSQL cluster with the domain name
pro-postgresql.storage.example.localin the private network. It is assumed that the cluster works on the standard port5432. -
Connect to the cluster as a superuser (usually
postgres). -
Create a database user that will be used for the service. Set a password for the user:
create user dbuser_pro password ''; -
Create databases owned by this user:
create database onpremise_pro owner dbuser_pro;create database onpremise_pro_tasks owner dbuser_pro;
Configure S3 storage
-
Place an S3 compatible storage with the domain name
pro-s3.storage.example.localin the private network. It is assumed that the storage works on the standard port80. -
Create keys to connect to the service. Save them.
Example:
- Access key:
AKIAIOSFODNN7EXAMPLE - Secret key:
wJalrXUtnFEMIK7MDENGbPxRfiCYEXAMPLEKEY
- Access key:
-
Choose bucket names that will be used for the service.
Example:
- Bucket with datasets, aggregations, and filters (
assetsDataBucket):assets - Bucket with datasets, aggregations, and filters created by a user (
userAssetsDataBucket):user_assets - Bucket with the prepared layer data (
layerDataBucket):layer_data - Bucket for storing snapshots (
snapshotBucket):snapshots - Bucket for storing static resources (
resourcesBucket):resources
- Bucket with datasets, aggregations, and filters (
Configure Elasticsearch
-
Place an Elasticsearch cluster with the domain name
pro-elastic.storage.example.localin the private network. It is assumed that the cluster works on the standard port9200. -
Create a user to connect to the service. Save their credentials.
Example:
- Username:
elasticsearch - Password:
elasticsearch_password
- Username:
Configure Apache Kafka
-
Place an Apache Kafka storage with the domain name
pro-kafka.storage.example.localin the private network. It is assumed that the storage works on the standard port9092. -
Create a user to connect to the service. Save their credentials.
Example:
- Username:
kafka - Password:
kafka_password
- Username:
-
(Recommended) Configure Apache Kafka topics as follows:
Topic name Transferred data Recommended settings kafka.importTasksTopic.nameImport tasks for user datasets - Maximum message size - 5 MB (
max.message.bytes: 5242880). - Log retention period - 3 days (
retention.ms: 259200000). See detailed recommendations on choosing the parameter value below. - Compression format - Gzip (
compression.type: gzip).
kafka.assetDataTopic.nameObjects of user datasets - Maximum message size - 5 MB (
max.message.bytes: 5242880). - Log retention period - 5 days (
retention.ms: 432000000). See detailed recommendations on choosing the parameter value below. - Compression format - Gzip (
compression.type: gzip).
kafka.permissionsTopic.nameMessages about access rights change - Maximum message size - 5 MB (
max.message.bytes: 5242880). - Log retention period - 1 day (
retention.ms: 86400000). See detailed recommendations on choosing the parameter value below. - Compression format - Gzip (
compression.type: gzip).
kafka.eventsTopic.nameVarious events - Maximum message size - 20 MB (
max.message.bytes: 20000000). - Log retention period - 1 day (
retention.ms: 86400000). See detailed recommendations on choosing the parameter value below. - Maximum storage size - 500 MB (
retention.bytes: 524288000). - Compression format - Gzip (
compression.type: gzip).
The
retention.msparameter defines the guaranteed message retention time in Apache Kafka and is used as a buffer in case of degradation or unavailability of consumers and corresponding services. The value of this parameter should be chosen based on the queue processing speed and the acceptable system recovery time. A larger value reduces the risk of data loss during incidents, but excessive increase does not provide additional reliability and increases disk space usage and cluster recovery time. For topics with data from the mobile application, especially frames and tracks, it is recommended to set an increased but reasonableretention.ms, corresponding to the expected system degradation scenarios.The specified values of the
retention.msparameter are recommended as they help to balance data storage reliability and operational costs. You can change the parameters if it is required by load, architectural features, or recovery time requirements.For a complete settings description, see the Apache Kafka documentation.
- Maximum message size - 5 MB (
4. Install 2GIS Pro
Install Pro API
-
Create a Helm configuration file. See here for more details on the available settings.
The example is prefilled with the necessary data collected on previous steps.
values-pro-api.yamldgctlDockerRegistry: docker.registry.example.comdgctlStorage:host: artifacts.example.comsecure: truebucket: onpremise-artifactsaccessKey: AKIAIOSFODNN7EXAMPLEsecretKey: wJalrXUtnFEMIK7MDENGbPxRfiCYEXAMPLEKEYmanifest: manifests/pro/1640661259.jsonregion: ''disablePayloadSigning: falseapi:ingress:enabled: trueclassName: nginxannotations:nginx.ingress.kubernetes.io/proxy-body-size: 100mnginx.ingress.kubernetes.io/proxy-connect-timeout: '120'nginx.ingress.kubernetes.io/proxy-read-timeout: '120'nginx.ingress.kubernetes.io/proxy-send-timeout: '120'nginx.ingress.kubernetes.io/enable-cors: 'true'nginx.ingress.kubernetes.io/cors-allow-credentials: 'true'nginx.ingress.kubernetes.io/cors-allow-origin: 'https://pro-ui.example.com'nginx.ingress.kubernetes.io/cors-allow-methods: 'GET, PUT, POST, DELETE, PATCH, OPTIONS'nginx.ingress.kubernetes.io/cors-allow-headers: 'DNT,Keep-Alive,User-Agent,X-Requested-With,If-Modified-Since,Cache-Control,Content-Type,Range,Authorization,x-share-token,x-auth-token,x-brand,pragma'nginx.ingress.kubernetes.io/proxy-buffer-size: 256knginx.ingress.kubernetes.io/proxy-buffering: 'on'nginx.ingress.kubernetes.io/proxy-buffers-number: '4'hosts:- host: pro-api.example.compaths:- path: /pathType: Prefixtls: []# - hosts:# - pro-api.example.com# secretName: secret.tlspod:imagePullSecrets: [onpremise-registry-creds]resources:requests:cpu: 400mmemory: 256Mlimits:cpu: 1memory: 1024Msettings:licenseKey: ''corsOrigins: ''auth:url: https://keycloak.example.comapiKey: ''type: openid10userInfoEndpoint: realms/Pro/protocol/openid-connect/userinfoautoRegisterUsers: truepermissions:ingress:className: nginxenabled: truehosts:- host: pro-permissions-api.example.compaths:- path: /pathType: Prefixtls:# - hosts:# - pro-permissions-api.example.com# secretName: secret.tlssettings:auth:enabled: trueapiKey: ''uiRequiredRoles:- permAdmin# For new users onlydefaultPermissions:openProUi: trueassets: ['*']territories: ['*']addUserAssets:allow: truequantity: 1000fileSize: 100isochrones: 1000authProvider:enabled: trueschema: Basichost: https://pro-permissions-api.example.comallowedHosts:- ['*']# If the authProvider.schema parameter has the Basic valuebasic:users:- username: 'admin'password: 'password'roles:- 'permAdmin'# If the authProvider.schema parameter has the Oidc valueoidc:authority: ''clientId: ''clientSecret: ''nameClaim: ''roleClaim: ''license:url: 'https://license.svc's3:assetsDataBucket: 'pro-assets'userAssetsDataBucket: 'pro-userassets'layerDataBucket: 'pro-layers'snapshotBucket: 'pro-snapshot'resourcesBucket: 'pro-resources'postgres:api:rw:host: 'pro-postgresql.storage.example.local'port: 5432name: 'onpremise_pro'username: 'dbuser_pro'password: ''ro: {}tasks:rw:host: 'pro-postgresql.storage.example.local'port: 5432name: 'onpremise_pro_tasks'username: 'dbuser_pro'password: ''ro: {}permissions:rw:host: 'pro-postgresql.storage.example.local'port: 5432name: 'onpremise_pro'username: 'dbuser_pro'password: ''ro: {}kafka:bootstrapServers: 'kafka:9092'securityProtocol: SaslPlaintextcreateTopics: truesasl:mechanism: Plainusername: kafka-userpassword: kafka-passwordassetTopicsReaderGroupId: pro.asset.grimportTasksTopic:name: pro.tasksreaderGroupId: pro.import.grassetDataTopic:name: pro.assetdatapermissionsTopic:name: pro.permissionsreaderGroupId: pro.permissions.greventsTopic:name: pro.eventsreaderGroupId: pro.events.grrefreshAssetsIntervalMinutes: 60elastic:username: ''password: ''secure: falsenodes:- port: 9200host: pro-elastic.storage.example.localredis:host: 'redis.svc'port: '6379'catalog:url: 'http://catalog-api.svc'key: ''navi:url: 'http://navi-front.svc'key: ''search:url: 'http://search-api.svc'assetImporter:appName: asset-importerrepository: 2gis-on-premise/pro-importerschedule: 0 18 * * *backoffLimit: 2successfulJobsHistoryLimit: 3failedJobsHistoryLimit: 3nodeSelector: {}settings:maxParallelJobs: 4startOnDeploy: trueWhere:
-
dgctlDockerRegistry: endpoint of your Docker Registry with the images of the 2GIS On-Premise services in theHOST:PORTformat. -
dgctlStorage: settings for access to the installation artifacts storage.host: endpoint of the S3 compatible storage in theHOST:PORTformat.secure: whether to use HTTPS for interacting with the S3 compatible storage. Default value:false.bucket: S3 bucket name.accessKey: access key for accessing the S3 bucket.secretKey: secret key for accessing the S3 bucket.manifest: path to the manifest file in themanifests/pro/1640661259.jsonformat. This file contains the description of pieces of data that the service requires to operate. See Installation artifacts lifecycle.region: S3 compatible storage region.disablePayloadSigning: whether to disable payload signing. If the S3 storage does not support the AWS Signature Version 4 streaming, the value must betrue. Default value:false.
-
api: environment variables.-
ingress: configuration of the Ingress resource. Adapt it to your Ingress installation. The URL specified in theingress.hosts.hostparameter should be accessible from the outside of your Kubernetes cluster, so that users in the private network can browse the URL.annotations: Kubernetes annotations intended for configuring nginx Ingress controller behavior.
If CORS is handled by the Ingress controller, configure it separately from
settings.corsOrigins. Setnginx.ingress.kubernetes.io/cors-allow-credentialstotrueand specify the request origin innginx.ingress.kubernetes.io/cors-allow-origin. -
pod.imagePullSecrets: Kubernetes Secrets to access the Docker Registry with the images of the 2GIS On-Premise services. -
pod.resources: computational resources settings for the service. To find out recommended resource values, see Computational resources. -
settings.licenseKey: 2GIS Pro license key. To get the key, contact your 2GIS manager or supplier. -
settings.corsOrigins: CORS policy. If the value is empty, any origin is allowed to perform requests to Pro API service. The*value is not supported. If CORS is configured in Ingress or proxy, configure the allowed origins there: see theapi.ingress.annotationssettings block. -
settings.auth: authentication service settings.url: authentication service URL.apiKey: API key for accessing the authentication service.type: authentication type. Possible values:openid10for OpenID 1.0/OAuth 2.0 protocol;urbifor internal Urbi protocol.userInfoEndpoint: path to the Userinfo endpoint.autoRegisterUsers: whether to register new users automatically on first login.
-
-
permissions: Permissions API settings.-
ingress: configuration of the Ingress resource for the Permissions API. Adapt the provided configuration to match the Ingress you use. The URL specified in thepermissions.ingress.hosts.hostparameter must be accessible from outside your Kubernetes cluster.enabled: whether to enable Ingress for the service.className: name of the Ingress controller class.hosts[0].host: domain name for Ingress.hosts[0].paths[0].path: path for Ingress.hosts[0].paths[0].pathType: path type for Ingress.tls: TLS configuration.
-
settings.auth.enabled: whether to enable authentication. The parameter value must be the same as that ofauthProvider.enabled: bothtrueorfalse. -
settings.auth.apiKey: access key for the Permissions API to perform authorized actions. Required if thepermissions.settings.auth.enabledparameter istrue. -
settings.auth.uiRequiredRoles: user roles required to access the Permissions UI. Values must match the roles defined in theauthProviderconfiguration. Required if thepermissions.settings.auth.enabledparameter istrue. -
settings.defaultPermissions: default access settings for new users.openProUi: permission to access Pro UI. Default value:true.assets: identifiers of system datasets to which access is granted. The['*']value grants access to all datasets.territories: list of territory identifiers to which access is granted. The['*']value grants access to all territories.addUserAssets: settings block that controls the ability for new users to add custom datasets.isochrones: maximum number of proximity zones a user can create.
-
-
authProvider: authentication provider settings for the Permissions UI.-
enabled: whether to use an authentication provider. The parameter value must be the same as that ofpermissions.settings.auth.enabled: bothtrueorfalse. -
host: host address of the authentication provider. Must point to the Permissions Ingress URL. Required if theauthProvider.enabledparameter istrue. -
schema: authentication schema. Supported values:Basic,Oidc. For details on configuring an OIDC provider, see Configuring an external provider for authentication. Required if theauthProvider.enabledparameter istrue. -
allowedHosts: list of allowed hosts. The['*']value allows access from all hosts. -
basic: basic authentication settings. Used ifauthProvider.schemais set toBasic.users[0].username: username.users[0].password: user password.users[0].roles: roles assigned to the user. You can set any roles. Thepermissions.settings.auth.uiRequiredRolesandtasks.settings.auth.adminRequiredRolesparameters must reference the roles defined here.
-
oidc: OIDC authentication settings. Used ifauthProvider.schemais set toOidc.authority: OIDC provider URL.clientId: client identifier registered with the OIDC provider.clientSecret: client secret of the OIDC provider.nameClaim: name of the claim containing the username. The exact name depends on the OIDC provider configuration.roleClaim: name of the claim containing user roles. The exact name depends on the OIDC provider configuration.
-
-
license.url: License service URL. -
s3: settings for access to the S3 compatible storage.assetsDataBucket: S3 bucket with system datasets, aggregations, and filters.userAssetsDataBucket: S3 bucket with user-created datasets, aggregations, and filters.layerDataBucket: S3 bucket with prepared layer data.snapshotBucket: S3 bucket for storing snapshots of incremental data updates.resourcesBucket: S3 bucket for storing static resources.
-
postgres: PostgreSQL settings.-
api: read-write (postgres.api.rw) or read-only (postgres.api.ro) access settings for theonpremise_prodatabase.host: host name or IP address.port: port number.name: database name.username: database username.password: database user password.
-
tasks: read-write (postgres.tasks.rw) or read-only (postgres.tasks.ro) access settings for theonpremise_pro_tasksdatabase used by the microservice for managing background tasks. The set of parameters is identical to thepostgres.apigroup but a separate database is used. -
permissions: read-write (postgres.permissions.rw) or read-only (postgres.permissions.ro) access settings for theonpremise_prodatabase used by the microservice for managing user access (Permissions API). The set of parameters is identical to thepostgres.apigroup and the same database is used.
-
-
kafka: Apache Kafka settings.-
bootstrapServers: Kafka endpoints. Example:HOST1:PORT1,HOST2:PORT2. -
securityProtocol: Kafka security protocol. Possible values:Plaintext,SaslPlaintext. -
createTopics: whether to enable automatic creation of topics. -
sasl: SASL settings.mechanism: SASL mechanism. Possible values:Plain,ScramSha256,ScramSha512.username: SASL username.password: SASL user password.
-
assetTopicsReaderGroupId: ID of the Kafka consumer group for reading streaming datasets data. -
importTasksTopic: settings for the Kafka topic for user dataset import tasks.name: topic name.readerGroupId: ID of the Kafka consumer group for reading import tasks.
-
assetDataTopic: settings for the Kafka topic for objects in user datasets.name: topic name.
-
permissionsTopic: settings for the Kafka topic for reading events related to access permission changes.name: topic name.readerGroupId: ID of the Kafka consumer group for reading access permissions data.
-
eventsTopic: settings for the Kafka topic for events.name: topic name.readerGroupId: ID of the Kafka consumer group for reading events.
-
refreshAssetsIntervalMinutes: refresh interval for streaming datasets in minutes.
-
-
elastic: Elasticsearch settings.username: Elasticsearch username.password: Elasticsearch password.secure: whether to use HTTPS for interacting with Elasticsearch. Default value:false.nodes[0].host: Elasticsearch host address.nodes[0].port: Elasticsearch port.
-
redis: Redis settings.host: Redis host address. Example:HTTP(S)://HOST.port: Redis port.
-
catalog: Catalog APIs settings.url: URL for Catalog APIs. Example:HTTP(S)://HOST.key: access key to Catalog APIs.
-
navi: Isochrone API settings.url: URL for Isochrone API. Example:HTTP(S)://HOST.key: access key to Isochrone API.
-
search: Search API settings.url: URL for Search API. Example:HTTP(S)://HOST.
-
assetImporter: import cron job settings.appName: Data Import job name.repository: Docker Repository Image.schedule: import job schedule in cron-format. Example:*/10 * * * *.backoffLimit: the number of retries before considering a Job as failed.successfulJobsHistoryLimit: how many completed jobs should be kept.failedJobsHistoryLimit: how many failed jobs should be kept.nodeSelector: Kubernetes node selectors.settings.maxParallelJobs: how many import jobs can be run simultaneously.startOnDeploy: indicates that asset import should start when service installed or updated.
-
-
Deploy the service with Helm using the created
values-pro-api.yamlconfiguration file:helm upgrade --install --version=VERSION --atomic --wait --timeout 3600s --values ./values-pro-api.yaml pro-api 2gis-on-premise/pro-apiIn the
--versionparameter, specify the required 2GIS Pro version. For a list of versions, see the 2GIS Pro releases section.warningVersions of services within a component must be the same and match the component version.
Install Pro UI
-
Create a Helm configuration file. See here for more details on the available settings.
The example is prefilled with the necessary data collected on previous steps.
values-pro-ui.yamldgctlDockerRegistry: docker.registry.example.comimagePullSecrets: [onpremise-registry-creds]dgctlStorage:host: artifacts.example.comsecure: truebucket: onpremise-artifactsaccessKey: AKIAIOSFODNN7EXAMPLEsecretKey: wJalrXUtnFEMIK7MDENGbPxRfiCYEXAMPLEKEYmanifest: manifests/pro/1640661259.jsonregion: ''disablePayloadSigning: falseui:auth:sso: truesecure: trueappTheme: 2gisappLocale: en_AEwhiteLabel:configUrl: "/static/theme/pro.json"appInitialMapCenter: '[55.26, 25.23]'publicS3Url: https://artifacts.example.com/styles:s3Bucket: 'pro-ui-styles'configUrl: 'https://artifacts.example.com/pro-ui-styles/config/production/styleConfig.json'api:url: 'https://pro-api.example.com/'mapgl:host: 'mapgl-js-api.example.com'key: ''styleUrl: 'https://artifacts.example.com/pro-ui-styles/styles/default/'stylePreview: ''resources:requests:cpu: 300mmemory: 256Milimits:cpu: 1memory: 384Miingress:enabled: trueclassName: nginxhosts:- host: pro-ui.example.compaths:- path: /pathType: Prefixtls: []# - hosts:# - pro-ui.example.com# secretName: secret.tlsstylesImporter:startOnDeploy: trueWhere:
-
dgctlDockerRegistry: endpoint of your Docker Registry with the images of the 2GIS On-Premise services in theHOST:PORTformat. -
imagePullSecrets: Kubernetes Secrets to access the Docker Registry with the images of the 2GIS On-Premise services. -
dgctlStorage: settings for access to the installation artifacts storage.host: endpoint of the S3 compatible installation artifacts storage in theHOST:PORTformat.secure: whether to use HTTPS for interacting with the S3 compatible storage. Default value:false.bucket: S3 bucket name.accessKey: access key for accessing the S3 bucket.secretKey: secret key for accessing the S3 bucket.manifest: path to the manifest file in themanifests/pro/1640661259.jsonformat. This file contains the description of pieces of data that the service requires to operate. See Installation artifacts lifecycle.region: S3 compatible storage region.disablePayloadSigning: whether to disable payload signing. If the S3 storage does not support the AWS Signature Version 4 streaming, the value must betrue. Default value:false.
-
ui: application settings.-
auth: authentication settings.sso: whether to enable authentication via Single Sign-On (SSO) technology. Default value:true.secure: whether to use HTTPS for interacting with the authentication service. Default value:true.
-
appTheme: branding inside the application. Possible values:. -
appLocale: default application language. -
whiteLabel.configUrl: URL of the configuration file for customizing user logo, favicon, and others. Example:/static/theme/pro.json. -
appInitialMapCenter: default map coordinates in the[lng, lat]format. Example:[55.26, 25.23]for Dubai. -
publicS3Url: URL of the public S3 compatible storage where the styles will be stored. -
styles: map styles settings.s3Bucket: S3 bucket name for styles. This bucket must be public and have the configured CORS.configUrl: URL of the configuration file for styles. Example:https://artifacts.example.com/pro-ui-styles/config/production/styleConfig.json.
-
api.url: base URL for the Pro API with a trailing slash. Example:HTTP(S)://HOST/. -
mapgl: settings for the MapGL JS API service.host: host for the MapGL JS API service without protocol and trailing slash.key: access key for the MapGL JS API service.styleUrl: path to the directory with thestyles.jsonconfiguration file for managing map styles. Example:https://artifacts.example.com/pro-ui-styles/styles/default/.stylePreview: URL for a thumbnail image that will be displayed as the default style preview in the map styles manager.
-
-
resources: computational resources settings for the service. To find out recommended resource values, see Computational resources. -
ingress: configuration of the Ingress resource. Adapt it to your Ingress installation. The URL specified in theingress.hosts.hostparameter should be accessible from the outside of your Kubernetes cluster, so that users in the private network can browse the URL. -
stylesImporter.startOnDeploy: whether to enable import of custom styles for Pro when installing or updating the service.
-
-
Deploy the service with Helm using the created
values-pro-ui.yamlconfiguration file:helm upgrade --install --version=VERSION --atomic --values ./values-pro-ui.yaml pro-ui 2gis-on-premise/pro-uiIn the
--versionparameter, specify the required 2GIS Pro version. For a list of versions, see the 2GIS Pro releases section.warningVersions of services within a component must be the same and match the component version.
5. Test deployment
Send the following request using cURL or similar tool:
curl -X GET \
  'https://PRO-API/items/1,14,164' \
  -H 'accept: application/json' \
  -H 'Authorization: Bearer TOKEN' # Or see settings.auth.apiKey
For authorization, use a Bearer token or see the defined value of the settings.auth.apiKey parameter in the Pro API configuration file.
The response should return a HTTP 200 status code and a list of elements in JSON format.
6. Set up user authentication
To work with 2GIS Pro, end users must pass the authentication. The On-Premise software suite does not provide an authentication service to be installed in a private environment. Therefore, you need to use your own OpenID Connect (OIDC) provider to authorize users via Single Sign-On (SSO) technology.
Only users registered in the external OIDC provider database can authenticate and be authorized in 2GIS Pro. User management is also handled on the provider side.
Configure your OIDC provider by meeting the following requirements:
-
Define the mandatory claims. The following user data must always be filled in the
user-inforesponse:sub- user identifier.email- user email.email_verified- flag indicating if the email is verified by the user.name- user full name.phone_number- user phone number.
-
Configure the scopes that can be used to request the defined claims. The standard set of scopes includes the following values:
openid- mandatory parameter indicating that OIDC is used for user authentication.email- user email.profile- link to the user profile.phone- user phone number.
-
Create a client in your OIDC provider:
-
Configure the client ID (
client_id) and secret (client_secret). -
Specify the Callback URL and the Logout URL for the service:
- Callback URL:
https://{application_host}/api/auth/code - Logout URL:
https://{application_host}/api/auth/after_sign_out_openid
- Callback URL:
-
Configure the client to work with previously defined scopes.
-
-
Configure role mapping for authorization.
Services that use an OIDC provider (
authProvider.schema: Oidc) check access rights based on roles passed in theid_token. If theid_tokendoes not contain a claim with roles, users will not be able to access such services, even after authentication.For authorization to work correctly, configure your OIDC provider:
- Assign the required roles to users.
- Configure role mapping to a separate token claim (for example,
roles). - Ensure the claim is placed at the top level of the JSON structure (not in a nested structure).
- Specify the claim value type as an array of strings.
- Ensure the claim is included in the
id_token.
id_tokenexample:{"sub": "123456","name": "John Doe","roles": ["admin", "editor"],"iss": "https://idp.example.com","aud": "client_id","exp": 1710000000}If your provider generates nested claims by default, configure transformation to a flat claim.
7. After installing
After installing 2GIS Pro in your environment and configuring all necessary access permissions, end users can begin working with the product. For detailed instructions, see the User guide.
Some built-in datasets may only be available in the cloud version of 2GIS Pro. For more information, see the Built-in data description.
What's next?
-
Find out how to update 2GIS Pro.
-
Install other On-Premise products:
-
Learn recommendations on maintaining the installation.