Map
Creating a map
To create a map, call the makeMapFactory() method and specify the required map settings as a MapOptions structure.
It is important to specify the correct PPI settings for the device. You can find them in the technical specification of the device. By default PPI settings are DevicePpi.autodetected.
You can also specify the initial camera position, zoom limits, and other settings.
// Map settings object.
var mapOptions = MapOptions.default

// PPI settings.
// By default, mapOptions.devicePPI == DevicePpi.autodetected.
mapOptions.devicePPI = devicePPI

// Create a map factory.
let mapFactory: DGis.IMapFactory = try sdk.makeMapFactory(options: mapOptions)
- For SDK version 13.0.0 or later
- For SDK version 12.x
To display the map, you can use UIKit or SwiftUI elements:
-
UIKit: get the map layer through the
mapUIViewproperty. The map controller is available through themapproperty (see class Map).// Map layer.
let mapView: UIView & IMapUIView = mapFactory.mapUIView
// Map controller.
let map = mapFactory.mapExample
UIViewControllerfor displaying a map:import Foundation
import DGis
import UIKit
class MapViewController: UIViewController {
private lazy var sdk = DGis.Container()
private var dataLoadingStateCancellable: ICancellable = NoopCancellable()
override func viewDidLoad() {
do {
var mapOptions = MapOptions.default
mapOptions.devicePPI = .autodetected
let mapFactory = try sdk.makeMapFactory(options: mapOptions)
let mapView: UIView & IMapUIView = mapFactory.mapUIView
mapView.frame = self.view.bounds
self.view.addSubview(mapView)
/// Starting position of the map can be calculated only after loading the map.
self.dataLoadingStateCancellable = mapFactory.map.dataLoadingStateChannel.sinkOnMainThread { loadingState in
if loadingState == .loaded {
print("Now map is loaded")
}
}
} catch let error as SDKError {
print(error.description)
} catch {
print("System error: \(error)")
}
}
}warningDGis.Containerobject must be instantiated as one instance only and stored at theUIViewControllerlevel. -
SwiftUI: get the map layer through the
mapViewproperty. The map controller is available through themapproperty (see class Map).// Map layer.
let mapView: MapView = mapFactory.mapView
// Map controller
let map = mapFactory.mapExample View for displaying a map:
import SwiftUI
import DGis

struct MapViewDemoView: View {
    private let mapFactory: IMapFactory

    init(
        mapFactory: IMapFactory
    ) {
        self.mapFactory = mapFactory
    }

    var body: some View {
        ZStack(alignment: .bottomTrailing) {
            self.mapFactory.mapView
                .showsAPIVersion(true)
                .edgesIgnoringSafeArea(.all)
        }
    }
}
To display the map, get the map layer through the mapView property. The map controller is available through the map property (see class Map).
// Map layer.
let mapView: UIView & IMapView = mapFactory.mapView

// Map controller.
let map = mapFactory.map
Example UIViewController for displaying a map:
import Foundation
import DGis
import UIKit

class MapViewController: UIViewController {
    private lazy var sdk = DGis.Container()
    private var dataLoadingStateCancellable: ICancellable = NoopCancellable()

    override func viewDidLoad() {
        do {
            var mapOptions = MapOptions.default
            mapOptions.devicePPI = .autodetected
            let mapFactory = try sdk.makeMapFactory(options: mapOptions)
            let mapView: UIView & IMapView = mapFactory.mapView
            mapView.frame = self.view.bounds
            self.view.addSubview(mapView)

            /// Starting position of the map can be calculated only after loading the map.
            self.dataLoadingStateCancellable = mapFactory.map.dataLoadingStateChannel.sink { loadingState in
                if loadingState == .loaded {
                    print("Now map is loaded")
                }
            }
        } catch let error as SDKError {
            print(error.description)
        } catch {
            print("System error: \(error)")
        }
    }
}
DGis.Container object must be instantiated as one instance only and stored at the UIViewController level.
Connecting a raster map
By default, the SDK uses a vector map with tiles provided by the Map Tiles API. If you want to use a raster map, you can connect it in two ways:
- Overlay raster tiles from an external source on top of the standard vector map: for example, to enrich the map with additional data.
- Connect the Raster Tiles API to use a 2GIS raster map instead of a vector one: for example, to display the map on a low-performance device.
To connect a raster map:
-
If you plan to use the 2GIS raster map, make sure the Raster Tiles API is activated for your key.
-
Create a style layer:
-
Open the Style editor.
-
Open the required style or create a new one.
-
In the Layers section, click
 icon.
icon. -
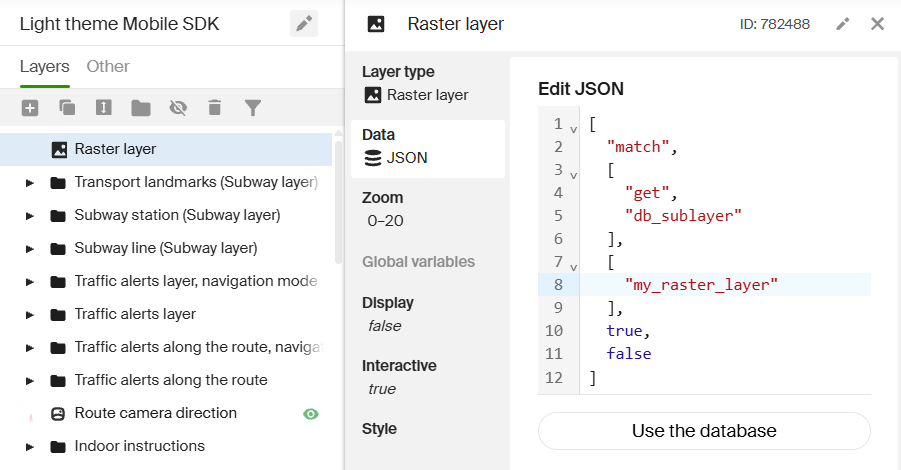
Scroll down, enable the Dynamic layers toggle, and select the Raster layer type.
-
On the Data tab, select JSON — add manually.
-
Add a
db_sublayerattribute with a unique layer identifier (e.g.,my_raster_layer) by inserting the following code into the text field:["match", ["get", "db_sublayer"], ["my_raster_layer"], true, false]This identifier will be used later to reference the style layer from code.
-
Configure other style parameters in the corresponding tabs.
-
-
Create a RasterUrlTemplate object and pass the raster tile source URL as a DefaultRasterUrlTemplate or WmsRasterUrlTemplate object (for the WMS standard). Example of connecting the Raster Tiles API:
 let sourceTemplate = RasterUrlTemplate(
    DefaultRasterUrlTemplate(
      url: "https://tile{n}.maps.2gis.com/v2/tiles/{tileset}/{z}/{x}/{y}.png?key={key}")
) -
Create a data source using RasterTileSource, specify the style layer identifier in the
sublayerNameparameter and the createdRasterUrlTemplateobject in thesourceTemplateparameter:let rasterSource = RasterTileSource(
context: context,
sublayerName: "my_raster_layer",
sourceTemplate: sourceTemplate
) -
Add the source to the map:
map.addSource(source: rasterSource)
Offline mode
To configure the offline mode of the map:
-
Complete preparation steps to enable the map to work with preloaded data.
-
Add a map data source. Use the createDgisSource() function and set one of the following values to the
workingModeparameter:OFFLINE- to always use preloaded data only.HYBRID_ONLINE_FIRST- to primarily use online data from 2GIS servers. Preloaded data is used only if it matches online data or data cannot be obtained from the servers.HYBRID_OFFLINE_FIRST- to primarily use preloaded data. Online data from 2GIS servers is used only if preloaded data is missing.
let sources = [DgisSource.createDgisSource(context: sdkContext, workingMode: .offline)] -
When creating a map, specify the created source in MapOptions:
var mapOptions = MapOptions.default
mapOptions.sources = sources
let mapFactory = try sdk.makeMapFactory(options: mapOptions)
let mapView = mapFactory.mapView
Frame rate
To achieve FPS higher than 60 when displaying the map on supported devices, add the key CADisableMinimumFrameDurationOnPhone with value true to the info.plist file in your application.
Adding objects
To add dynamic objects to the map (such as markers, lines, circles, and polygons), you must first create a MapObjectManager object, specifying the map instance.
// Deleting an object manager removes all associated objects from the map, so do not forget to save it to a property.
self.objectsManager = MapObjectManager(map: map)
After you have created an object manager, you can add objects to the map using the addObject() and addObjects() methods. For each dynamic object, you can specify a userData field to store arbitrary data. Object settings can be changed after their creation.
To remove objects from the map, use removeObject() and removeObjects(). To remove all objects, call the removeAll() method.
MapObjectManager is an object container. As long as objects must be presented on the map, MapObjectManager must be stored on the class level.
Marker
To add a marker to the map, create a Marker object, specifying the required options (MarkerOptions), and pass it to the addObject() method of the object manager.
You can create an icon for the marker by calling the make() method of the IImageFactory and using UIImage, PNG data, or SVG markup as input.
// UIImage
let uiImage = UIImage(systemName: "umbrella.fill")!.withTintColor(.systemRed)
let icon = sdk.imageFactory.make(image: uiImage)

// SVG markup.
let icon = sdk.imageFactory.make(svgData: imageData, size: imageSize)

// PNG data (faster than UIImage).
let icon = sdk.imageFactory.make(pngData: imageData, size: imageSize)

// Marker settings.
let options = MarkerOptions(
    position: GeoPointWithElevation(
        latitude: 55.752425,
        longitude: 37.613983
    ),
    icon: icon
)

// Create and add the marker to the map.
let marker = try Marker(options: options)
objectManager.addObject(object: marker)
To update settings of an already created marker, set new values to the Marker object parameters: see the full list of available parameters in the Marker description.
// Changing marker coordinates
marker.position = GeoPointWithElevation(latitude: 59.93428, longitude: 30.33510)

// Changing an icon
let uiImage = UIImage(systemName: "bubble.right.fill")!.withTintColor(.systemGreen)
let newIcon = sdk.imageFactory.make(image: uiImage)
marker.icon = newIcon

// Changing the icon anchor point
marker.anchor = Anchor(x: 0.5, y: 0.5)

// Changing the icon opacity
marker.iconOpacity = Opacity(value: 1.0)

// Changing the marker label
marker.text = "New text"

// Changing the label style
marker.textStyle = TextStyle(
    fontSize: LogicalPixel(value: 8),
    color: Color(argb: 4294967295),
    strokeWidth: LogicalPixel(value: 0.3499999940395355),
    strokeColor: Color(argb: 4294967295),
    textPlacement: TextPlacement.bottomCenter,
    textOffset: LogicalPixel(value: 0),
    fontName: nil
)

// Changing the marker draggability flag
marker.isDraggable = true

// Changing the target marker width
marker.iconWidth = LogicalPixel(value: 2.0)

// Changing the marker rotation angle relative to the north direction
marker.iconMapDirection = MapDirection(value: 10)

// Changing the flag of animating the marker appearance
marker.animatedAppearance = true
Line
To draw a line (polyline) on the map, create a Polyline object, specify line settings in PolylineOptions, and pass the object to the addObject() method of the object manager.
You can specify the coordinates of the line vertices and set the line width, color, and other parameters.
// Coordinates of the line vertices
let points = [
    GeoPoint(latitude: 55.7513, longitude: 37.6236),
    GeoPoint(latitude: 55.7405, longitude: 37.6235),
    GeoPoint(latitude: 55.7439, longitude: 37.6506)
]

// Line settings
let options = PolylineOptions(
    points: points,
    width: LogicalPixel(value: 2),
    color: DGis.Color.black
)

// Creating a line and adding the line to the map
let polyline = try Polyline(options: options)
objectManager.addObject(object: polyline)
To change settings of a created line, set new values for the Polyline object parameters: see the full list of available parameters in the Polyline description.
// Changing the coordinates of the line vertices
polyline.points = [
    GeoPoint(latitude: 54.7513, longitude: 36.6236),
    GeoPoint(latitude: 54.7405, longitude: 36.6235),
    GeoPoint(latitude: 54.7439, longitude: 36.6506)
]

// Changing the line width
polyline.width = LogicalPixel(value: 3)

// Changing the line color
polyline.color = Color(argb: 4294967295)

// Erasing part of the line
polyline.erasedPart = 0.8

// Changing dashed line parameters
polyline.dashedPolylineOptions = DashedPolylineOptions(
    dashLength: LogicalPixel(value: 5),
    dashSpaceLength: LogicalPixel(value: 2)
)
The line color will smoothly transition from one to another. To create a gradient line, specify the gradient options in the GradientPolylineOptions property of the Polyline object.
For example, a line of three points forms two segments. To color the first segment red and the second green, create a palette of three colors (red, yellow, and green) and specify the color indices for each line segment (0 for red, 2 for green). The number of indices must equal the number of segments (the number of points minus 1). The transition between segments will be a smooth gradient through yellow, since it lies between red and green in the palette.
The transition length between colors is set using the gradientLength parameter: the higher the value, the smoother the transition between colors.
// Color palette for the gradient
let colors: [DGis.Color] = [
    Color(argb: 0xFFFF0000),   // Red (index 0)
    Color(argb: 0xFFFFFF00),   // Yellow (index 1)
    Color(argb: 0xFF00FF00)    // Green (index 2)
]

// Color indices for each line segment
let colorIndices = Data([0, 2])

// Changing gradient line parameters
polyline.gradientPolylineOptions = GradientPolylineOptions(
    borderWidth: LogicalPixel(value: 10),       // Width of the line border
    secondBorderWidth: LogicalPixel(value: 5),  // Width of the second line border
    gradientLength: LogicalPixel(value: 10),    // Length of the gradient transition between colors
    borderColor: Color(argb: 0xFFFF0000),       // Color of the line border
    secondBorderColor: Color(argb: 0xFF00FF00), // Color of the second line border
    colors: colors,                             // Line color palette
    colorIndices: colorIndices                  // Line color indices
)
Polygon
To draw a polygon on the map, create a Polygon object, specifying the required options in PolygonOptions, and pass it to the addObject() method of the object manager.
Coordinates for the polygon are specified as a two-dimensional array. The first subarray must contain the coordinates of the vertices of the polygon itself. The other subarrays are optional and can be specified to create a cutout (a hole) inside the polygon (one subarray - one polygonal cutout).
// Polygon settings.
let options = PolygonOptions(
    contours: [
        // Vertices of the polygon.
        [
            GeoPoint(latitude: 55.72014932919687, longitude: 37.562599182128906),
            GeoPoint(latitude: 55.72014932919687, longitude: 37.67555236816406),
            GeoPoint(latitude: 55.78004852149085, longitude: 37.67555236816406),
            GeoPoint(latitude: 55.78004852149085, longitude: 37.562599182128906),
            GeoPoint(latitude: 55.72014932919687, longitude: 37.562599182128906)
        ],
        // Cutout inside the polygon.
        [
            GeoPoint(latitude: 55.754167897761, longitude: 37.62422561645508),
            GeoPoint(latitude: 55.74450654680055, longitude: 37.61238098144531),
            GeoPoint(latitude: 55.74460317215391, longitude: 37.63435363769531),
            GeoPoint(latitude: 55.754167897761, longitude: 37.62422561645508)
        ]
    ],
    color: DGis.Color.black,
    strokeWidth: LogicalPixel(value: 2)
)

// Create and add the polygon to the map.
let polygon = try Polygon(options: options)
objectManager.addObject(object: polygon)
To update settings of an already created polygon, set new values to the Polygon object parameters: see the full list of available parameters in the Polygon description.
// Changing the coordinates of the polygon vertices
polygon.contours = [
    GeoPoint(latitude: 55.72014932919687, longitude: 37.562599182128906),
    GeoPoint(latitude: 55.72014932919687, longitude: 37.67555236816406),
    GeoPoint(latitude: 55.72014932919687, longitude: 37.562599182128906)
]

// Changing the polygon fill color
polygon.color = Color(argb: 4294967295)

// Changing the polygon stroke width
polygon.strokeWidth = LogicalPixel(value: 2)

// Changing the polygon stroke color
polygon.strokeColor = Color(argb: 4294967295)
Circle
To draw a circle on the map, create a Circle object, specifying the required options in CircleOptions, and pass it to the addObject() method of the object manager.
// Configuring circle parameters
let options = CircleOptions(
    position: GeoPoint(latitude: 55.72014932919687, longitude: 37.562599182128906),
    radius: Meter(value: 10)
)

// Creating and adding a circle to the map
let circle = try Circle(options: options)
objectManager.addObject(object: circle)
To update settings of an already created polygon, set new values to the Circle object parameters: see the full list of available parameters in the Circle description.
// Changing the coordinated of a circle center
circle.position = GeoPoint(latitude: 55.74460317215391, longitude: 37.63435363769531)

// Changing the circle radius
circle.radius = Meter(value: 1)

// Changing the circle fill color
circle.color = Color(argb: 4294967295)

// Changing the circle stroke width
circle.strokeWidth = LogicalPixel(value: 2)

// Changing the circle stroke color
circle.strokeColor = Color(argb: 4294967295)
3D models
Requirements and recommendations
For optimal map performance and correct display of 3D models on the map, follow the requirements and recommendations.
Mandatory requirements:
-
Format: glTF/GLB (
.gltf,.glbfiles). -
Mesh: it is preferred that the model contains one mesh (a geometric object on the scene). Using models with multiple meshes reduces map performance.
-
Texture:
- A mesh can have a texture or a fill with one color.
- The texture resolution must be a power of two (2, 4, 8, 16, 32, 64, 128, and 256). High resolution textures reduce map performance.
- The supported image formats for textures are
.png,.jpg, and.bmp. - Texture compression is not supported.
-
Instantiation: extensions for instantiation are not supported.
Usage and performance recommendations:
- Size: the optimal size for unique models is less than 10,000 vertices; for typical models (e.g., trees), it is from 200 to 2000 vertices.
- Texture: the optimal texture size for unique models is 256×256; for typical models, it is 64×64.
- Colors: if you do not customize your own map styles and only load models, it is recommended to match the texture colors of the models with the colors of the 2GIS map.
- Compression: the Draco algorithm is recommended for model compression.
- Matrix animations: supported, but using them reduces map performance.
- PBR lighting model: supported, but using them reduces map performance.
- Local transformations: local transformations (translations, rotations, and scaling) are supported but reduce map performance.
Adding models
To add a 3D model to the map:
-
Using IModelFactory, transform your model to a ModelData object to be used in SDK:
let modelFactory = try DGis.Container.modelFactory
let modelData = try modelFactory.make(modelData: userModelData) -
Create a ModelSize object and specify the model size in one of the following ways:
-
To set a constant model size that will not change when the map scale changes, use the
logicalPixel()method and specify the size in logical pixels:let size = ModelSize.logicalPixel(LogicalPixel(0.5)) -
To set a size that will depend on the map scale (when zooming out, the model will become smaller, and vice versa), use the
scale()method and specify the scaling factor as a ModelScale object:let size = ModelSize.scale(ModelScale(value: 0.5))
-
-
Create a ModelMapObject specifying the required options in ModelMapObjectOptions and pass it to the
addObject()method of the object manager:// Configuring 3D model parameters
let model = try ModelMapObject(
options: ModelMapObjectOptions(
position: GeoPointWithElevation(
latitude: 55.752425,
longitude: 37.613983
),
data: modelData,
size: size,
mapDirection: MapDirection(value: 0.5),
opacity: Opacity(value: 1.0),
visible: true
)
)
// Creating and adding a 3D model to the map
mapObjectManager.addObject(item: model)
To change the settings of an already added model, set new values for the parameters of the ModelMapObject: see the full list of available parameters in the description of ModelMapObject.
// Changing coordinates of the 3D model center
model.position = GeoPointWithElevation(latitude: 55.74460317215391, longitude: 37.63435363769531)

// Changing the opacity of the 3D model
model.opacity = Opacity(value: 0.5)

// Changing the constant size of the 3D model
model.size = ModelSize.logicalPixel(LogicalPixel(5))

// Changing the scaling factor of the 3D model
model.size = ModelSize.scale(ModelScale(value: 3))

// Changing the rotation angle of the 3D model
model.mapDirection = MapDirection(value: 35)
Adding multiple objects
Do not add a collection of objects to the map using the addObject method in a loop for the whole collection: this might lead to performance losses. To add a collection of objects, prepare the whole collection and add it using the addObjects method:
// preparing the object collection
let options = [MarkerOptions(<params>), MarkerOptions(<params>)]
var markers: [SimpleMapObject] = []
options.forEach{ option in
    markers.append(Marker(options: option))
}

// adding the collection to the map
mapObjectManager.addObjects(objects: markers)
Clustering
Clustering is the visual grouping of closely located objects (markers) into a single cluster as you zoom out the map. The grouping occurs gradually: the lower the zoom level, the fewer clusters are formed. A cluster is displayed as a marker with a number indicating the count of objects in the cluster.
To add markers to the map in the clustering mode, create an object manager (MapObjectManager) using the MapObjectManager.withClustering() method and specify the following properties:
- The map instance (
map). - The minimum distance between markers in logical pixels at zoom levels at which clustering is active (
logicalPixel). - The zoom level at which and above only individual markers are visible, without clusters (
maxZoom). - The zoom level at which and below no new clusters are formed (
minZoom). - A custom implementation of the SimpleClusterRenderer protocol, which is used to customize clusters in MapObjectManager.
final class SimpleClusterRendererImpl: SimpleClusterRenderer {
    private let image: DGis.Image
    private var idx = 0

    init(
        image: DGis.Image
    ) {
        self.image = image
    }

    func renderCluster(cluster: SimpleClusterObject) -> SimpleClusterOptions {
        let textStyle = TextStyle(
            fontSize: LogicalPixel(15.0),
            textPlacement: TextPlacement.rightTop
        )
        let objectCount = cluster.objectCount
        let iconMapDirection = objectCount < 5 ? MapDirection(value: 45.0) : nil
        idx += 1
        return SimpleClusterOptions(
            icon: self.image,
            iconMapDirection: iconMapDirection,
            text: String(objectCount),
            textStyle: textStyle,
            iconWidth: LogicalPixel(30.0),
            userData: idx,
            zIndex: ZIndex(value: 6),
            animatedAppearance: false
        )
    }
}

self.objectManager = MapObjectManager.withClustering(
    map: map,
    logicalPixel: LogicalPixel(80.0),
    maxZoom: Zoom(19.0),
    minZoom: Zoom(8.0),
    clusterRenderer: SimpleClusterRendererImpl(image: self.icon)
)
Once an object manager with clustering is created, you can add markers as usual using addObject() or addObjects().
Generalization
Generalization is the visual grouping of closely located objects (markers) such that, as you zoom out the map, a single "key" object is displayed instead of several markers. The grouping occurs gradually: the lower the zoom level, the fewer groups are formed.
To add markers to the map in the generalization mode, create an object manager (MapObjectManager) using the MapObjectManager.withGeneralization() method and specify the following properties:
- The map instance (
map). - The minimum distance between markers in logical pixels at zoom levels at which generalization is active (
logicalPixel). - The zoom level at which and above only individual markers are visible, without groups (
maxZoom). - The zoom level at which and below no new groups are formed (
minZoom).
self.objectManager = MapObjectManager.withGeneralization(
    map: map,
    logicalPixel: LogicalPixel(80.0),
    maxZoom: Zoom(19.0),
    minZoom: Zoom(8.0)
)
Once an object manager with generalization is created, you can add markers as usual using addObject() or addObjects().
Custom geolocation marker
You can replace the default geolocation marker on the map with a custom 3D model. See the requirements for uploaded models in the 3D models section.
Set a custom geolocation marker in one of the following ways:
- Via API
- In the Style editor
-
Convert the prepared 3D model into a ModelData object using IModelFactory:
let modelFactory = try DGis.Container.modelFactory
let modelData = try modelFactory.make(modelData: userModelData) -
Add a geolocation data source to the map using the MyLocationMapObjectSource object and set the marker type to
modelin themarkerTypeparameter:let locationSource = MyLocationMapObjectSource(
context: sdk.context,
controllerSettings: MyLocationControllerSettings(),
markerType: .model
)
map.addSource(source: locationSource) -
Set the 3D model using the setModelData() method:
locationSource.setModelData(data: modelData)
-
Open the Style editor.
-
Open the required style or create a new one.
-
Upload the prepared 3D model:
-
In the top menu, open the Models tab and select Upload models.
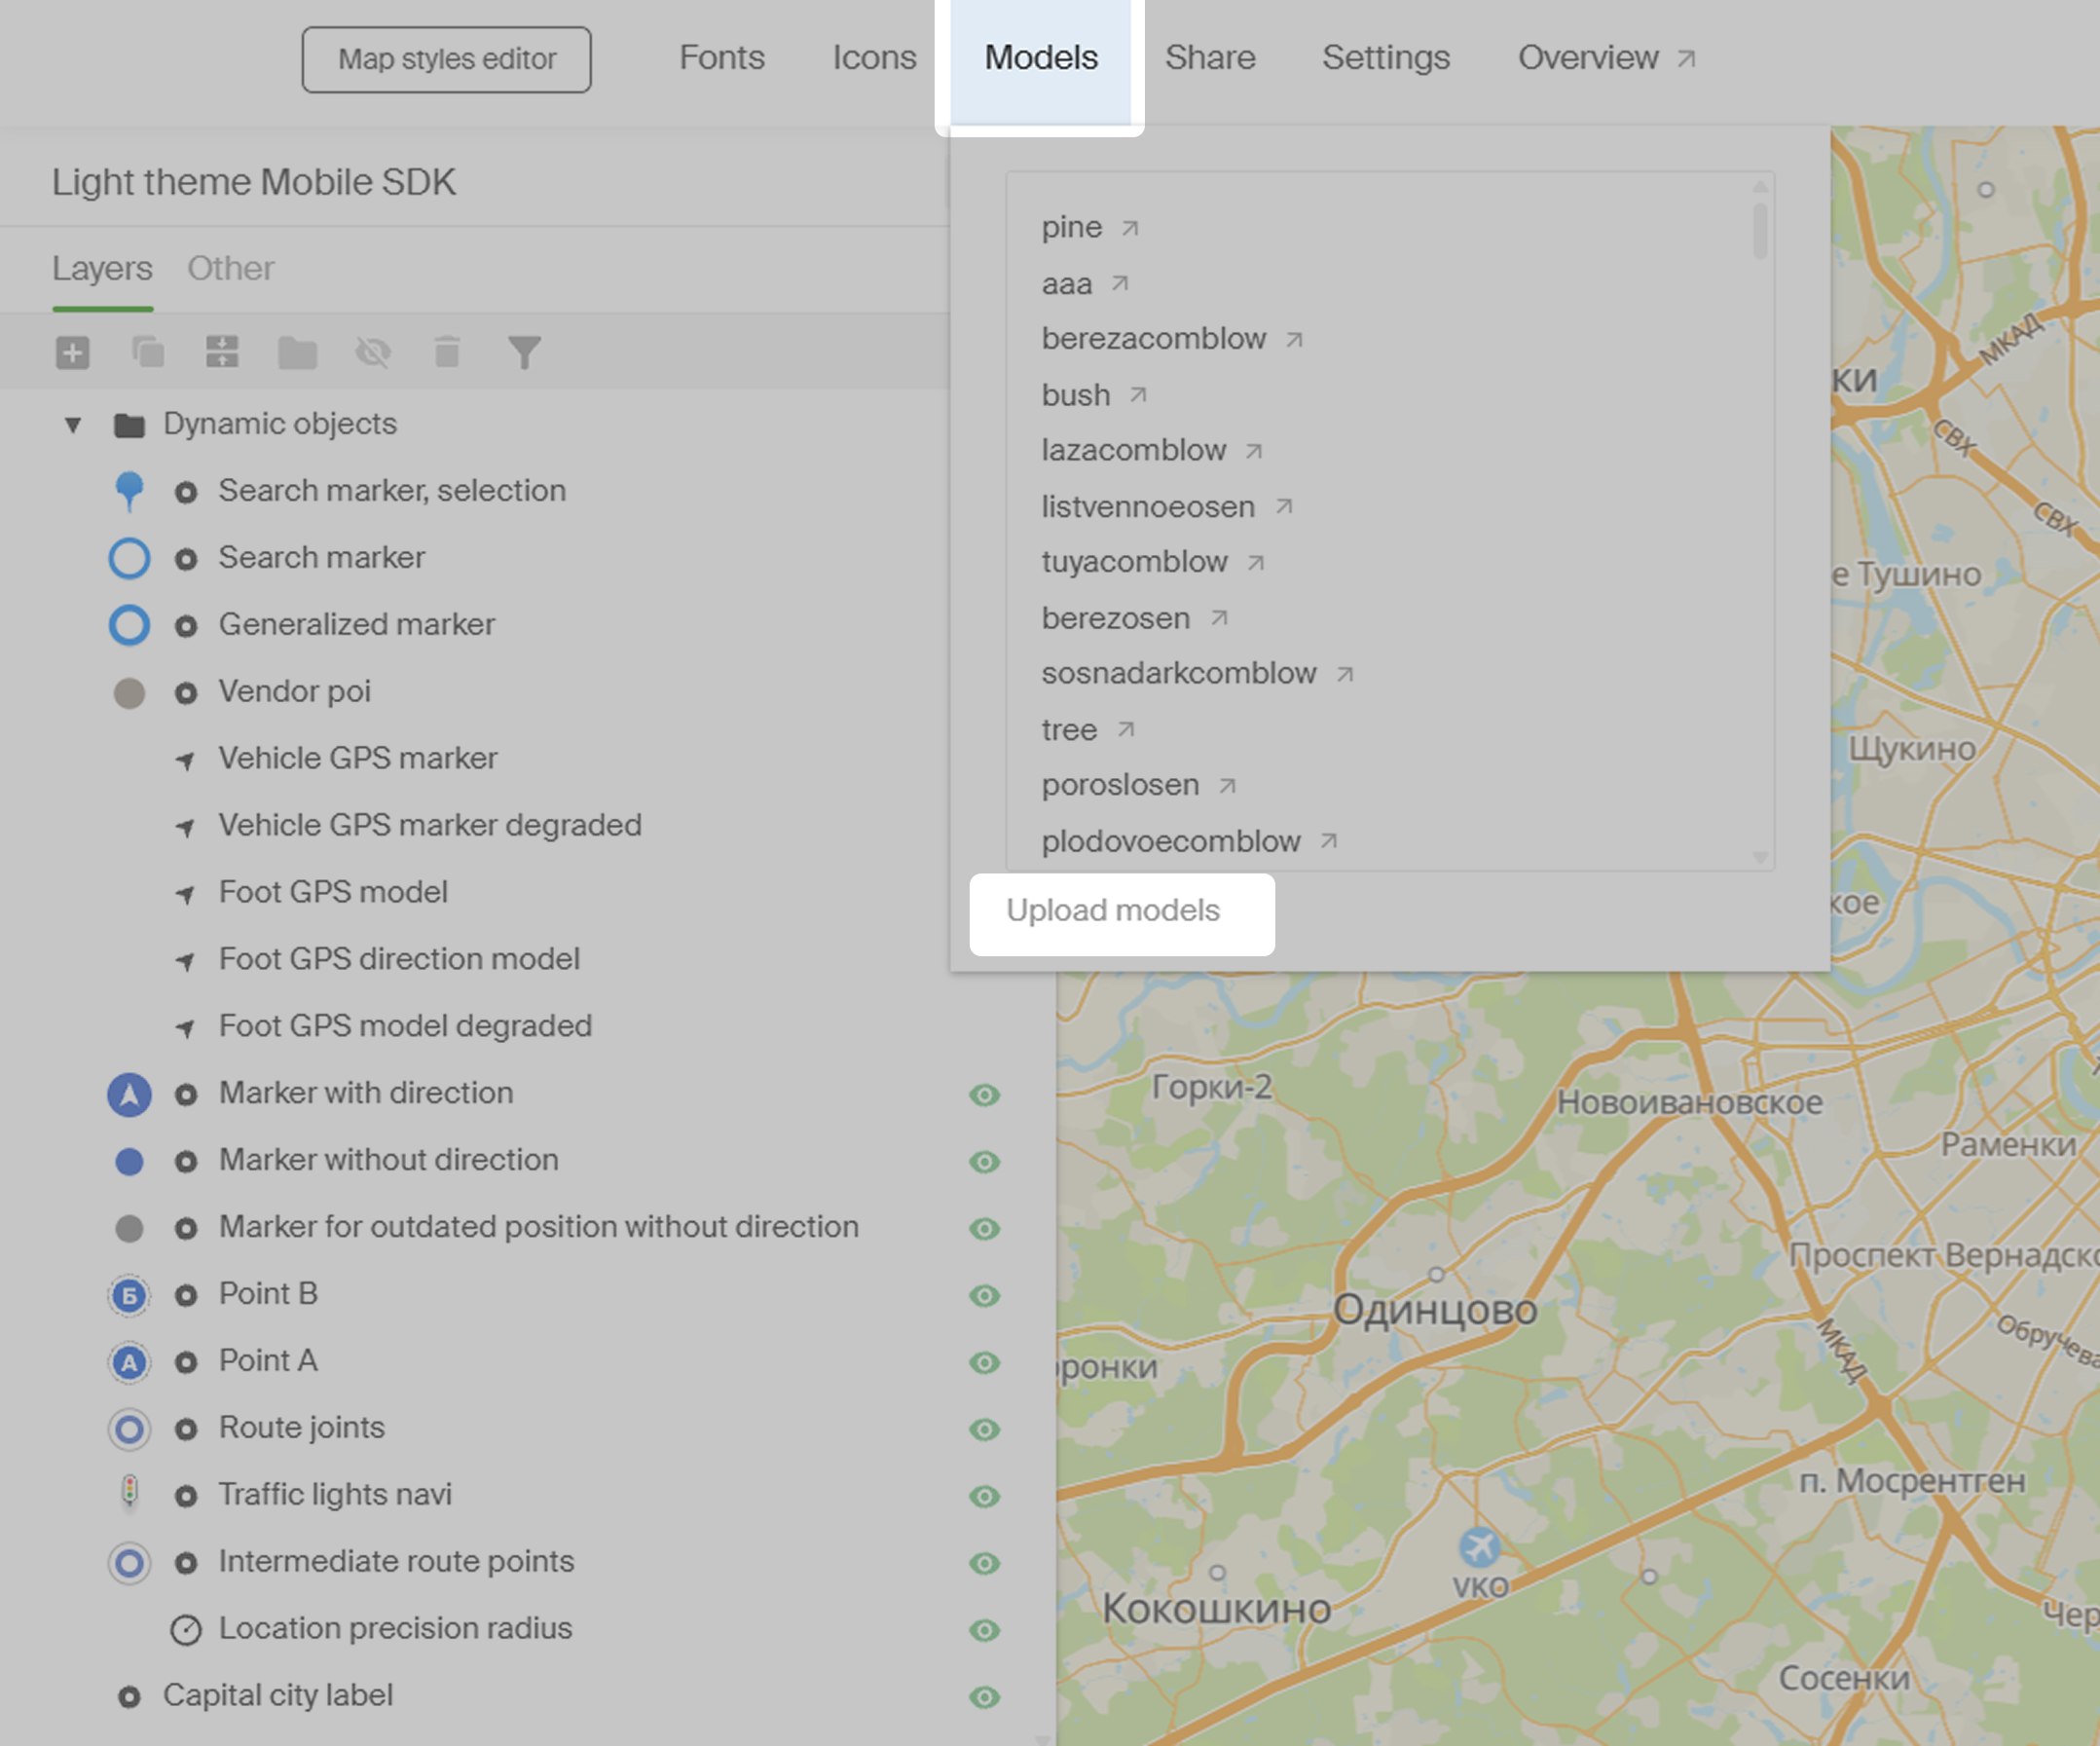
-
Click Choose files and upload one or more model files.
-
Wait for the files to upload and click OK.
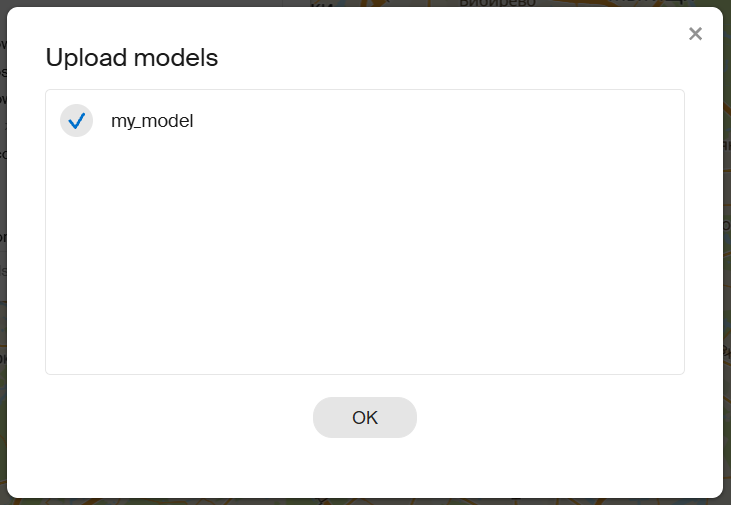
Now your models will be available for use in the Style editor.
-
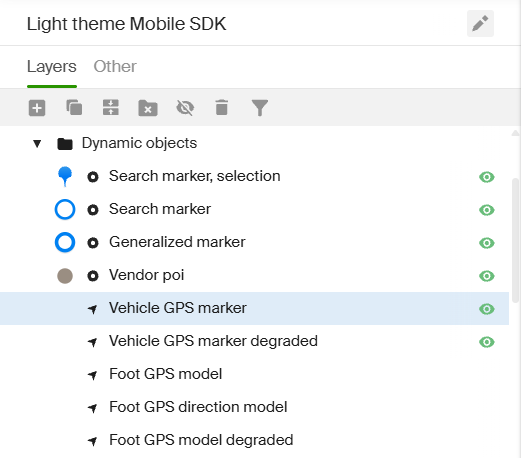
-
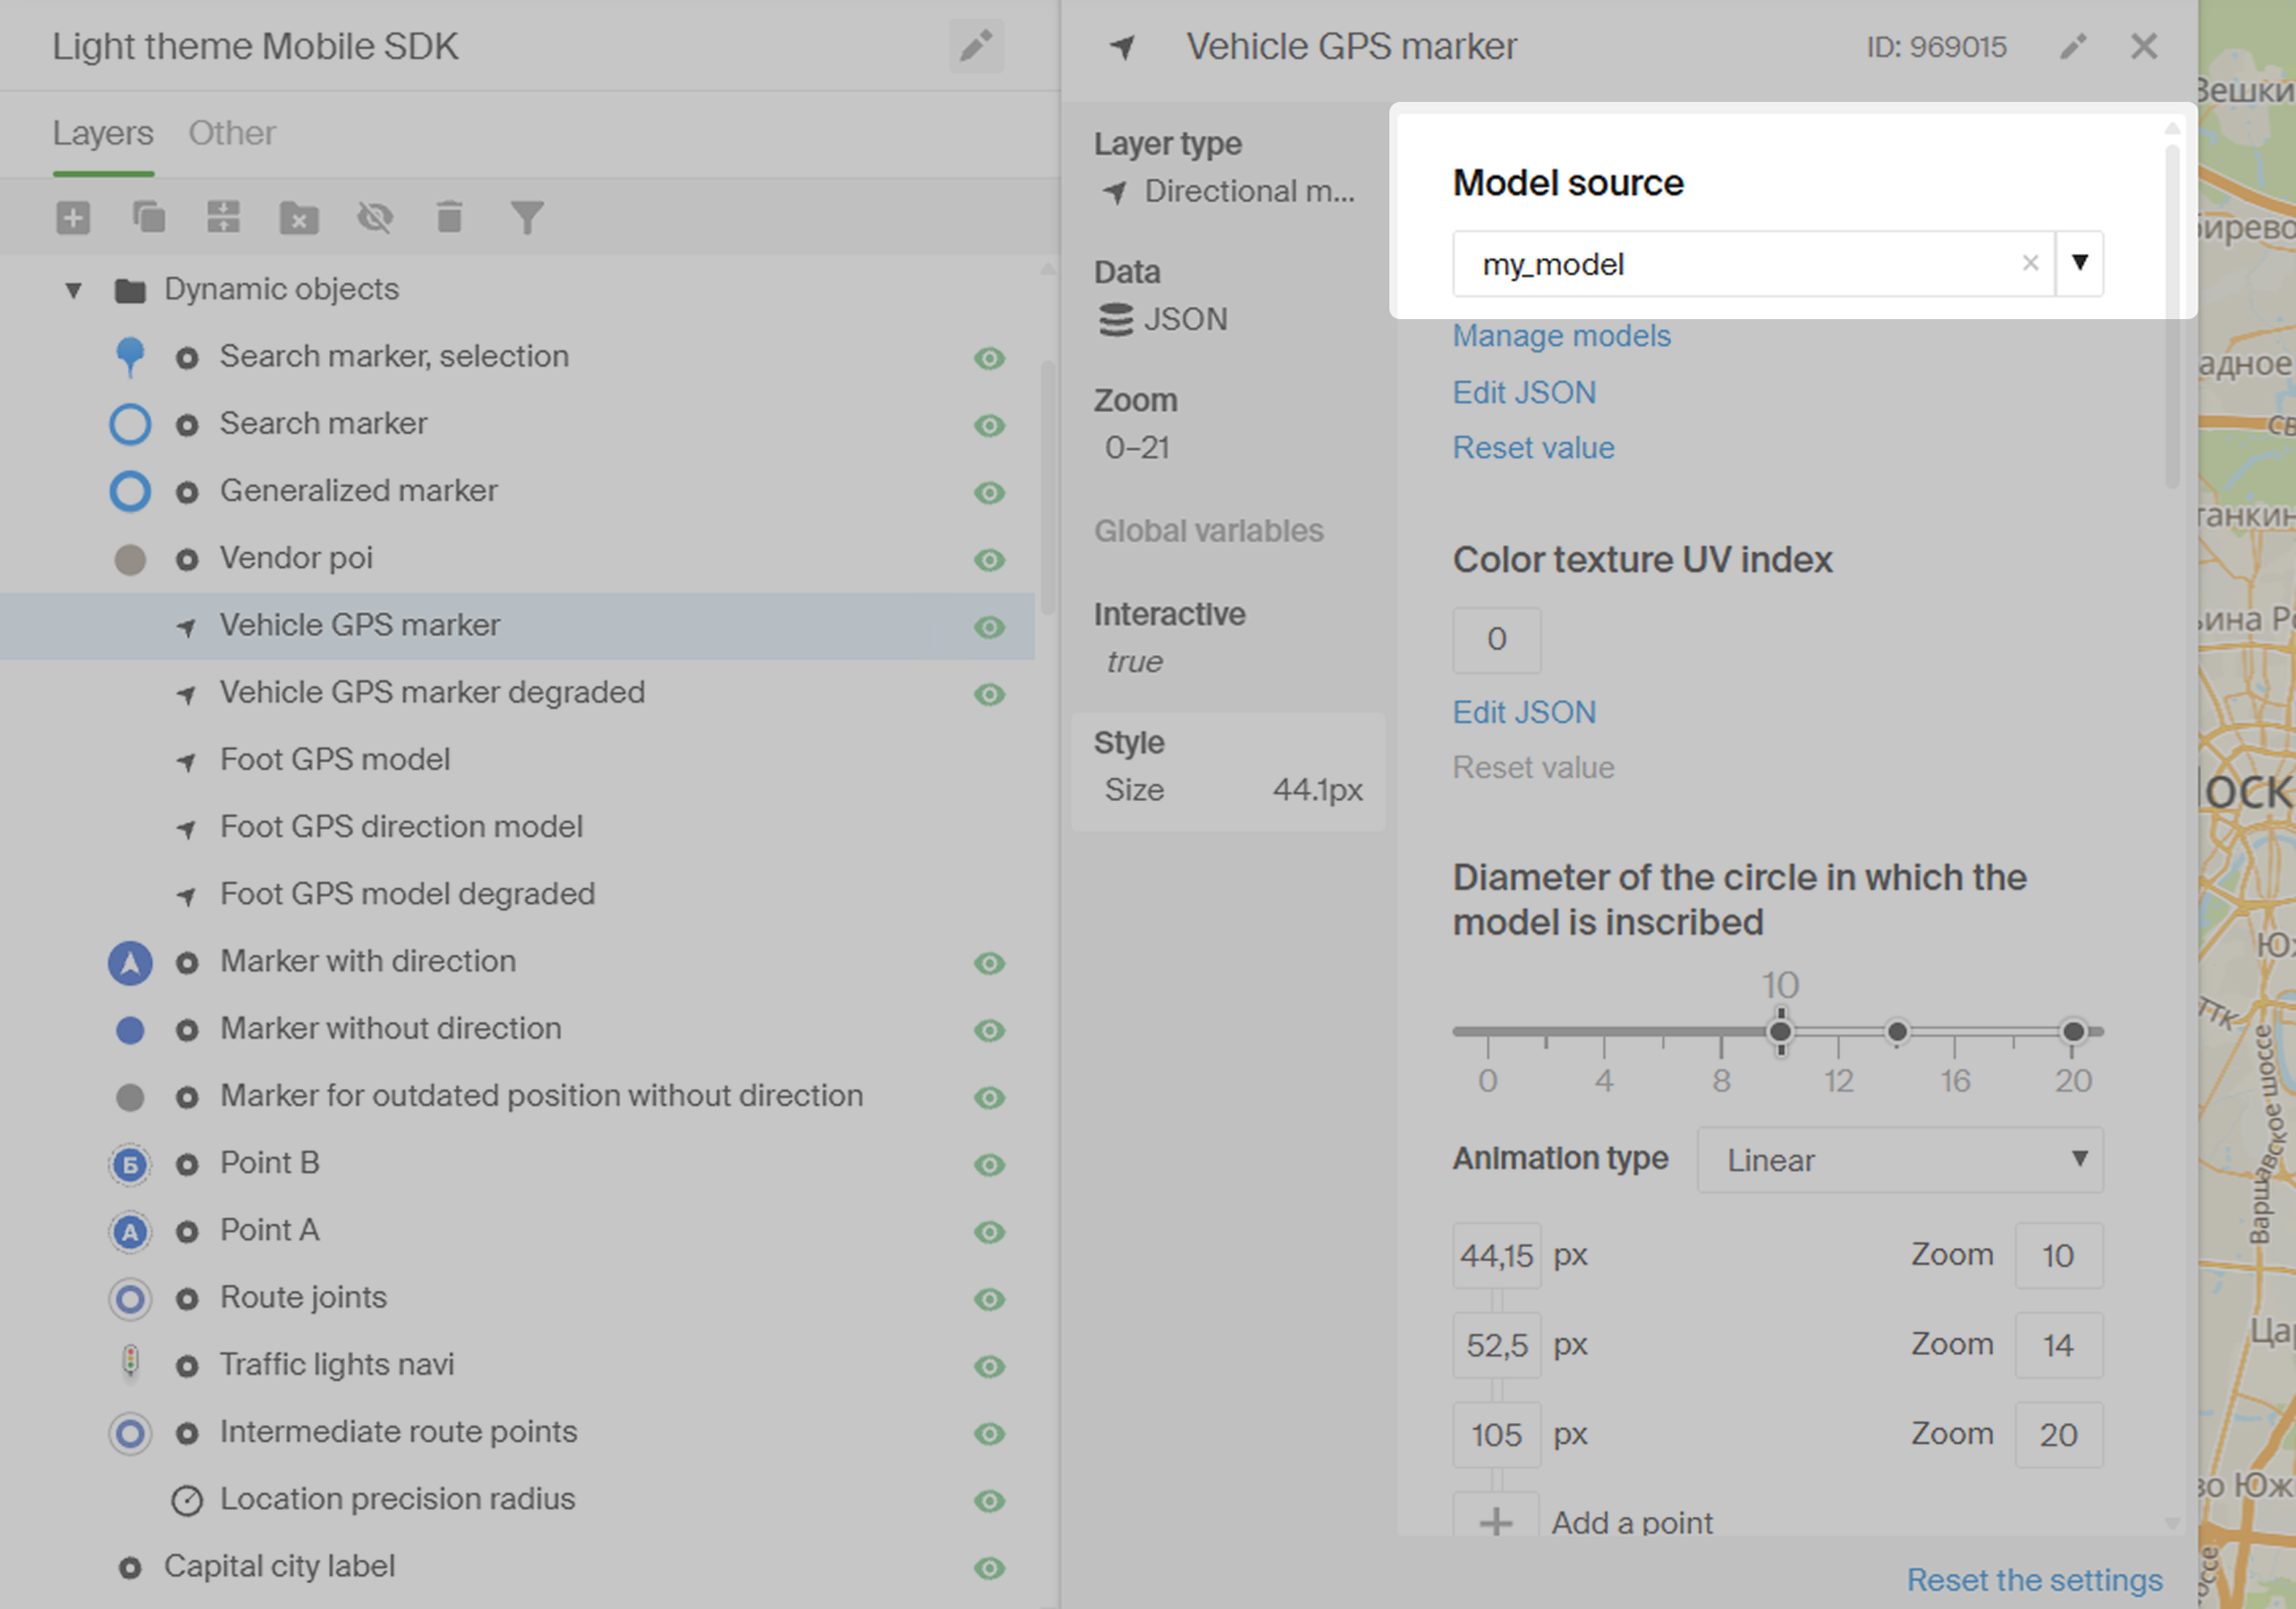
In the list of configured layers, select the layer in the Dynamic objects folder:
- Foot GPS model - style for the geolocation marker. By default, the marker is a colored dot.
- Foot GPS model degraded - style for the geolocation marker with low location accuracy. By default, the marker is a gray dot.
- Foot GPS direction model - style for the direction indicator, used together with the geolocation marker. By default, the indicator is a colored cone.
-
Go to the Style tab and in the Model source dropdown, select the uploaded model.
-
If necessary, repeat steps 4–5 to set models for other layers.
Styling objects
You can configure a complex style for a dynamic object using the Style editor. For example, configure the maximum and minimum zoom level on which the object must be displayed.
-
Create a style layer for an object:
-
Open the Style editor.
-
Open the required style or create a new one.
-
In the Layers section, click
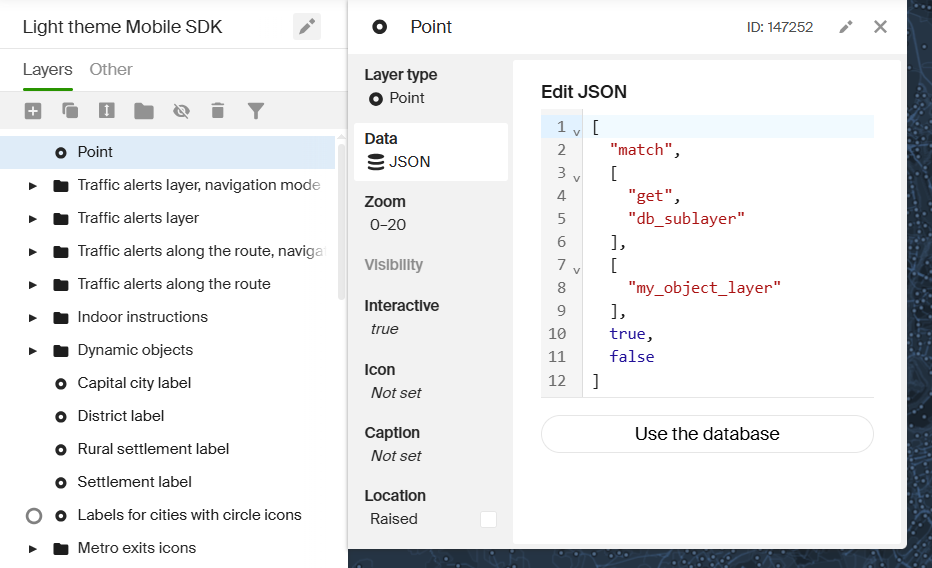
icon. -
Select the layer type depending on the object type. For the current task, only Polygon, Line, and Point types are supported. See more about layers in the Layer types for the Mobile SDK article.
-
On the Data tab, scroll down and select JSON — add manually.
-
Add the
db_sublayerattribute with a unique layer identifier (for example,my_object_layer) by inserting the following code into the text field:["match", ["get", "db_sublayer"], ["my_object_layer"], true, false]This identifier will be later used in the code to refer to the style layer.
-
Configure other style parameters on corresponding tabs.
-
-
Create a dynamic object using GeometryMapObjectBuilder and specify the identifier of the created style layer in the
setObjectAttribute()method. For example, to add an object of the point type:let geometryObject = GeometryMapObjectBuilder()
.setGeometry(geometry: PointGeometry(point: point)) // Point geometry
.setObjectAttribute(name: "db_sublayer", value: .string("my_object_layer"))
.createObject() // Creating an object -
To display the object on the map, add it to the data source:
-
Create a source:
let geometrySource = GeometryMapObjectSourceBuilder(context: sdkContext).createSource() -
Add the source to the map:
map.addSource(source: geometrySource) -
Add the created object to the source:
geometrySource.addObject(item: geometryObject)
-
Selecting objects
Configuring styles
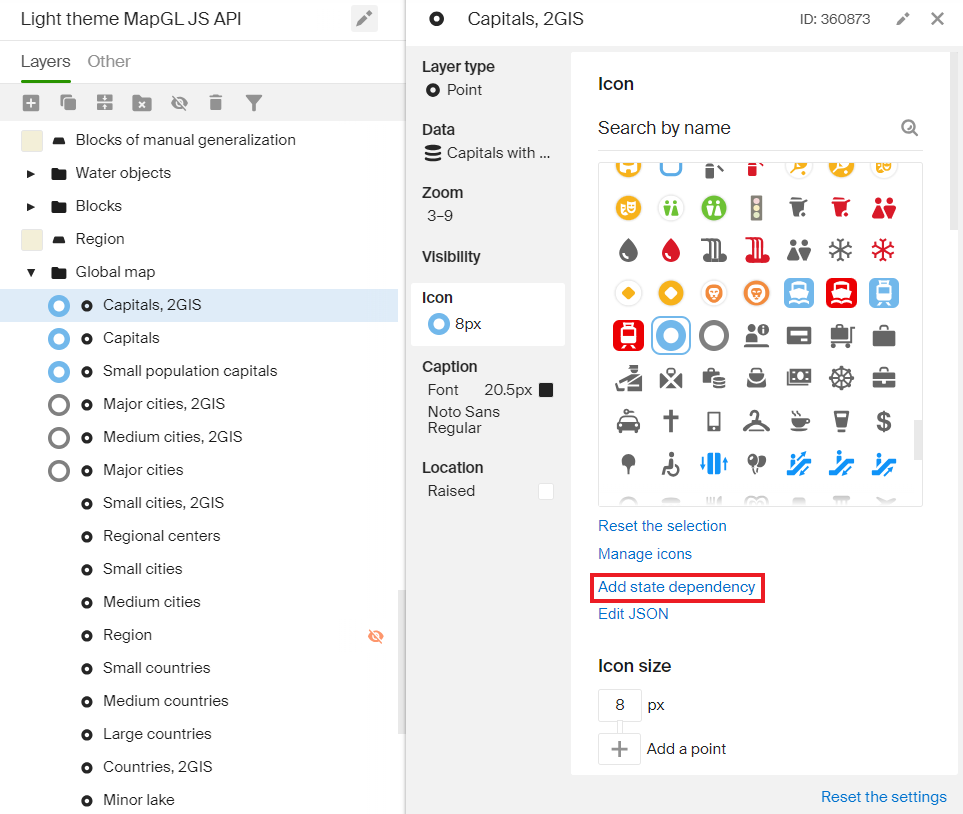
To make objects on the map visually react to selection, configure the styles to use different layer look using the "Add state dependency" function for all required properties (icon, font, color, and others):
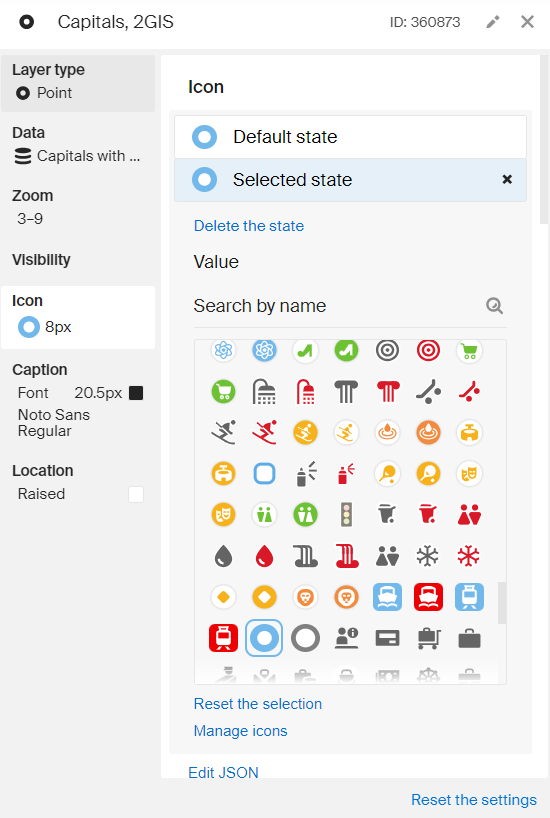
To configure properties of the selected object, go to the "Selected state" tab:
Highlight selected objects on tap
First, get information about the objects falling into the tap region using the getRenderedObjects() method like in the example of Getting objects using screen coordinates.
To highlight objects, call the setHighlighted() method that takes a list of IDs from the variable objects directory DgisObjectId. Inside the getRenderedObjects() method, you can get all data required to use this method like the source of objects data and their IDs:
private func tap(point: ScreenPoint, tapRadius: ScreenDistance) {
    let scale = UIScreen.main.nativeScale
    let point = ScreenPoint(x: Float(location.x * scale), y: Float(location.y * scale))
    self.getRenderedObjectsCancellable?.cancel()
    let cancel = self.map.getRenderedObjects(centerPoint: point, radius: tapRadius).sink(
        receiveValue: {
            infos in
            // Getting the closest object to the tap spot inside the specified radius
            guard let info = infos.first(
                where: {
                    $0.item.source is DgisSource
                    && $0.item.item is DgisMapObject
                }
            ) else { return }

            // Saving the object data source and the object ID
            let source = info.item.source as! DgisSource
            let id = (info.item.item as! DgisMapObject).id

            // Highlighting the required object and its entrances
            let future = searchManager.searchByDirectoryObjectId(objectId: id)

            self.getDirectoryObjectCancellable = future.sinkOnMainThread(
                receiveValue: {
                    [weak self] directoryObject in
                    guard let self = self else { return }
                    guard let directoryObject = directoryObject else { return }
                    guard let objectId = directoryObject.id else { return }

                    var selectedObjectIds = [objectId]
                    directoryObject.entrances.forEach { entrance in
                        selectedObjectIds.append(entrance.id)
                    }

                    source.setHighlighted(directoryObjectIds: selectedObjectIds, highlighted: true)
                },
                failure: { ... }
            )
        },
        failure: { ... }
    )
    ...
}
Controlling the camera
You can control the camera by accessing the map.camera property. See the Camera class for a full list of available methods and properties.
Changing camera position
You can change the position of the camera by calling the move() method, which initiates a flying animation. This method has three parameters:
position- new camera position (coordinates and zoom level). Additionally, you can specify the camera tilt and rotation (see CameraPosition).time- flight duration in seconds (as TimeInterval).animationType- type of animation to use (CameraAnimationType).
The call will return a Future object, which can be used to handle the animation finish event.
// New position for camera.
let newCameraPosition = CameraPosition(
    point: GeoPoint(latitude: 55.752425, longitude: 37.613983),
    zoom: Zoom(value: 16)
)

// Start the flying animation.
let future = map.camera.move(
    position: newCameraPosition,
    time: 0.4,
    animationType: .linear
)

// Handle the animation finish event.
let cancellable = future.sink { _ in
    print("Camera flying finished.")
} failure: { error in
    print("An error occurred: \(error.localizedDescription)")
}
Getting camera state
The current state of the camera (i.e., whether the camera is currently flying) can be obtained using the state property. See CameraState for a list of possible camera states.
let currentState = map.camera.state
- For SDK version 13.0.0 or later
- For SDK version 12.x
To subscribe to changes of camera state, use sinkOnStatefulChanges to subscribe to a specific queue. To subscribe on the main queue, you can use sinkOnStatefulChangesOnMainThread.
// Subscribe.
let connection = map.camera.sinkOnStatefulChangesOnMainThread(reason: .state) {
    [weak self] (state: CameraState) in
    print("Camera state has changed to \(state)")
}

// Unsubscribe.
connection.cancel()
To subscribe to changes of camera state, use stateChannel.sink.
// Subscribe.
let connection = map.camera.stateChannel.sink { state in
    print("Состояние камеры изменилось на \(state)")
}

// Unsubscribe.
connection.cancel()
Getting camera position
The current position of the camera can be obtained using the position property (see the CameraPosition structure).
let currentPosition = map.camera.position
print("Coordinates: \(currentPosition.point)")
print("Zoom level: \(currentPosition.zoom)")
print("Tilt: \(currentPosition.tilt)")
print("Rotation: \(currentPosition.bearing)")
- For SDK version 13.0.0 or later
- For SDK version 12.x
To subscribe to changes of camera position (and tilt/rotation angle), use the sinkOnStatefulChanges method to subscribe to a specific queue. To subscribe on the main queue, you can use sinkOnStatefulChangesOnMainThread.
// Subscribe.
let connection = map.camera.sinkOnStatefulChangesOnMainThread(reason: .position) {
    [weak self] (position: CameraPosition) in
    print("Camera position has changed (coordinates, zoom level, tilt, or rotation).")
}

// Unsubscribe.
connection.cancel()
To subscribe to changes of camera position (and tilt/rotation angle), use positionChannel.sink.
// Subscribe.
let connection = map.camera.positionChannel.sink { position in
    print("Camera position has changed (coordinates, zoom level, tilt, or rotation).")
}

// Unsubscribe.
connection.cancel()
Calculating camera position
To display an object or a group of objects on the map, you can use the calcPosition method to calculate camera position:
// To "see" two markers on the map:

// Creating a geometry that covers both objects
let geometry = ComplexGeometry(geometries: [PointGeometry(point: point1), PointGeometry(point: point2)])
// Calculating the required position
let position = calcPosition(camera: map.camera, geometry: geometry)
// Using the calculated position
map.camera.move(position: position)
The example above returns a result similar to:
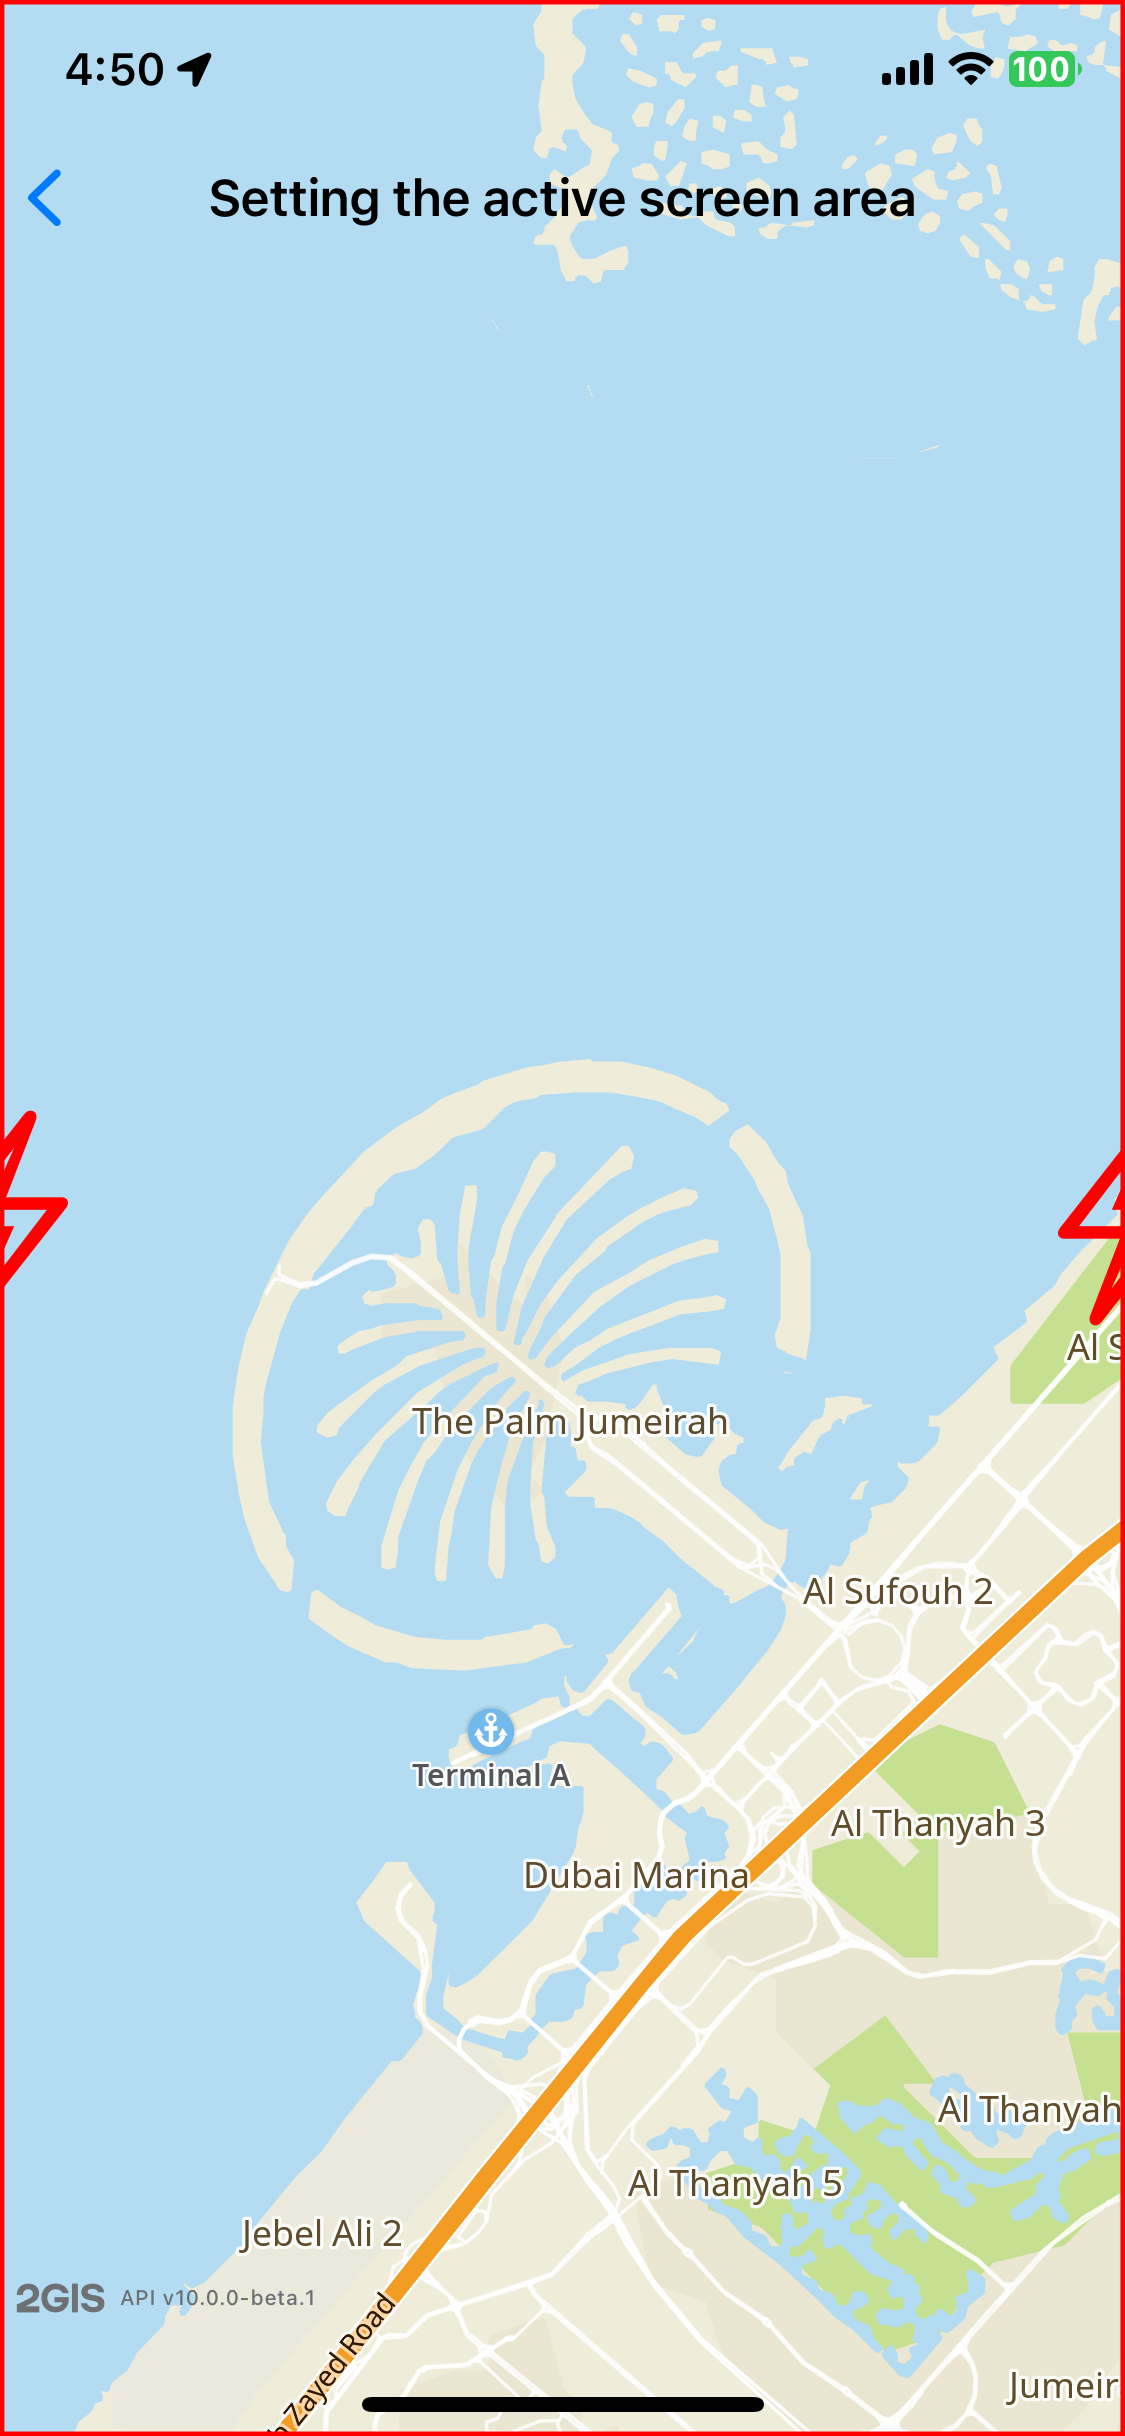
The markers are cut in half, because the method does not have any information about objects, only geometry. In this example, the marker is in its center. The method calculates the position to embed marker centers in the active area. The active area is shown as a red rectangle along the screen edges. To display markers in full, you can set the active area.
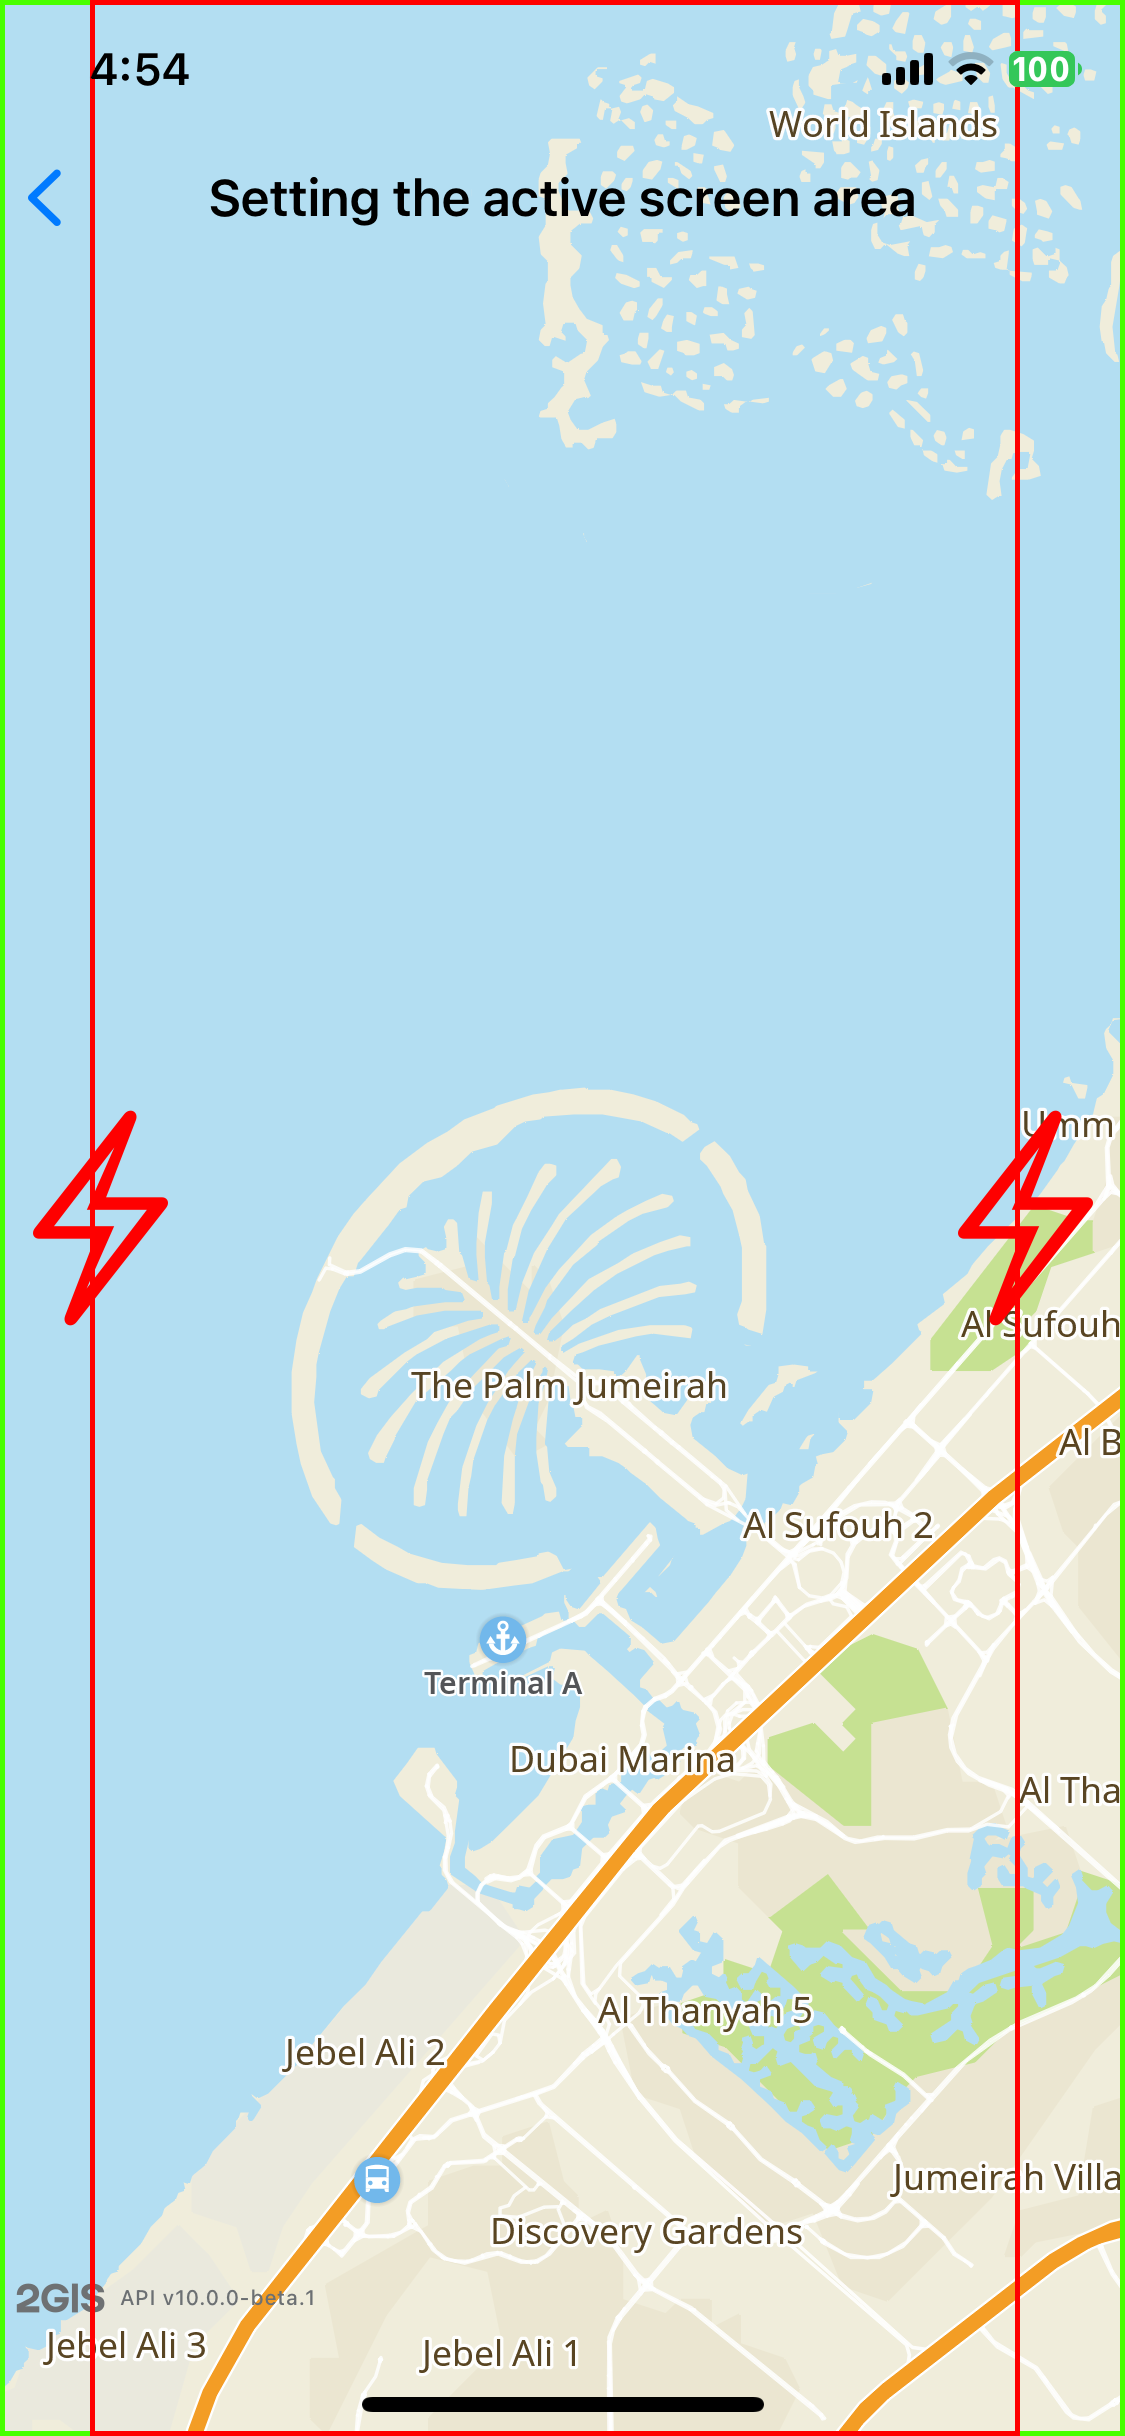
For example, set paddings from the left and right of the screen:
let geometry = ComplexGeometry(geometries: [PointGeometry(point: point1), PointGeometry(point: point2)])

// Setting left and right paddings so that markers are displayed in full
map.camera.padding.left = 100
map.camera.padding.right = 100
let position = calcPosition(camera: map.camera, geometry: geometry)
map.camera.move(position: position)
Result:
You can also set specific parameters for position calculation only. For example, you can set paddings only inside the position calculation method and get the same result.
let geometry = ComplexGeometry(geometries: [PointGeometry(point: point1), PointGeometry(point: point2)])
// Setting an active area only for the position calculation
let position = calcPosition(camera: map.camera, geometry: geometry, screenArea: Padding(left: 100, right: 100))
map.camera.move(position: position)
Result:
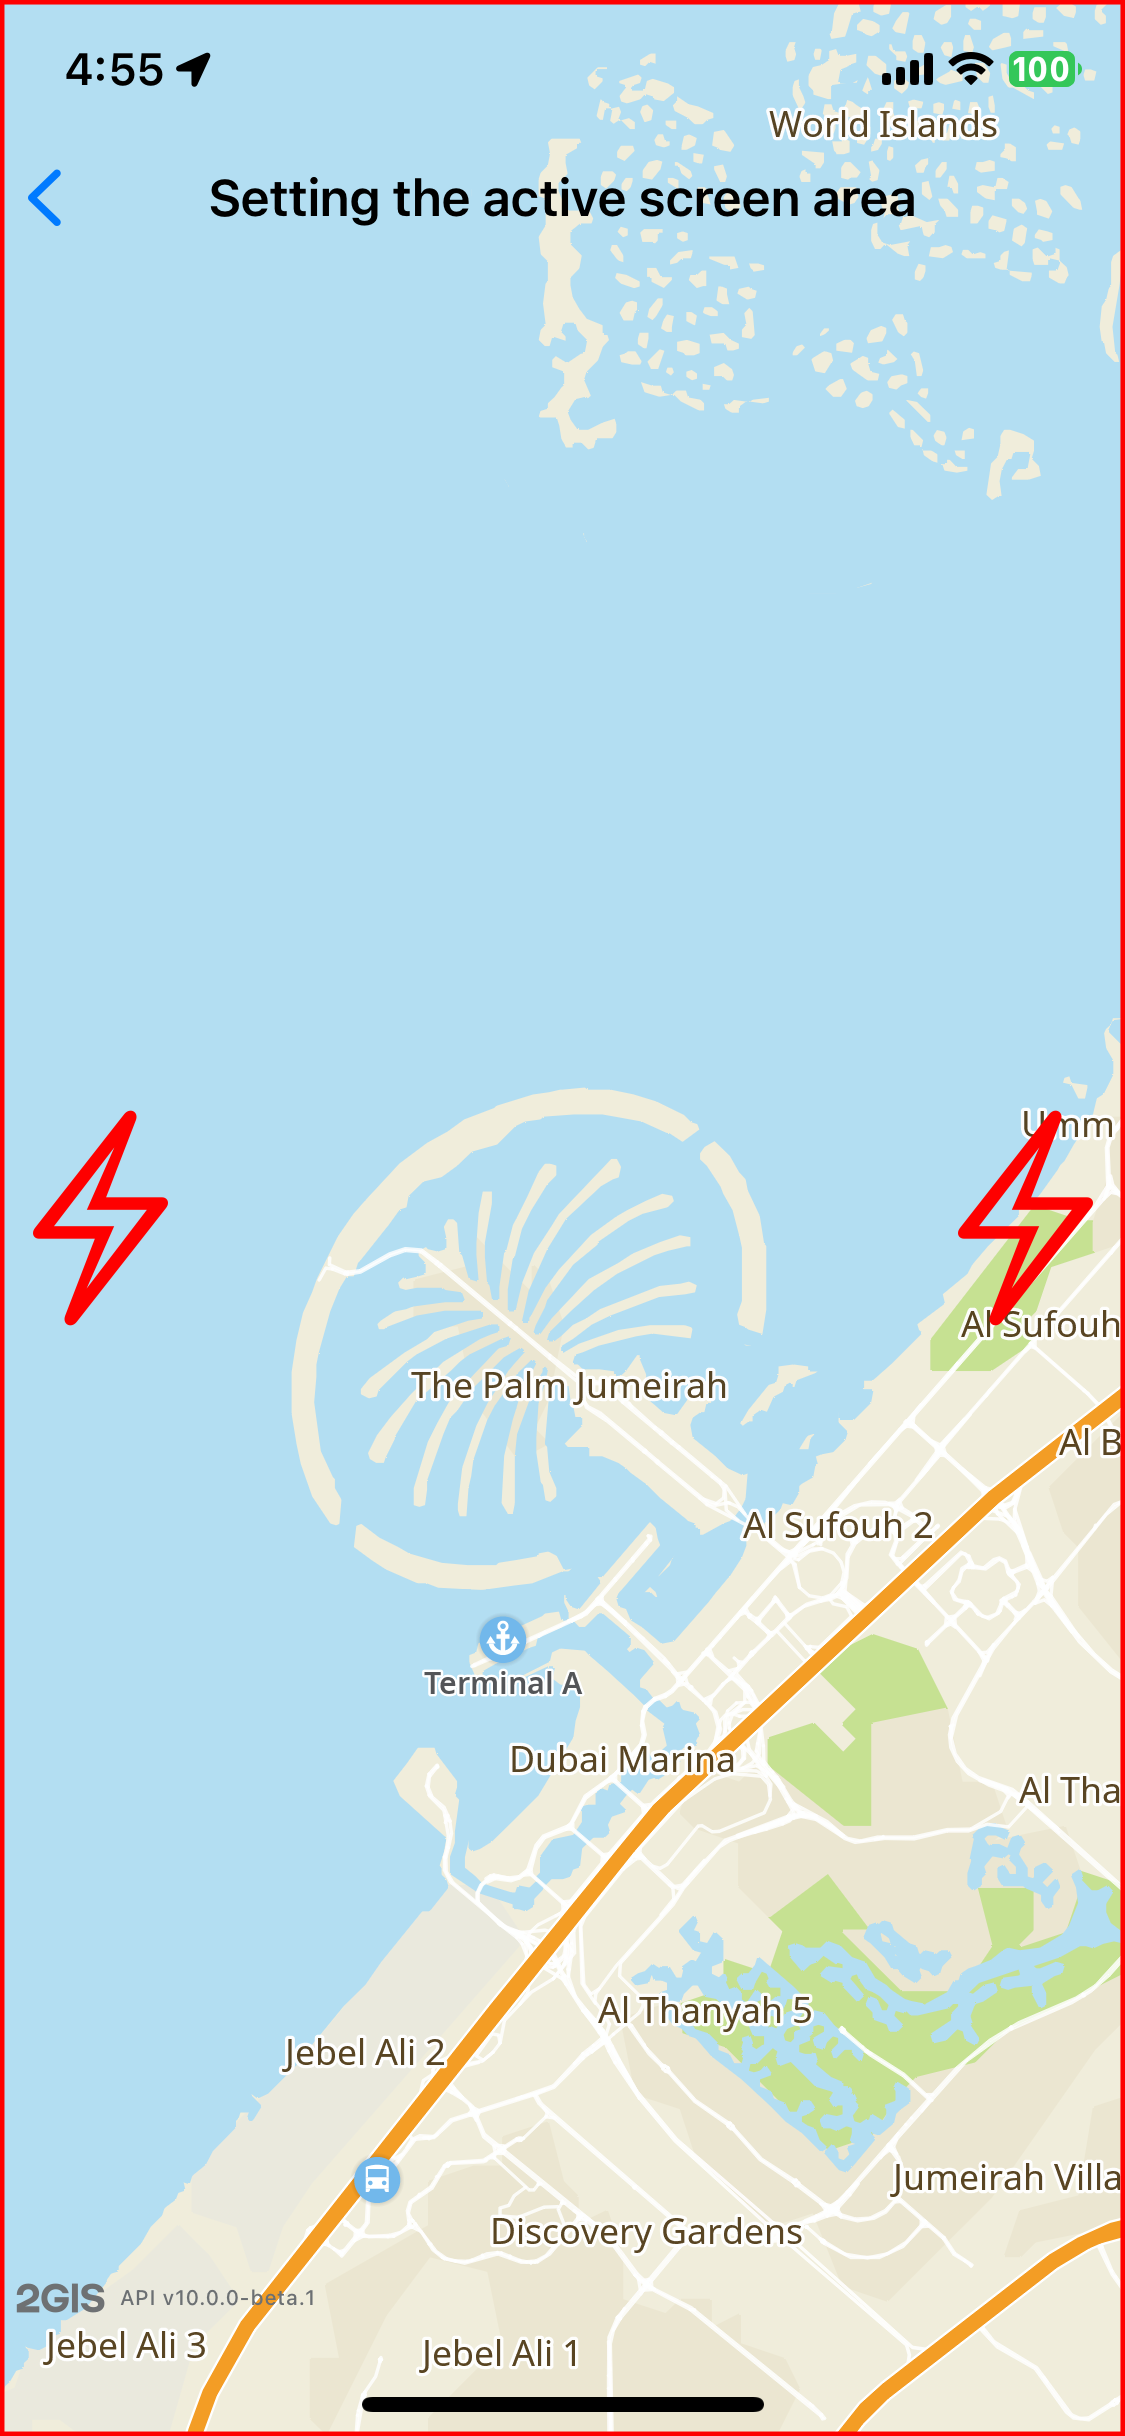
You can see that the active area is not changed, but the markers are fully embedded. This approach may cause unexpected behavior, because the camera position specifies a geocoordinate that must be within the camera position spot (a red circle in the screen center). Parameters like padding, positionPoint, and size impact the location of this spot.
If parameters that shift the camera position spot are passed to a method during the position calculation, the result may lead to unexpected behavior. For example, if you set an asymmetric active area, the picture can shift a lot.
Example of setting the same position for different paddings:
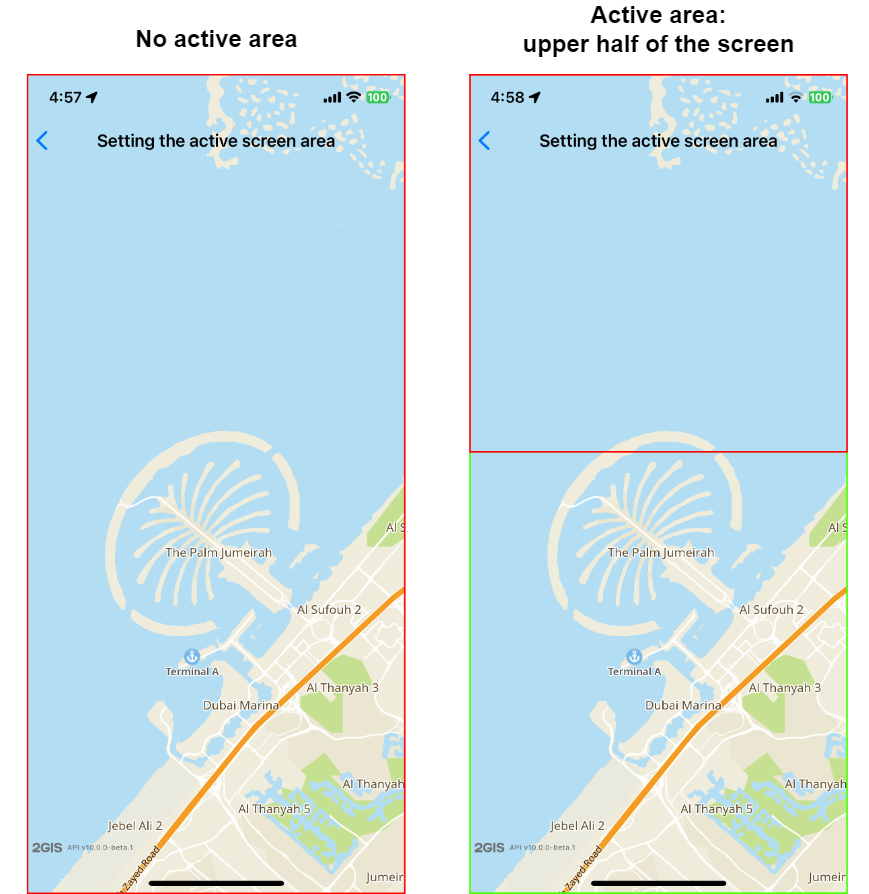
The easiest solution is to pass all required settings to the camera and use only the camera and geometry to calculate position. If you use additional parameters that are not passed to the camera, edit the result to shift the picture in the right direction.
Configuring camera position point and camera viewpoint
You can control the map display on the screen, for example, change the size of the map viewport, while keeping the view position. To do this, use screen points: the camera position point BaseCamera.positionPoint and the camera viewpoint BaseCamera.viewPoint.
The camera position point (BaseCamera.positionPoint) is the screen point to which the camera is anchored with the set paddings BaseCamera.padding. The point is set relative to the map viewport:
let cameraPositionPoint = CameraPositionPoint(x: 0.5, y: 0.5)
map.camera.setPositionPoint(positionPoint: Constants.cameraPositionPoint)
When the camera position point changes, the map viewport changes and the observation point CameraPosition.Point shifts. It is a terrain point in geographic coordinates that is located at the camera position point. The tilt angle CameraPosition.Tilt and the camera rotation angle CameraPosition.Bearing do not change:
The camera viewpoint (BaseCamera.viewPoint) is the screen point the camera is looking at. The point is set relative to the map viewport:
let cameraViewPoint = CameraViewPoint(x: 0.5, y: 0.5)
map.camera.setViewPoint(viewPoint: Constants.cameraViewPoint)
When the camera viewpoint changes, the direction of view relative to the observation point changes. The observation point CameraPosition.Point does not shift. Also, the tilt angle CameraPosition.Tilt and the camera rotation angle CameraPosition.Bearing do not change:
visibleArea и visibleRect
Camera has two properties that both describe geometry of a visible area but in different ways. visibleRect has the GeoRect and is always a rectangle. visibleArea is an arbitrary geometry. You can tell the difference easily by examples of different camera tilt angles (relatively to the map):
-
With 45° tilt,
visibleRectandvisibleAreaare not equal: in this case,visibleRectis larger because it must be a rectangle containingvisibleArea.visibleAreais displayed in blue,visibleRect- in red.
-
With 0° tilt,
visibleAreaиvisibleRectoverlap, as you can tell from the color change.
Detecting if an object falls into the camera coverage area
Using the visibleArea property, you can get the map area covered by the camera as Geometry. Using the intersects() method, you can get the intersection of the camera coverage area with the required geometry:
// Telling if a marker falls into the visible map area
// let marker: Marker
let markerGeometry: Geometry = PointGeometry(point: marker.position)

let intersects: Bool = map.camera.visibleArea.intersects(geometry: markerGeometry)
Floor plans
With the SDK, you can display floor plans of a building on the map and switch between floors. Detailed floor plans are available only for certain groups of buildings (for example, shopping malls). To get started, purchase access to Places API and additionally to information about floor plans. See the Getting started section for details.
The main object for working with floor plans is the floor plan manager IndoorManager, which is available via the indoorManager map property.
To get information about the floor plans of the building currently displayed on the map, use the focusedBuilding property of the IndoorManager class or subscribe to the focusedBuildingChannel channel.
// Getting information about the current building with floor plans
let currentBuilding = map.indoorManager.focusedBuilding

// Subscribe to changes of the current building
let connection = map.indoorManager.focusedBuildingChannel.sink { building in
    if let building = building {
        print("Building with ID: \(building.id) is displayed")
        print("Number of floors: \(building.levels.count)")
        print("Default floor: \(building.defaultLevelIndex)")
    } else {
        print("Floor plans are not displayed")
    }
}

// Unsubscribing from notifications
connection.cancel()
Showing and hiding floor plans
To control the display of floor plans, use the setIndoorState() method of the IndoorManager class:
// Show floor plans
map.indoorManager.setIndoorState(newState: .enabled)

// Hide floor plans
map.indoorManager.setIndoorState(newState: .disabled)
Switching between floors
To switch between floors, specify the required floor index in the activeLevelIndex property of the IndoorBuilding object:
// Getting information about the current building
let building = map.indoorManager.focusedBuilding

if let building = building {
    // Getting information about all floors
    let levels = building.levels
    print("Available floors:")
    for (index, levelInfo) in levels.enumerated() {
        print("Floor \(index): \(levelInfo.name)")
    }

    // Switching to the first floor (index 0)
    building.activeLevelIndex = 0

    // Switching to the last floor
    building.activeLevelIndex = UInt64(levels.count - 1)

    // Subscribing to changes of the active floor
    let connection = building.activeLevelIndexChannel.sink { levelIndex in
        let levelName = levels[Int(levelIndex)].name
        print("Active floor changed to: \(levelName)")
    }
}
Creating UI for floor control
To create a UI element for floor control, use the IndoorControlModel:
import UIKit
import DGis

class IndoorControlViewController: UIViewController {
    private let map: Map
    private var indoorControlModel: IndoorControlModel?
    private var levelNamesConnection: DGis.Cancellable?
    private var activeLevelConnection: DGis.Cancellable?
    private var levelButtonsStackView: UIStackView!

    init(map: Map) {
        self.map = map
        super.init(nibName: nil, bundle: nil)
    }

    required init?(coder: NSCoder) {
        fatalError("init(coder:) has not been implemented")
    }

    override func viewDidLoad() {
        super.viewDidLoad()
        setupUI()

        // Creating the floor control model
        indoorControlModel = IndoorControlModel(map: map)

        // Subscribing to changes in the list of floors
        levelNamesConnection = indoorControlModel?.levelNamesChannel.sinkOnMainThread { [weak self] levelNames in
            guard let self = self else { return }
            if !levelNames.isEmpty {
                Task { @MainActor in
                    self.updateLevelsUI(levelNames: levelNames)
                }
            } else {
                Task { @MainActor in
                    self.hideLevelsUI()
                }
            }
        }

        // Subscribing to changes of the active floor
        activeLevelConnection = indoorControlModel?.activeLevelIndexChannel.sinkOnMainThread { [weak self] levelIndex in
            if let levelIndex = levelIndex {
                Task { @MainActor in
                    self?.updateActiveLevelUI(activeLevelIndex: Int(levelIndex))
                }
            }
        }
    }

    private func setupUI() {
        levelButtonsStackView = UIStackView()
        levelButtonsStackView.axis = .vertical
        levelButtonsStackView.spacing = 8
        levelButtonsStackView.translatesAutoresizingMaskIntoConstraints = false
        view.addSubview(levelButtonsStackView)

        NSLayoutConstraint.activate([
            levelButtonsStackView.topAnchor.constraint(equalTo: view.safeAreaLayoutGuide.topAnchor, constant: 20),
            levelButtonsStackView.trailingAnchor.constraint(equalTo: view.trailingAnchor, constant: -20),
            levelButtonsStackView.widthAnchor.constraint(equalToConstant: 60)
        ])
    }

    private func updateLevelsUI(levelNames: [String]) {
        // Removing existing buttons
        levelButtonsStackView.arrangedSubviews.forEach { $0.removeFromSuperview() }

        // Creating buttons for each floor
        for (index, levelName) in levelNames.enumerated() {
            let button = UIButton(type: .system)
            button.setTitle(levelName, for: .normal)
            button.backgroundColor = UIColor.systemGray6
            button.layer.cornerRadius = 8
            button.tag = index
            button.addTarget(self, action: #selector(levelButtonTapped(_:)), for: .touchUpInside)

            button.translatesAutoresizingMaskIntoConstraints = false
            button.heightAnchor.constraint(equalToConstant: 44).isActive = true

            levelButtonsStackView.addArrangedSubview(button)
        }

        levelButtonsStackView.isHidden = false
    }

    @objc private func levelButtonTapped(_ sender: UIButton) {
        // Switching to the selected floor
        indoorControlModel?.activeLevelIndex = UInt64(sender.tag)
    }

    private func updateActiveLevelUI(activeLevelIndex: Int) {
        // Updating visual state of buttons
        for (index, button) in levelButtonsStackView.arrangedSubviews.enumerated() {
            if let button = button as? UIButton {
                if index == activeLevelIndex {
                    button.backgroundColor = UIColor.systemBlue
                    button.setTitleColor(.white, for: .normal)
                } else {
                    button.backgroundColor = UIColor.systemGray6
                    button.setTitleColor(.systemBlue, for: .normal)
                }
            }
        }
    }

    private func hideLevelsUI() {
        // Hiding floor control UI
        levelButtonsStackView.isHidden = true
    }

    override func viewDidDisappear(_ animated: Bool) {
        super.viewDidDisappear(animated)

        // Unsubscribing from notifications
        levelNamesConnection?.cancel()
        activeLevelConnection?.cancel()
    }
}
Highlighting floors
To highlight a specific floor (for example, with important objects), use the markedLevels property of the IndoorControlModel:
// Setting marked floors
let markedLevels: Set<LevelId> = [
    LevelId(value: 70030076428115998),
    LevelId(value: 70030076428235234)
]
indoorControlModel?.markedLevels = markedLevels

// Checking if a floor is marked
let isMarked = indoorControlModel?.isLevelMarked(index: 1) ?? false // true for floor with index 1
Traffic jams on the map
To display the traffic jams layer on the map, create a TrafficSource and pass it to the addSource() method of the map.
let trafficSource = TrafficSource(context: sdk.context)
map.addSource(source: trafficSource)
Road events on the map
You can configure the display of road events from 2GIS data on the map, as well as add your own events.
Displaying events on the map
To display the road events layer on the map, create a data source RoadEventSource and add it to the map using the addSource() method of the map:
let roadEventSource = RoadEventSource(context: sdk.context)
map.addSource(source: roadEventSource)
To remove the created data source and all associated objects, call the removeSource() method of the map:
map.removeSource(source: roadEventSource)
Adding an event
You can add your own road event to the map, which will be visible to all 2GIS map users. You can place an event on the map only within a 2 km radius of your current location.
-
Create an instance of the object manager RoadEventManager:
- For SDK version 13.0.0 or later
- For SDK version 12.x
self.roadEventManager = RoadEventManager.instance(context: sdk.context)self.roadEventManager = RoadEventManager(context: sdk.context) -
Add an event of one of the types below (each type has its own icon on the map):
-
Car accident. Call the createAccident() method and specify the event coordinates (GeoPoint), affected lanes (Lane), and a text description of the event:
let accidentLocation = GeoPoint(latitude: 55.751244, longitude: 37.618423)
let accidentLanes: LaneOptionSet = [.left, .center] // left and center lanes are affected

let accidentFuture = roadEventManager.createAccident(
    location: accidentLocation,
    lanes: accidentLanes,
    description: "Accident on the left lane"
)

// Handling the result
let accidentCancellable = accidentFuture.sink(
    receiveValue: { result in
        switch result {
        case .event(let event):
            print("Accident event successfully created: \(event.id)")
        case .error(let error):
            print("Error creating the event: \(error)")
        }
    },
    failure: { error in
        print("An error occurred: \(error)")
    }
) -
Traffic camera. Call the createCamera() method and specify the event coordinates (GeoPoint) and a text description:
let cameraLocation = GeoPoint(latitude: 55.752220, longitude: 37.615560)

let cameraFuture = roadEventManager.createCamera(
    location: cameraLocation,
    description: "Speed control camera"
)

// Handling the result
let cameraCancellable = cameraFuture.sink(
    receiveValue: { result in
        switch result {
        case .event(let event):
            print("Camera event successfully created: \(event.id)")
        case .error(let error):
            print("Error creating the event: \(error)")
        }
    },
    failure: { error in
        print("An error occurred: \(error)")
    }
) -
Road closure. Call the createRoadRestriction() method and specify the event coordinates (GeoPoint) and a text description:
let restrictionLocation = GeoPoint(latitude: 55.753930, longitude: 37.620795)

let restrictionFuture = roadEventManager.createRoadRestriction(
    location: restrictionLocation,
    description: "Road closed for a festival"
)

// Handling the result
let restrictionCancellable = restrictionFuture.sink(
    receiveValue: { result in
        switch result {
        case .event(let event):
            print("Road closure event successfully created: \(event.id)")
        case .error(let error):
            print("Error creating the event: \(error)")
        }
    },
    failure: { error in
        print("An error occurred: \(error)")
    }
) -
Roadworks. Call the createRoadWorks() method and specify the event coordinates (GeoPoint), affected lanes (Lane), and a text description of the event:
let roadWorksLocation = GeoPoint(latitude: 55.754800, longitude: 37.621000)
let roadWorksLanes: LaneOptionSet = [.right] // right lane is affected

let roadWorksFuture = roadEventManager.createRoadWorks(
    location: roadWorksLocation,
    lanes: roadWorksLanes,
    description: "Road surface repair"
)

// Handling the result
let roadWorksCancellable = roadWorksFuture.sink(
    receiveValue: { result in
        switch result {
        case .event(let event):
            print("Road works event successfully created: \(event.id)")
        case .error(let error):
            print("Error creating the event: \(error)")
        }
    },
    failure: { error in
        print("An error occurred: \(error)")
    }
) -
Comment. Call the createComment() method and specify the event coordinates (GeoPoint) and a text description:
let commentLocation = GeoPoint(latitude: 55.755000, longitude: 37.622000)

let commentFuture = roadEventManager.createComment(
    location: commentLocation,
    description: "Caution, icy road!"
)

// Handling the result
let commentCancellable = commentFuture.sink(
    receiveValue: { result in
        switch result {
        case .event(let event):
            print("Comment successfully created: \(event.id)")
        case .error(let error):
            print("Error creating the comment: \(error)")
        }
    },
    failure: { error in
        print("An error occurred: \(error)")
    }
) -
Other event. Call the createOther() method and specify the event coordinates (GeoPoint), affected lanes (Lane), and a text description of the event:
let otherLocation = GeoPoint(latitude: 55.756000, longitude: 37.623000)
let otherLanes: LaneOptionSet = [.center, .right] // center and right lanes are affected

let otherFuture = roadEventManager.createOther(
    location: otherLocation,
    lanes: otherLanes,
    description: "Obstacle on the road"
)

// Handling the result
let otherCancellable = otherFuture.sink(
    receiveValue: { result in
        switch result {
        case .event(let event):
            print("Other event successfully created: \(event.id)")
        case .error(let error):
            print("Error creating the event: \(error)")
        }
    },
    failure: { error in
        print("An error occurred: \(error)")
    }
)
-
Getting objects using screen coordinates
You can get information about map objects using pixel coordinates. For this, call the getRenderedObjects() method of the map and specify the pixel coordinates and the radius in screen millimeters (not more than 30). The method will return a deferred result (Future) containing information about all found objects within the specified radius on the visible area of the map (an array of RenderedObjectInfo).
An example of a function that takes tap coordinates and passes them to getRenderedObjects():
private func tap(location: CGPoint) {
    let scale = UIScreen.main.nativeScale
    let point = ScreenPoint(x: Float(location.x * scale), y: Float(location.y * scale))
    let radius = ScreenDistance(30.0)
    self.getRenderedObjectsCancellable?.cancel()
    let cancel = self.map.getRenderedObjects(centerPoint: point, radius: radius).sink(
        receiveValue: {
            infos in
            // First array object is the closest to the coordinates.
            guard let info = infos.first(
                where: {
                    $0.item.source is DgisSource
                    && $0.item.item is DgisMapObject
                }
            ) else { return }

            // Process the result in the main thread.
            let source = info.item.source as! DgisSource
            let id = (info.item.item as! DgisMapObject).id

            // Select object and entrances.
            let future = searchManager.searchByDirectoryObjectId(objectId: id)

            self.getDirectoryObjectCancellable = future.sinkOnMainThread(
                receiveValue: {
                    [weak self] directoryObject in
                    guard let self = self else { return }
                    guard let directoryObject = directoryObject else { return }
                    guard let objectId = directoryObject.id else { return }

                    var selectedObjectIds = [objectId]
                    directoryObject.buildingEntrances.forEach { entrance in
                        selectedObjectIds.append(entrance.id)
                    }

                    source.setHighlighted(directoryObjectIds: selectedObjectIds, highlighted: true)
                },
                failure: { ... }
            )
        },
        failure: { error in
            print("Error retrieving information: \(error)")
        }
    )
    // Save the result to a property to prevent garbage collection.
    self.getRenderedObjectsCancellable = cancel
}
- For SDK version 13.0.0 or later
- For SDK version 12.x
To set the callback for a tap on the map:
-
UIKit: set the MapObjectTappedCallback callback for tap or long tap in IMapUIView using the addObjectTappedCallback and addObjectLongPressCallback methods. This callback will receive RenderedObjectInfo for the object that is closest to the touch point.
...
let mapObjectTappedOrLongPress = MapObjectTappedCallback(callback: { [weak self] objectInfo in
    print("Arbitrary object data: \(objectInfo.item.item.userData)")
})
...

self.mapView.addObjectTappedCallback(callback: mapObjectTappedOrLongPress)
self.mapView.addObjectLongPressCallback(callback: mapObjectTappedOrLongPress) -
SwiftUI: set the MapObjectTappedCallback callback for tap or long tap in MapView using the objectTappedCallback and objectLongPressCallback methods. This callback will receive RenderedObjectInfo for the object that is closest to the touch point.
...
let mapObjectTappedOrLongPress = MapObjectTappedCallback(callback: { [weak self] objectInfo in
    print("Arbitrary object data: \(objectInfo.item.item.userData)")
})
...

self.mapFactory.mapView
    .objectTappedCallback(callback: mapObjectTappedOrLongPress)
    .objectLongPressCallback(callback: mapObjectTappedOrLongPress)
Set the MapObjectTappedCallback callback for tap or long tap in the IMapUIView using the addObjectTappedCallback and addObjectLongPressCallback methods. This callback will receive RenderedObjectInfo for the object that is closest to the touch point.
...
let mapObjectTappedOrLongPress = MapObjectTappedCallback(callback: { [weak self] objectInfo in
    print("Arbitrary object data: \(objectInfo.item.item.userData)")
})
...

self.mapView.addObjectTappedCallback(callback: mapObjectTappedOrLongPress)
self.mapView.addObjectLongPressCallback(callback: mapObjectTappedOrLongPress)
Map gesture recognizer
- For SDK version 13.0.0 or later
- For SDK version 12.x
To customize the map gesture recognizer, you need to provide an implementation of the IMapGestureUIView protocol in IMapUIView and MapView, or an implementation of IMapGestureUIViewFactory in MapOptions.
If none of these implementations are provided, the default implementation will be used. You can see an example of such gesture recognizer customization here.
To customize the map gesture recognizer, you need to provide an implementation of the IMapGestureUIView protocol in IMapUIView, or an implementation of IMapGestureUIViewFactory in MapOptions.
If none of these implementations are provided, the default implementation will be used. You can see an example of such gesture recognizer customization here.
Placing a view on the map
- For SDK version 13.0.0 or later
- For SDK version 12.x
-
UIKit:
IMarkerUIViewFactory is a factory for creating UIViews attached to geographic coordinates, is available in the Container.markerViewFactory object. Let's try to create an IMarkerUIView using this factory:
let sdk: Container
// Any UIView, for example, let's use UILabel
let view: UILabel
// Position on the map to which the view will be attached
let position: GeoPointWithElevation
// Point inside the view that will be anchored to the position coordinate
let anchor: Anchor = Anchor()
// Offset in pixels along the axes
let offsetX: CGFloat = 0.0
let offsetY: CGFloat = 0.0

sdk.markerViewFactory.make(
    view: view,
    position : position,
    anchor: anchor,
    offsetX: offsetX,
    offsetY: offsetY
)
To display the created View, add it using the
add()method of the IMarkerOverlayUIView object obtained from the IMapFactory.markerOverlayUIView. -
SwiftUI:
Creating MarkerView:
let sdk: Container
// Any View
let view: some View
// Position on the map to which the view will be attached
let position: GeoPointWithElevation
// Point inside the view that will be anchored to the position coordinate
let anchor: Anchor = Anchor()
// Offset in pixels along the axes
let offsetX: CGFloat = 0.0
let offsetY: CGFloat = 0.0

let mapMarkerViewModel = DGis.MarkerViewModel(
    id: .init(),
    position: position,
    anchor: anchor,
    offsetX: offsetX,
    offsetY: offsetY
)
let mapMarkerView = DGis.MarkerView(
    viewModel: mapMarkerViewModel,
    content: view
)
markerOverlayView.add(mapMarkerView)
To display the created View, add it using the
add()method of the MarkerOverlayView object obtained from the IMapFactory.markerOverlayView.
IMarkerUIViewFactory is a factory for creating Views attached to geographic coordinates. It is available in the Container object. Let's create an IMarkerUIView using this factory:
let sdk: Container
// Any View, for example, let's use UILabel
let view: UILabel
// Position on the map to which the view will be attached
let position: GeoPointWithElevation
// Point inside the view that will be anchored to the position coordinate
let anchor: Anchor = Anchor()
// Offset in pixels along the axes
let offsetX: CGFloat = 0.0
let offsetY: CGFloat = 0.0

sdk.markerViewFactory.make(
    view: view,
    position : position,
    anchor: anchor,
    offsetX: offsetX,
    offsetY: offsetY
)
To display the created View, add it using the add() method of the IMarkerOverlayUIView object obtained from the IMapFactory.